Mileseey Xtape1 Smart Laser Tape Measure Review: The Ultimate Layout Tool?

Mileseey XTape 1 Smart Laser Tape Measure Review
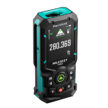
The Mileseey XTape1 Smart Laser Tape Measure is a combination smart laser tape measure tool that integrates a spring-wound steel blade with a laser module that delivers the versatility needed to solve many measuring tasks. In addition, the Mileseey XTape1 provides a brilliant green laser line that runs 90 degrees on either side of the tool’s long axis. This provides a virtual square for layout work and other tasks.
XTape 1 In Its Work Environment
When I initially learned the capabilities of the Mileseey XTape1 Smart Laser Tape Measure, I saw that Mileseey loaded the digital tape measure with a full-featured sensor set. One of the more interesting features is an included angle and a tilt angle function. I was eager to see if Mileseey used these two angular capabilities to offer a true way to measure point-to-point measurements in space. When I reviewed the Mileseey S50 laser measure last year, that was a feature that produced an approximate result as the S50 did not have the sensors to detect included angles. Here is a link to that Milessey S50 review.
The Mileseey XTape1 is a unique blend of functions in a handheld electronic measuring tool. The XTape 1 has a lot of measuring capabilities, and it is worth a close look. Here is what I found.
Manufacturers Specifications
| Model | Xtape 1 |
|---|---|
| Tope length | 12 ft |
| Laser Iength | 330 ft |
| Digital Accuracy | +/-1/32" |
| Laser Accuracy | +/ -1/16" |
| Screen | 2" IPS |
| Minimum display resolution | 0.001 m |
| Units | m/cm/mm/ft/in/’ " |
| References | Front/Green laser Iine/Rear |
| Memory | 30 Groups |
| Green laser line extension | ü |
| Gyro sensor | ü |
| Single length Measurement | ü |
| Continuous Measurement | ü |
| Area Measurement | ü |
| Volume Measurement | ü |
| indirect Length | ü |
| Indirect Height | ü |
| Point-to-point(P2P) | ü |
| Stake-Out | ü |
| Incremental Measurement | ü |
| I/N Line Spllt Functlon | ü |
| Add/Subtraction | ü |
| Rotation angle display | ü |
| Live tilt angle display | ü |
| Laser type | Class 2 |
| Measuring laser wavelength | 635nm red laser, <1mw |
| Green marking laser wavelength | 515nm green laser, <1mw |
| Green laser adjustment | 180°, 150° |
| Storage temperature | Minus 10°C to 60°C |
| Charging port | USB-C |
| Working temperature | 0 °C to 40°C |
| Battery type | 1400 mAh rechargeable Li-ion battery |
| Battery runtime | 5 hours |
| Drop resistance | 1.5 meters |
| Dimensions | 162.5 X 51 X 67.5 mm |
| Net weight | 445g |
Hardware Initialization & Modular Assembly
Modular Interlocking System
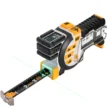
The XTape 1 physical chassis splits into two independent primary housings: the upper active optoelectronic laser core and the lower heavy-duty mechanical spring-wound tape cassette frame. This feature may be handy if the user wants to carry around the laser core and use it independently of the tape cassette. The laser core, alone, is much lighter and easily fits into a pocket. Of course, the user can always use the tape cassette as a standard 12-foot tape measure by itself.
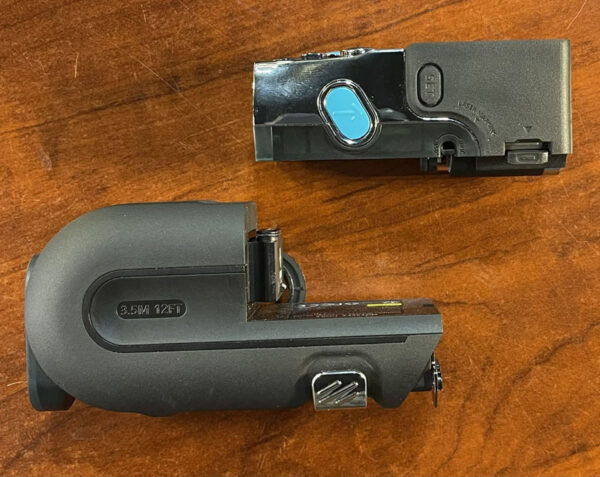
The Mileseey Xtape1 features a modular design, allowing you to separate the active digital laser core from
the mechanical tape cassette.
The tape cassette part is ‘dumb’ when it is separated from the laser core. It is certainly useful as a standalone 12-foot long (3.5M) tape measure. But when the user couples it with the laser core, the tape becomes ‘smart’ and displays digitally on the laser’s IPS display screen. In addition, the green laser line that is orthogonal to the tape axis is particularly useful for squaring up the tape. When using some of the higher-level functions like the Staking of 1/N capabilities, the green laser is key for transferring measurements to the work piece far from the tape.
Disassembly
It is not readily clear that the Mileseey XTape1 Smart Laser Tape Measure. comes apart just by looking at the tool. When the user understands the mechanics, separating the two components is easily accomplished.
Mechanical Interlocking Workflow:
- Locate the male guide channels running longitudinally along the base perimeter of the laser engine core.
- Align these channels with the corresponding structural female retention tracks.
- Slide the laser core horizontally backward into the track slots.
- Apply firm pressure until the spring-loaded internal locking pin drops vertically into its matching recess with an audible click. This mechanical seating establishes the electronic bus connection and locks the chassis into place.
Mileseey XTape1 Smart Laser Tape Measure Procedure:
- Locate the joint between the chrome metallic part of the laser core and the black plastic tape housing. That is where the tool separates.
- Slide the upper laser module horizontally away from the bottom of the tape housing. The tool will separate along the guide channels until it clears the tracks completely.
Mileseey XTape1 Smart Laser Tape Measure Review | Control Mapping & User Interface
The entire user interface is on the laser module of the Mileseey XTape1 Smart Laser Tape Measure. The only external interface on the tape cassette is the embedded tripod screw insert and the flat plastic base to hold the tool vertically. The rest of the business end of the tool is on the laser part. Here is a rundown of the interface items that the user will need to know and understand to effectively use the layout tool. I have sorted the buttons in order of importance:
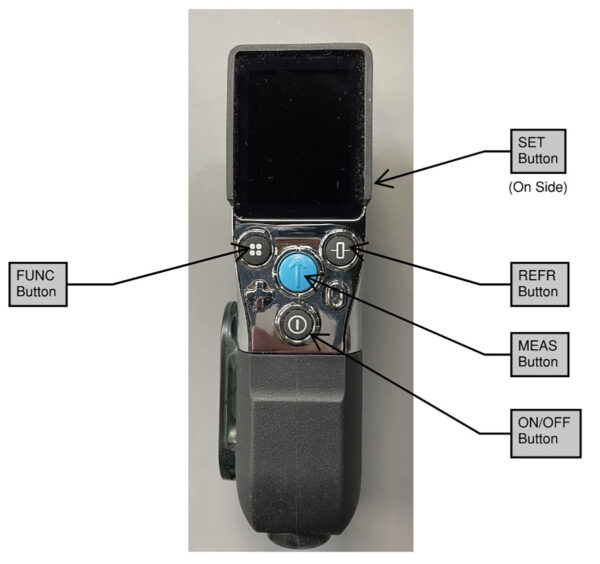
The Major User Interface Buttons on the XTape 1.
- MEAS Button (Master Trigger): Found prominently in the center on the front face. This key wakes the processing core from standby, fires the physical laser diode for visual target acquisition, and commits the computed distance data to the primary registry slot. It also serves as the ‘ENTER’ button for many advanced operations.
- SET Button (Configuration Key): This button is on the right-hand side of the tool, as one faces the screen. A momentary press steps through basic parameter variables. These steps include distance units (Metric, fractional feet, inches, millimeters), display settings, wireless link, and setting distance offsets.
- FUNC Button (Computational Toggle): Positioned under the display screen at the lower left. This button has a grid of four rectangles. This FUNC key sequentially changes the onboard ALU mathematical modes, moving through geometric formulas like area, volume, and trigonometry.
- Reference Switch: Located under the color screen on the right-hand face. The Reference switch changes the laser datum starting position to one of three locations: the green transverse laser line, the back of the tape cassette housing/tripod mount, or the housing stop on the tape cassette.
/image
The green transverse laser line and the housing stop datum locations are remarkably close together—I saw only a difference of 3 mm (1/8″) between these two selections. Clearly, the housing stop is quite easy to use when measuring from a sharp corner—a circumstance where the laser line would be near impossible to line up accurately and hold steady enough to use.
- Plus/Minus/Select Left Button: The button with the PLUS sign is the one that the user presses to scroll or select items to the left. In addition, the user can long-press the PLUS button to change the sign of the inputted item.
- Zero/Select Right Button: On the opposite side of the XTape1 from the PLUS button is the MINUS button. The user presses this button to select items to the right on menus.
- Power/Clear Button: The button with the power symbol serves two functions: turning on the device and clearing any entry that needs modification.
- Chassis Peripherals: Dual auxiliary side-measure buttons allow for stabilized thumb-firing while taking vertical readings. The base features a standard metal 1/4-20 threaded insert for tripod mounting, and a ruggedized rubber flap protects the USB-C power terminal.
System Parameters & Reference Calibration
SET Button – A Deeper Dive
To access the Mileseey XTape1 Smart Laser Tape Measure configuration matrix, power on the device and press the SET key. Use the secondary navigational keys to step through options and use the MEAS button to select and write values to non-volatile memory.
- Parameter 1: Operational Offset Configuration (Calibration Override): This parameter allows manual micro-adjustments (±mm scaling steps) to calibrate the laser’s time-of-flight receiver against a known baseline. It allows advanced users to compensate for structural deviations or field wear over time.
- Parameter 2: Measurement Units Matrix: Cycles the display rendering through SI and Imperial formats. Changing this setting instantly converts all active screen history and cached totals.
- Parameter 3: Acoustic Feedback Controls: Toggles between full-frequency audible alert tones, continuous tracking buzzes, or absolute mute.
- Parameter 4: Screen Rotation Array: Inverts the display UI coordinates by 180 degrees to accommodate left-handed or right-handed operational view preferences.
- Parameter 5: Display Theme & Font Scale: Toggles between multi-line history tracking views and Large Font Mode.
Datums & Reference Frameworks
Pressing the Reference key cycles the tool through three independent reference datums. The device automatically adds or subtracts its own physical housing dimensions from the final measurement calculation based on this selection:
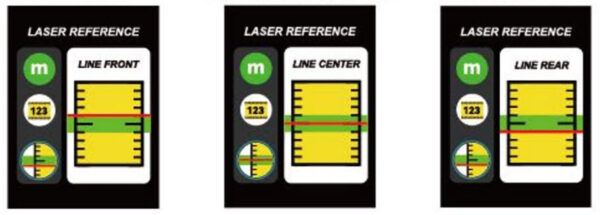
Three possible reference places for the green transverse laser.
- Front Reference Node: Calculates from the front optical lens aperture. Use this when buttressing the front face of the tool against an opening or inside corner.
- Center Thread Reference Node: Calculates from the exact center axis of the 1/4-20 tripod mount. Use this during angular surveying, P2P mapping, or tripod setups to keep the pivot point true.
- Rear Baseline Reference Node: Calculates from the rear spine of the chassis. This is the default setting for measuring wall-to-wall distances.
Mileseey XTape1 Smart Laser Tape Measure | Core Measuring Operations
Laser Distance Subsystem
The laser rangefinder works on a time-of-flight phase-shift principle, projecting a red laser to target distant points.
- Static Single-Shot Measurement: Point the laser beam at the target surface and short-press MEAS to record the discrete distance.
- Continuous Real-Time Tracking (Dynamic Scanning): Press and hold the MEAS button for 2 seconds. The laser diode stays continuously energized, and the display switches to show real-time registers for Minimum, Maximum, and Current Delta.
Digital Mechanical Tape Extraction
The tape cassette module uses an internal encoder to digitalize mechanical extension data. To carry out this encoding, the blade has digital dots along its length to allow the XTape1 to display digital measurement information. Extending the tape from the cassette causes the display to come on and show the measured distance instantly.
- Automatic Mode Transitioning: The moment you pull out the heavy-duty 12ft steel blade, the internal sensor switches the display UI over to digital tape readouts. At the same time, it blanks the laser emitter to save power and prevent accidental eye exposure. The user can activate or turn off the laser mode while using the tape by pressing the MEAS button.
- True Zero Compensation Hook Mechanics: The end hook has exactly 1.0 mm of play to compensate for its own physical thickness. Push the hook flush against an inside surface for butt-against measurements, or hook the blade end over an outside edge for hook-over measurements. The digital zero point shifts automatically to remain accurate.
- Laser Override Control: While the blade is in use, the user can short-press MEAS to manually reactivate the laser engine, allowing combined physical tape baselines with long-distance laser projections.
Advanced Computational Functions
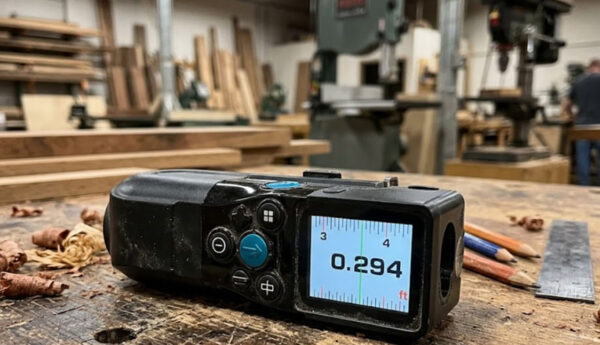
Press the FUNC key to access the tool’s advanced calculation modes. The 2.0-inch color screen will display a flashing red vector graphic to show which measurement vector the user needs to capture.
Area & Volumetric Modes
- Area Calculation: Select Area Mode via the FUNC key. Follow the blinking red prompt on the UI to capture vector L (Length), then vector W (Width) using either the laser or tape. The system instantly computes total surface area:
Area = Length × Width
- Arithmetic Modifier Logic: Use the Plus (+) or Minus (-) keys between measurements to actively sum or deduct secondary areas into or out of the main memory register. Remember that the user must long press the Plus (+) key to activate the minus function.
- Volume Calculation: Select Volume Mode via the FUNC key. Sequentially capture Length (L), Width (W), and Height (H) vectors as guided by the 3-axis UI prompt. The microprocessor automatically calculates total cubic displacement:
Volume = Length × Width × Height
Indirect Geometric Profiling & Triangulation
The Mileseey XTape1 Smart Laser Tape Measure combines distance data with an internal tilt sensor to calculate inaccessible points using trigonometric formulas.
- Indirect Height Profile (2-Point Pythagorean): Use this mode to measure vertical walls when the user cannot reach the top or bottom. Mount the tool on a tripod, if possible, for more exact measurements. Aim at the highest target point to shoot the angled hypotenuse (Vector A), then rotate the tool down to the true horizontal baseline and shoot (Vector B). The internal processor calculates the remaining leg (H) using the Pythagorean theorem:
Indirect Height = √(A² – B²)
- Point-to-Point (P2P) Technology: This mode calculates the distance between any two random points in space from a single stationary position. Mount the tool securely to a tripod, turn on P2P Mode, and shoot remote Point 1, then remote Point 2. Using the Law of Cosines, the device determines the spatial distance (D) between the two remote points:
Distance in Space = √(d₁² + d₂² – 2d₁d₂ × cos(Δθ))
The Law of Cosines is probably more mathematics than anyone cares about on a jobsite. The important thing is that the Point-To-Point function works quite well. The XTape 1 has the angular sensors to accurately derive such a measurement. I ran a test by measuring an elevated overhead soffit dimension from ground level. I was approximately 42 feet away and had the Mileseey XTape1 Smart Laser Tape Measure mounted on a tripod with a hydraulic head. I took two oblique elevated measurements and the XTape1 gave an answer of 13’ 3 1/2”.
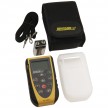
To verify the accuracy of the Point-To-Point result, I set up a BOSCH layout laser and transferred the edge of the soffit to a mark on the wall. I used my Mileseey S50 laser to measure the distance between the transferred wall mark and the opposite edge of the soffit. The S50 measurement is the “true” dimension. The S50 gave me an answer of 159 19/32”, which is 13’3” and 19/32. The difference between a direct laser measurement and the XTape 1 Point-To-Point was only 3/32” apart. That result is remarkably close. You can see the results in the picture below.
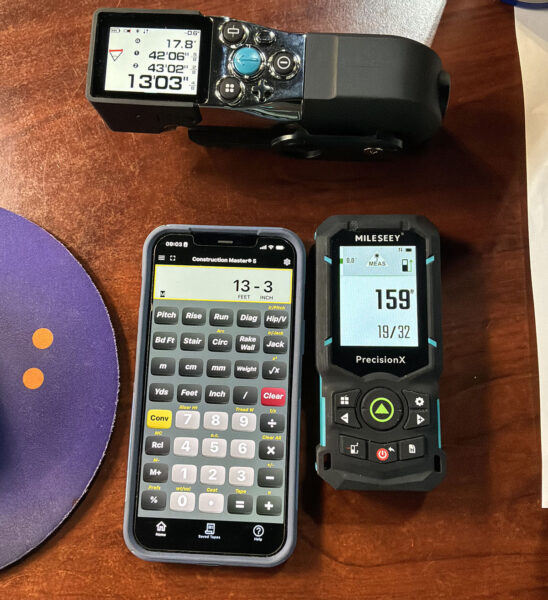
Testing the point-to-point laser measurement accuracy of the Xtape1 against a dedicated laser measure on a
jobsite tripod.
I repeated the Point-To-Point measurements several times from different spots on the floor and the maximum variation I experienced was plus/minus 1/2”. I am aware that the heavy duty tripod and hydraulic head gave me a very stable and accurate base to work from. The XTape 1 gets high marks for its ability to perform this type of measurement. One item worth noting is that each time the user begins a Point-To-Point measurement, he/she should perform the calibration step on a flat and level surface.
* Layout & Interval Functions (Stake-Out Mode): Use this mode to mark off repeating, uniform increments along a line. Enter Stake-Out Mode and enter your chosen intervals (e.g., Target distance X). Move along the measuring path while the laser scans continuously. The screen will show your real-time distance from the target mark, and the audio beeper will speed up its pulses as you get closer, switching to a solid tone the exact millisecond you hit the programmed distance.

Tagging the stake out marks in comparison to a computer generated layout sheet.
I used this function to create a 6-foot wide gate for my front porch. I created a Fusion 360 drawing of the gate and I knew my specific dimensions before I let the XTape 1 tell me where to place my equal spaced layout marks. The result was very successful, and I only made one mistake reading the XTape 1. The error was obvious, and going back and remarking the correct point was simple. The result was exactly what my Fusion drawing indicated it would be. Next time I have an appropriate layout project, I will not need to take the time to create a detailed drawing. That is a real efficiency benefit.
- 1/N Line Split Equalization: The 1/N function is very similar to the Stake Out mode. As an example, the user can shoot a total overall wall distance, then input a divisor number (N) through the interface. The Xtape1 automatically divides that total distance into N perfectly equal spaces, making it easy to layout studs, framing, or fixtures without manual division math. Again, this function can save a lot of time and pencil work.
- Bonus Feature: The green transverse laser line is perfectly suited to play the same role as a layout laser when mounted and held vertically by a tripod. I have used it to set level shelves, provide a level line for mounting holes, and transfer marks from one wall to another. This is another great feature that means the XTape 1 is a multi-featured and valuable tool.
Smart Ecosystem & Wireless Sync
Smart Life Application Pairing
I have to confess that I am not a great fan of transferring data from handheld devices to a “Smart” app; I haven’t found those too useful in my work. I do use the internal memory functions to store measurements and read them back to me, but that is as far as it goes for me. That being said, the Mileseey XTape 1 does have an integration with a smart app for users that are into higher technology integrations than I.
The XTape 1 includes a built-in Bluetooth transceiver to pair with external mobile operating systems for digital floor planning.
- Turn on the tool, short-press SET to enter settings, and toggle the wireless communication radio icon to ON.
- Open the Smart Life App on your iOS or Android mobile device.
- Check the wireless icon status on the tool’s screen: a Flashing Icon means it is broadcasting its pairing name, while a Steady Solid Icon means the app has successfully paired.
Data Export Mechanics: Once connected, the XTape 1 sends every measurement you lock in by pressing MEAS or by pulling out the digital tape to the app as a data payload. You can drop these measurements onto live CAD sketchpads, log them into CSV tables, or use them to calculate material needs on site.
Mileseey Xtape1 Smart Laser Tape Measure | Price and Value
As of this review, the internet price for the Xtape1 is $239.00. While this price is in the range of fully functional laser measurement tools, the XTape 1 offers features that many of these laser measure tools will never offer.
The only tool that is close to the Mileseey Xtape1 Smart Laser Tape Measure. is the Reekon T1 Tomahawk Digital Tape Measure. I have not reviewed the Reekon tool in detail, but my internet research showed me that the Mileseey XTape 1 has significantly more measuring functions. On that basis, the XTape 1 is an excellent value in comparison. The internet price for the Reekon offering is $259.00.
Given the features and functions that Mileseey has designed into the Xtape 1 at the $239.00 price, Mileseey has another winning value combination to sell. I have included informational links to further highlight the features for the XTape 1.
Mileseey Xtape1 Smart Laser Tape Measure | Manual & Guides
- Official Digital User Manual (PDF) – This is the full comprehensive guide.
- Web-Based User Guide – A browser-friendly version with quick-jump sections for assembly and app connectivity.
- Official Video Tutorials – Mileseey has a YouTube playlist covering setup, calibration, and smart features.