Mastering Crown Molding BEST Fastening Method
 Fastening Crown Molding – My Go-To Method
I want to share my method for fastening crown molding. I recently had several carpenters on a job site impressed by this technique—they’d never seen it before!
I learned this method over 30 years ago from my mentor, and I’ve since modified it with the advent of GRK trim head screws.
Most carpenters I see installing crown molding use a 15 or 16-gauge pneumatic or cordless nailer, firing 2-1/2-inch finish nails, in their crown, hoping to hit studs.
However, I was taught a more reliable approach—using a 16-penny nail. Here’s how it works:
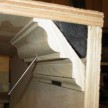
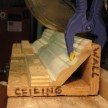
You pre-drill a hole and drive the nail at a 45-degree angle through the belly of the crown molding. This angle ensures that you hit the top plate of the wall every time.
The nail pulls both the top and bottom edges of the crown tight to the wall and ceiling.
Note:
This tip works best in platform-framed homes, assuming you have a double or single top plate above your wall. For balloon-framed or timber framed homes this method won’t apply as easily. In those cases, you’ll need to locate the studs —my go-to for finding the studs is with a “Stud-Pop” magnet.
Now, here’s the updated version of the technique I use today:
 Using GRK Cabinet Trim Head Screws
Instead of nails, I now use 4-inch GRK cabinet trim head screws.
You can pre-drill or drive them straight in, depending on the quality of your crown molding.
Just like before, I drive the screw at a 45-degree angle into the top plate, and the molding gets sucked tight against the wall and ceiling.
The result is incredibly secure, with the screw closing most gaps rather than just hanging there on the wall like finish nails do.
It’s true—GRK screws are more expensive than finish nails. But the grip they provide is far superior. This method also eliminates the need for multiple finish nails in the wall studs or angled nails in the ceiling where you might not hit strapping or joists—it’s always a bit of a guessing game up there.
Installing The Screws
With my method, I place a screw every 18 to 24 inches, then simply nail the outside miters.
Occasionally, I’ll use my 16-gauge cordless nailer to temporarily hold the molding in place while I screw it, but otherwise, I use minimal finish nails.
One trick I’ve learned: avoid using screws within 18 inches of an outside miter. Get your miter tight, fasten it, and let the glue joint cure before adding a screw near that area. If you can’t wait for the glue to set, try using a screw, but if it hampers your miter, just stick with nails in that section. Same applies to the butt end of the molding that is covered by a coped joint.
Give this method a try—I think you’ll find it not only secures the crown molding better but also saves time on fastening and caulking.
Read More From Us: How To Us A Preacher Board For Perfect Baseboard Fit


