Crown Molding Shelf
By Robert Robillard on Design
Crown Molding Shelves Secured with a French Cleat
Crown molding shelves have become more and more popular these days to display nick knacks and pictures. Building a Crown molding shelf can intimidate many people only because of the miter cuts needed to return the crown molding to the wall.
Crown Molding Shelf Materials and Tools:
- Crown molding
- 1 by wood for the top shelf, bottom cover and French cleat
- Wood glue
- Brad nailer with compressor or 1-1/2″ finish nails
- Wood clamps
- Miter saw or hand saw and miter box
- Table saw for cutting shelf width [if applicable]
- Tape measure
- Level
- Screw driver and screws for mounting French cleat
- sander or hand sandpaper
How To Build A Crown Molding Shelf
Determine your shelf lengths and secure materials. When figuring your crown molding length take your shelf length and add a foot or more for the return miters and waste cuts. A foot each side should be plenty but if your new at this go with 3 or 4 extra feet for mis-cuts.
Cutting Crown Molding?
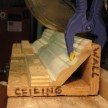
I prefer to cut molding upside down, bedding it to the fence and table and using a standard miter saw. I have found that this is the easiest way to cut crown molding miters.
Cutting the Shelf Front:
With the molding in the saw turn the miter saw all the way to the left at 45 degrees and cut a miter on the far left side of the molding. Once this cut is complete hook your tape measure on the new miter corner you just cut and measure and mark your shelf length on the right side of the molding.
Once you have a mark slide the molding so the mark is under the saw blade. Turn the miter saw to the right at 45 degrees.
Making this right side cut can be tricky. I prefer to start my cut away from my line and making a series of cuts, slowly work my way toward my pencil line until I have the length cut at my mark.
Cutting the Two Shelf Returns: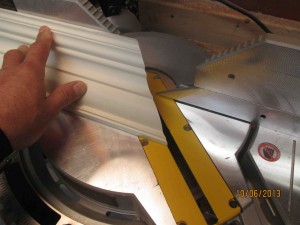
- The next step is to cut the two small return miters that return to the wall.
- To to this I take my scrap crown molding, holding it upside down and backwards in the saw I cut two similar miter cuts as before, one on each end of the molding. [Following steps mentioned above]
- Once this is complete I return the miter saw to the center [90 degrees to the saw fence]
- Next I cut a straight cut along the short end of the mitered crown molding cut. The cut off of this cut will be used as the crown shelf return.
- Once both returns are cut I bring all three crown parts to the work bench and get ready to assemble them.
Attaching the Crown Molding Shelf:
I’ve fond the easiest method of securing crown molding is with a brad or pin nailer.
I apply glue t one mitered return and attach it to the larger shelf. Holding the large shelf upside down maes this process easier and is also easier to apply fasteners.
Once the returns are glues and fastened I allow the crown mitered corners to dry before handling them.
Attaching the Top Shelf:
I like the top shelf to have a rounded edge so I use a router to make a thumbnail or round over detail. You can do this, leave the edge flat or cut 45 degree edges on the shelf edge and then round them over with a sander.
I use the table saw and miter saw to rip the board to a with and length approximately 2″ longer than the longest part of the shelf molding and 1 inch wider than the depth. This gives me a consistent 1 inch over hang.
I secure this shelf to the top of the molding with glue and finish nails.
Attaching the Bottom Cover:
I prefer to cover up the bottom of the shelf molding with wood as opposed to leaving it open.
Holding the molding on the table I measure the with and length of the opening and then cut and install a piece of wood to fill the hole.
Attaching the French Cleat:
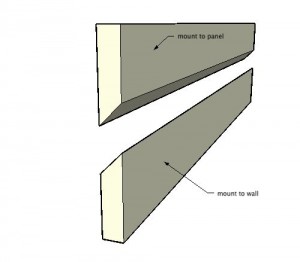
This is the last thing I do. I take a 1×4 board cut to the length or the longest measurement on the back side of the molding shelf.
Once I know this board fits the angle of the crown molding returns I then rip this board down the middle at a 45 degree bevel.
I then hold the cut the ends of one of the ripped 1×4 boards to the back side of the crown shelf return molding, up against the shelf. Make sure that the long point of the beveled cleat is on the outer most edge or wall side of the board.
Transfer the molding return angle to this beveled board and cut that angle on both ends. do the same process for the cleat that will mount to the wall. [Note – This board will eventually be fastened to the crown shelf and side crown returns and used to overlap and hang onto the wall cleat.]
The wall cleat is cut the same way but must be smaller and fit inside the crown shelf when against the wall.
If this is too tricky then cut both cleats the same size and don’t worry about trying to fasten them to the crown molding sides. Just secure one toe the crown shelf top and the other to the wall.
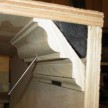
When the crown molding shelf is installed you should not be able to see the French cleats. They should be well hidden within the crown molding shelf cavity.
Attaching the French Wall Cleat:
If your cleat is long enough to span across wall studs then use screws to make this connections. Otherwise you will need wall anchors or toggle bolts.
Use a level to mark a level line on the wall and a stud finder or a finish nail to locate the walls studs.


