
How To Design A Wine Cellar

How to Build A Wine Cellar
This article will give you the essentials needed to understand and learn How To Design A Wine Cellar.
When building your wine cellar, room preparation is key in controlling the environmental factors that may negatively affect the storing and aging of your wine. A properly constructed cellar will allow you to use the smallest cooling system possible.
General guide on how to construct a wine cellar:
- All walls and ceilings must be scaled with a vapor barrier on the “warm side” of the walls. We recommend a 6 or 8 mil plastic sheeting.
- Interior walls should be insulated to a minimum of R-19. We recommend rigid foam board. All cracks should be filled with expanding spray foam.
- Walls are finished with moisture resistant green board.
Doors should be solid wood and/or insulated. Weather stripping should be used for an air tight seal. - Glass should be double pane with a minimum of a 1/2″ gap.
Lighting should be low wattage
Wall & Ceiling Framing:
Build wine cellar walls using standard 2×4 or 2×6 construction methods and ceiling joists following the guidelines of local and state codes in your area. The general rule for a cellar is the thicker the walls, the better the insulation factor, the better the cellar remains at a consistent temperature.
Vapor Barrier :
Vapor barrier is REQUIRED if a climate control cooling unit is installed to keep the cellar at the correct temperature. Six mil. plastic sheeting is applied to the HOT side of the cellar walls.
The vapor barrier must be either applied to the outside walls and ceiling, or if it is impossible to get to the outside, then the plastic must be applied from within the cellar.
The most common method is to wrap the entire interior, leaving the plastic loose in the stud cavity so the insulation can be placed between each stud. All walls and ceiling must be wrapped in plastic for a complete vapor barrier. PRODEX vapor barrier/insulation can also be used.
Insulation:
Insulation is REQUIRED if a climate control cooling unit is going to be used. The R factor or thickness of insulation is determined by the thickness of the walls and ceiling. For example, fiberglass insulation of R13 is designed to be used in a 2×4 wall while R19 is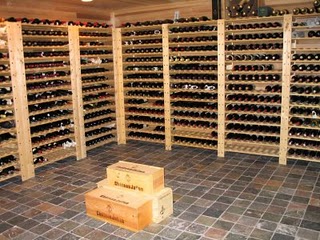 used in a 2×6 wall. It is important to use the correct insulation for the wall thickness.
A minimum of R11 should be applied to the walls of a cellar. R19-R30 is recommended in the ceiling. Standard “Fiberglass” or Rigid Foam” insulation is normally used in cellar construction, or in some cases, blown in insulation is used.
It is very important that all walls and ceiling be insulated to keep the cellar temperature as consistent as possible during the summer and winter months.
Wall & Ceiling Covering:
The interior wall and ceiling covering is determined by the decor theme of the cellar. Often times green board is applied, then painted (always use latex paint) to match a color theme of the cellar.
Most commonly used is redwood (depending upon the racking materials) tongue and groove material applied to the walls and ceiling. This T&G 1×4 paneling is the same wood species as the racking material which makes for a very uniform look throughout the cellar.
Stone or granite is also used as a wall covering material. Never use an aromatic cedar due to its strong aroma that will taint wine.
Wine Cellar Doors:
If a cooling system is installed, an exterior grade (1 3/4″) door must be installed as a cellar door.
It is very important that weather stripping is attached to all 4 sides of the doorjamb. A bottom “sweep” or threshold is also imperative. The door MUST have a very good seal to keep the cool cellar air from escaping out of the cellar.
One of the most common problems with cooling units running continually is due to not sealing the door properly. Solid core doors or doors with a full glass insert are most often used. Glass doors must have at least double-pane insulated tempered glass.
Wine Cellar Flooring:
All types of flooring are used in cellars. Most commonly used is slate, tile, marble, or vinyl. NEVER USE CARPET. Carpet will mold and mildew in the cool, damp climate conditions of a cellar. As with the case of wall coverings, flooring is normally chosen to match the overall decor colors of the cellar. The flooring should be applied to a level surface. It is best not to apply base trim or moldings to the walls behind the racking.
Wine Cellar Lighting:
Lighting a wine cellar is an important part of the overall cellar decor. “Air Lock” recessed ceiling can lights are the most popular. These should be put on dimmer switches to control brightness.
In most cases, these are used as the main lights within the cellar. Also popular are various display lights to accent different areas of the cellar. Display “rope” lighting that is specially designed and built to fit into the display angle of individual bottle racking.
Different types of spotlights are used to highlight picture openings, table areas, or large format display bottles. It is recommended that all lighting be on a timer system so they can’t be left on for long periods of time. Lights cause excess heat and will cause the cooling equipment to over work itself.

Breezaire WKE-4000 through the wall, wine room cooler
Wine Cellar Climate Control:
If a climate controlled cellar is required, provide cooling equipment to properly keep the cellar at a temperature of about 55-58 degrees and humidity of 50-70%.
Wine Cellar Racking:
Standard materials are either all Heart Redwood or clear, grade A, and mahogany. All woods are very resistant to rot in the cool, damp environment of a cellar. Clients usually choose one over the other due to matching decor colors in the cellar design.


