Installing A Swinging Door

Swinging Door With Butler Style Hinges
I put the final carpentry touches on my new office by installing a swinging door. the door is a 15-lite clear safety glass door on a “butlers hinge. ”
A butler hinge allows the door to swing in both directions and is sprig loaded to swing open and then closed. If the door is pushed open, in either direction, all the way it will lock open until pushed closed.
Why A Swinging door?
Privacy was the main concern. The idea for adding this door was to cut down on noise from the kitchen and family room when the television is on.
I chose the glass style door because it matched an adjacent door in the dining room, out of view. I’m partial to using glass doors because of they allow light to pass through rooms.

Ordering A Primed door Saves Time and Money:
I bought a primed 15-lite glass door to save on painting – I hate painting!
This primed door comes with plastic installed over the glass. The factory sprays on the primer and completely covered the plastic. That’s why the glass is white, once the plastic is peeled off the glass will be clear.
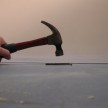
 Cutting and planing the door to fit the out of square circa 1863 doorway

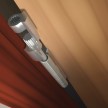
Swinging Hinge:
A “Butler or Servants hinge” shown below. This hinge allows the door to swing in both directions, the spring can be adjusted to control the doors swing speed.
The Butler’s hinge secures to the floor with four screws. the door has to be cut to allow the hinge to mount to the door.

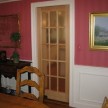
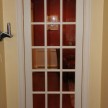
Door in place. There is a polished brass plate to cover the spring at the floor. Once the door is painted the white plastic protecting the glass will be removed revealing clear glass.
 Door installed, painted and plastic removed from glass. The plastic made painting simple, although I still used care when cutting the glass edge, you really do not need to.
Removing the plastic was a breeze, I used a utility knife and scored all four sides and peeled it of ~ that easy!

View from kitchen looking into office. Notice the butlers finish plate at the bottom. I think I may paint this black???

Finished product.

~ a concord carpenter