How To Install Crown Molding with Rope Lighting

Nailing This Crown Molding:
This molding is only nailed along it’s bottom edge. I installed 8d finish nails into the molding along the bottom edge to the wall. A little glue along this bottom edge helps too.
A friend of mine once said, “If it’s worth doing, it’s worth gluing.” Make sure to use glue and 8 penny finish nails, if you hand nail I recommend pre-drilling and using a nail set to set them slightly deeper [1/16″] than the surface.
I chose to use my Paslode cordless finish nailer. This nailer does not have a cumbersome cord and allow me to set the exact depth of my nails.
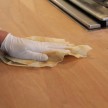
After I had all three crown molding boards installed I made sure to set all of the nails and fill them with wood filler.
TIP: I find its less sanding effort to fill nail holes flush and to do a light second coat if necessary. This two coat method is still faster than over applying the wood filler and having to sand it smooth.
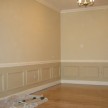
After the second coat I lightly sand the wood filler spots and spot prime them. I caulked all of the seams at this time as well. A final coat of trim paint and it looked like it was always there.
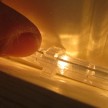
I then cut a hole into the house side of one of the moldings. This hole was to be used to pass the rope lighting down to the electrical outlet.
To hide the rope light cord going to the outlet I built a chase out of poplar wood. The chase hides the rope lighting and allow for the rope lighting to be passed down to the cord undetected.


Install crown molding with rope lighting:
I ran the the rope lighting in the chase, through the hole and around the room behind the molding. The rope lighting I bought came with plastic clips and screws. These clips worked great for keeping the lighting down behind the crown molding.
This whole project including buying the rope lighting and wood took 6 hours but will give me years of enjoyment and bragging rights!

RELATED POSTS:
Rope lighting basics: designing with rope lighting
Tips on installing crown molding lighting
Speaker wire installed behind crown molding