How-to Build Sturdy, Stacking Sawhorses


How to Build Simple, Stackable Sawhorses with 2x4s Under $30.00
This project outlines how to build durable, stackable sawhorses using only 2×4 lumber.
Ideal for supporting materials or transforming into a temporary table, the design is budget-friendly ($30 if buying new wood) and simple enough to complete in under an hour. Related Video.

Materials & Tools
• Five 8-foot 2x4s [straight 2×4’s will make your task easier]
• 3-inch deck screws
• Saw, measuring tape, Square, level, pencil, drill/driver

Cut List
• 14 – 30-inch 2x4s (for legs and the I-beam)


Sawhorse Assembly Steps
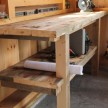
1. Build I-Beams: Sandwich a 30-inch 2×4 between two 30-inch boards, centered with 1-inch overhangs, and secure with screws.


2. Attach Legs: Angle the 30-inch legs under the I-beam’s lip and screw each in place with four screws. Use a Square to keep the legs square to the I-beam.
3. Stack: The compact design allows for easy stacking when not in use.

Sawhorse Assembly-Tip:
Install 1 screw in each leg then flip the horse onto the floor or workbench and check for wobble. Using the square and by tweaking the legs, adjust legs so there is no wobble. Assuming a level workbench, using a level on the I-beam will keep you honest.

Beveling Sawhorse Feet
If these sawhorses are used on solid surfaces or floors, consider beveling the feet. Beveling the feet creates a wider base, which improves stability and helps distribute weight more evenly. A common bevel angle is 20-degrees, resulting in a 60-degree angle at the base.


Adding Additional Stability To Sawhorses
For added anti-sway stability, consider installing stretcher supports between the lower legs, either on the side, longway, or both. These stretchers not only enhance the sawhorse’s load-bearing capacity but also prevent the legs from swaying under heavy loads. Furthermore, you can attach a piece of plywood on top of the stretchers to create a convenient lower storage shelf.

Alternative Option
Stacking Sawhorses With Stretchers Applied
If you plan to add side stretchers, you’ll need to adjust the length of one set of horses to accommodate the additional material. To do this, make one sawhorse longer than the other to prevent interference with stacking.
Here’s how to adjust for stacking
1. On one sawhorse, make the I-beam 2” longer than usual and attach the legs almost flush with the I-beam’s ends.
2. On the other sawhorse, position the legs 1” inward from the ends of the I-beam (towards the center).
This setup creates a 4-inch clearance, ensuring that the side stretchers of the top horse will pass over the lower horse’s stretchers, allowing them to stack properly.

Plywood Shelf | Sawhorse Stacking
If you add a plywood shelf, it cannot be mounted permanently if you plan to stack the sawhorses. The shelf would need to be a removable, “drop-in” style to avoid interference when stacking the horses.

Conclusion
Building your own stackable sawhorses from 2x4s is a quick, affordable project that pays off with lasting utility.
Whether you’re supporting large workpieces, assembling temporary tables, or organizing your workshop, these sturdy, customizable sawhorses are up to the task. With just a few tools and under an hour of your time, you can create a reliable pair that stacks neatly and stores easily.