Designing a Garage Workshop

Garage Workshop – “Going Vertical” – Storing Workbench at Ceiling
One of the most challenging and fun aspects of a garage workshop is coming up with a useful and efficient use of the space you have. For most, it’s a constant evolution as new tools are added or upgraded and new ideas on how to be more efficient are utilized.

Perhaps the most common at-home workshop location is a garage. The semi-finished space with usually high ceilings, access to utilities, and great ventilation by way of a garage door is an excellent location to set up a DIY or at-home pro workshop. For those willing to sacrifice a parking space or two, a great space can be set up to hone your craft.
Modular and Mobile Workshop
But what if you are unable or unwilling to sacrifice your indoor parking space. Is it possible to still use the space for automotive and woodworking? Let’s find out.
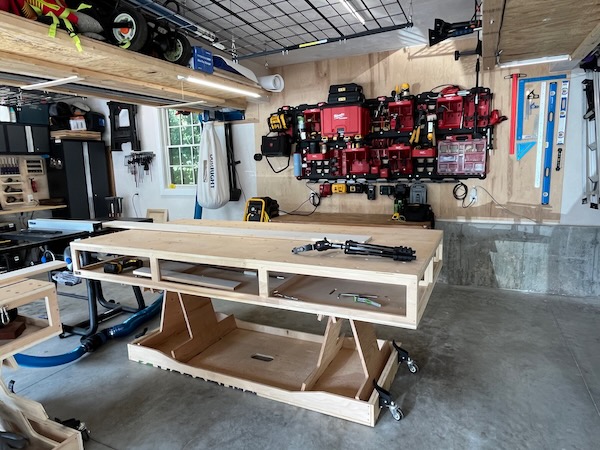
In this workshop buildout, we set out to design a “Modular”, “Mobile” and “Efficient” workshop that can pack away and allow the garage to still function as its intended purpose, a garage. For modularity, we built and modified Paulk-style workbenches and workstations with a drop-in router table.
Both workbenches can be attached with hardware and turnbuckles to vertical lifts and stored above the head when space is required. The lightweight packable design makes this possible.
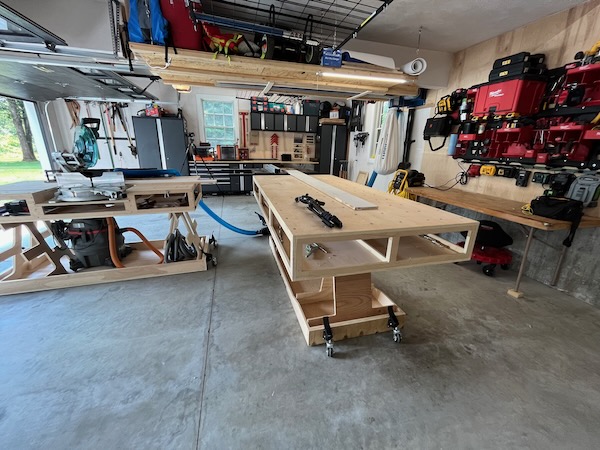
For mobility, wheels. You’re automobiles that share the space move with them, and so should your large tools and work tables.
To be efficient with the space provided we intend to take full advantage of the wall space provided with wall-mounted storage solutions and wall-mounted dust collection. A slim profile miter station will take advantage of a front rail miter saw. In this article, we hope that some of the ideas, products, and solutions that we have come up with, will work with your space and your goals.

Modular Workspace
With limited space having a versatile work surface or surfaces is important to maximizing your space. With that in mind, we decided to adopt the very popular Ron Paulk workbenches and workstations for this application. If you’re unfamiliar with Ron’s designs go check out his website the smartwoodshop.com and his associated YouTube channel.
Essentially the Paulk style workbenches are a plywood torsion box, supported by collapsable plywood sawhorses with a surface drilled out with 20mm holes in a regular pattern found on Festools popular MFT tops. There is a suite of plans available for different sizes of benches, workstations and even router tables and table saw mounts. For our build, we took inspiration from his designs and built a miter station and a large 4×8 workbench.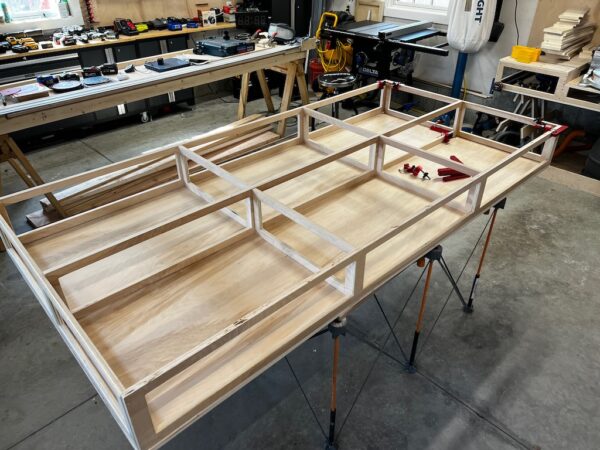
 These tables can be made exclusively from plywood and a handful of screws, glue, and hinges. To create the MFT style grid on the top of the station, a UJK Parf Guide MKII was used.
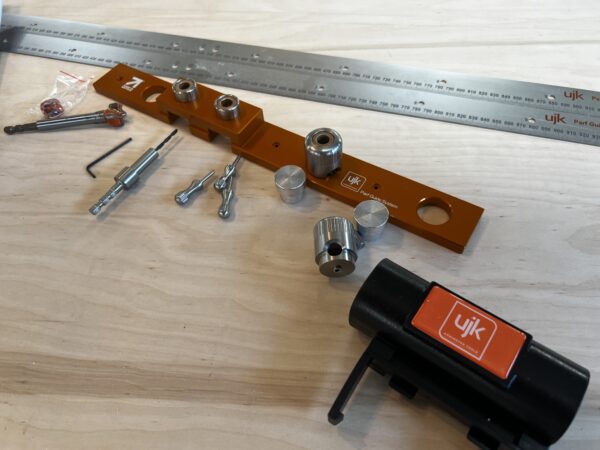
This neat system uses a pair of high precision straight edge/rules with indexing holes and some basic Pythagorean theorem math to allow for a dead on accurate and square 20mm MFT style grid without the use of a CNC machine.

Miter Saw Station
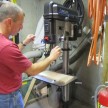
One keystone tool found in most workshops is the miter saw. Some key features to consider when selecting a miter saw for your workshop are blade size, front rail design, and dust collection. The blade size is going to be the primary factor in determining the size of stock and material you can cut. A front rail design on a miter saw is an efficient design that allows the saw to sit relatively flush against a back wall, minimizing it’s use footprint and maximizing your space. Good dust collection ports are vital to keeping your shop clean minimizing clean time.
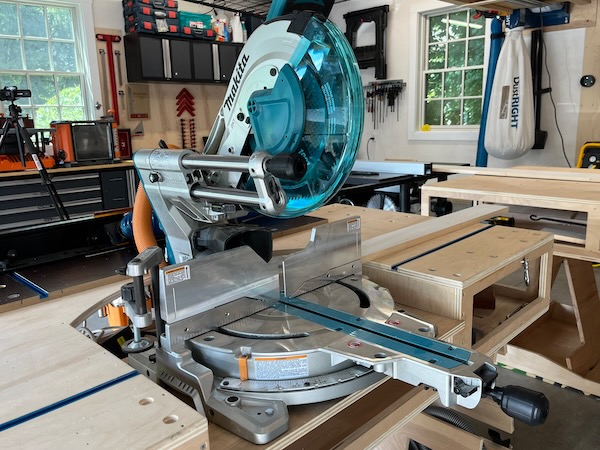
Makita LS1219L Miter saw
For our build we chose the 12” LS1219L Miter saw from Makita. This Dual-Bevel Sliding Compound Mitre Saw has a large cut capacity with its 12” blade capable of cross-cutting a 4×14 at 90 degrees. The saw features a 2-Steel Rail sliding system that is front-mounted, offering a reduced footprint and can sit flush against the wall, a real space saver for a saw this size. Makita has a real long legacy of finish carpentry and woodworking saws and this saw does a great job at building on that legacy.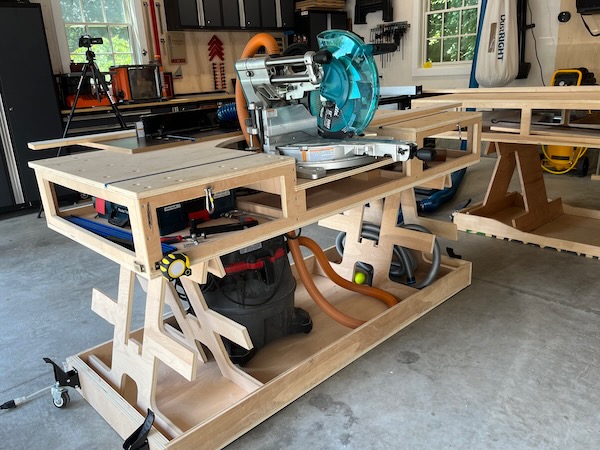
With the saw selected and the dimensions are known, we set out on building the miter station. Using the Paulk Smart Station as inspiration we modified the plans to fit the saw and our workspace. Some important dimensions when designing a drop-in miter station are the footprint of the saw, the height of the saw’s base and the arc of the swing of the saw arms.
Ideally, you want your saw to fit as snug in the station as possible while still allowing for free movement in all directions. The base of the saw should sit at or just barely above the station top so a workpiece is supported in both directions without any rocking.


Collecting Dust At The Source
Active dust collection, automatically configured to turn on when the miter saw trigger is pulled, is a fantastic timesaver and feature to have. While a miter station can be integrated into a shop’s overall dust collection architecture, not everyone or every space can easily or cost-effectively make that work.

For our miter stand, we elected to use a spare shop vac attached to the miter saw and controlled for via an “i-Socket AutoSwitch“ This little unit is a great low-tech solution that accepts the 120v plug from your saw and vacuum, and automatically turns on the vacuum each time the trigger is pulled.
Repetitive Cutting Jig
The last feature we wanted to incorporate into our miter station was a positive stop system. When multiple cuts of the exact same length need to be made, using a stop block can be a huge timesaver and really improve the repeatable accuracy of your cuts.
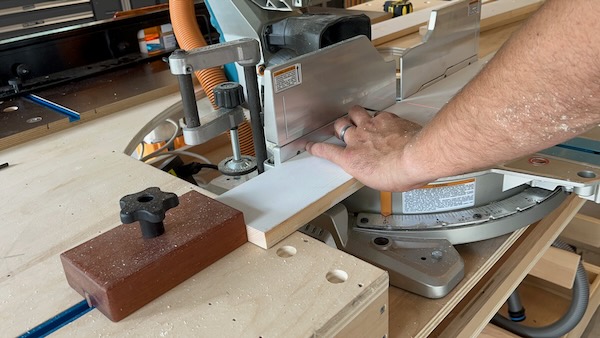
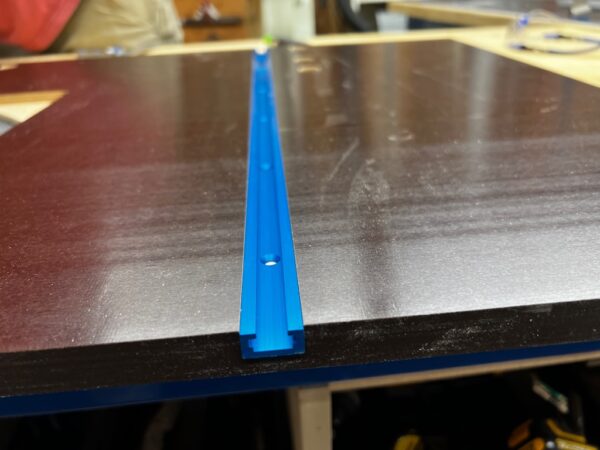
To accomplish this we used a set of Universal T-Track from Rockler and made a pair of stop blocks from some spare hardwood we had lying around and some track hardware. T track is a fantastic versatile solution that can have an endless set of uses around the shop.
To mount the track in our bench we made a few passes with a router and a 3/4” dado bit. Once the desired depth was achieved, the track was cut to length on the miter saw and installed.
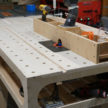
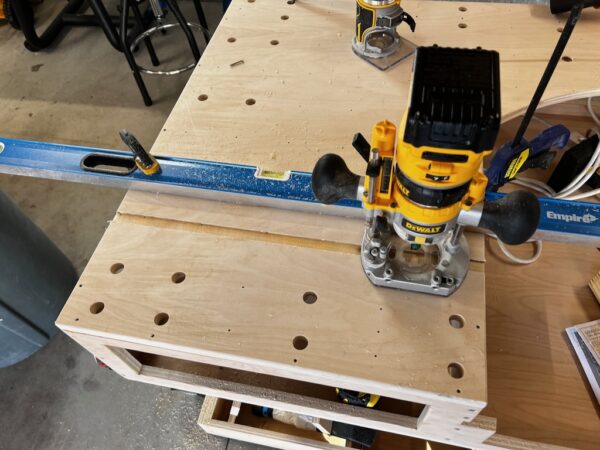
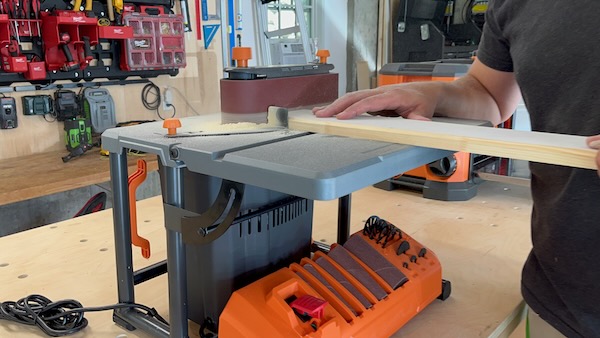
Cantilevered Router Table
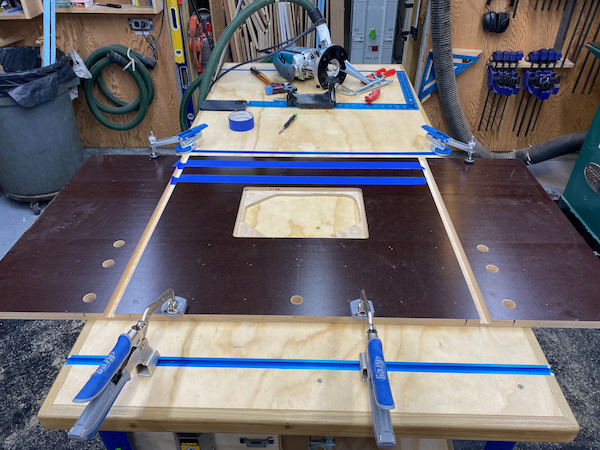
A router table is another staple of a woodworking shop that we wanted to incorporate. Router tables can be purchased in benchtop variants, free-standing, and even incorporated into table saws. To continue with the theme of modularity we elected to build our own router table that would cantilever off of the workbenches and securely mate with the MFT holes of the table.

The heart of the router table is the Rockler Pro Router Lift. We used a 2’x4″ piece of Phenolic Faced Birch Plywood for the structure and surface of the table. The Phenolic coating provides a protective surface to the plywood that can be cleaned to maintain low friction for the stock being worked on.
To install the router lift into the tabletop, we used a pre-made Router Template plate from Rockler to save time in setting up our own. Using a handheld router and a pattern cutting bit we removed the minimum amount of material necessary for the router lift to sit flush with the top of the table surface.
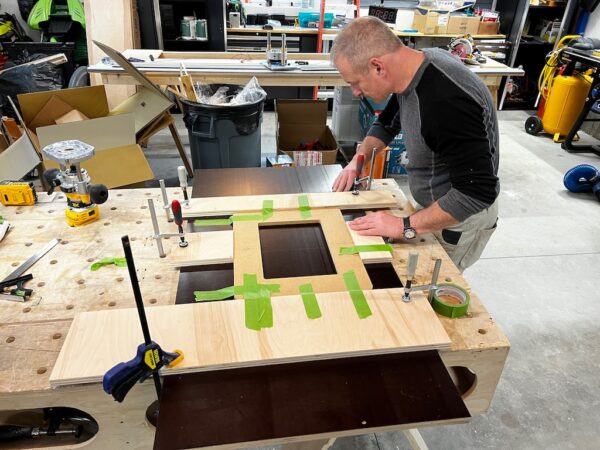
In order to accommodate a Rockler Pro Router fence, an additional T-track needed to be mounted. While a handheld router can be used for cutting the grooves for the track, given that the surface is just a sheet of plywood, we elected to cut the channels with a dado set on a table saw.
To mount the router table to the pair of workshop tables, 20mm holes were cut in the same pattern using the Parf Guide System.
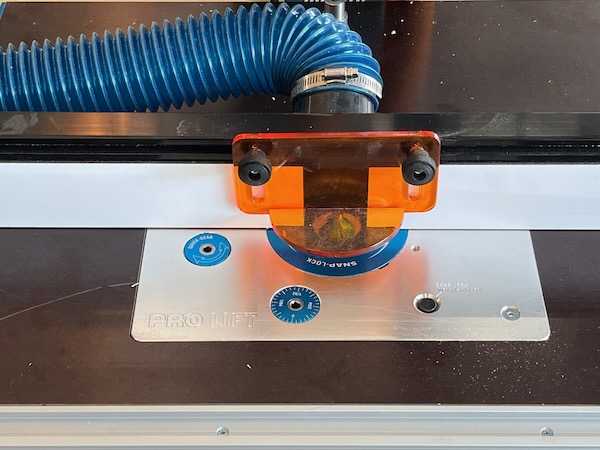

With the holes lined up, a pair of TSO Power-Loc Bench Connector Dogs can securely mount the cantilever router table to the bench. The Power-Loc Bench connectors are designed to insert through a pair of overlapping 3/4″ thick material with 20mm holes. A locking lug on the bottom that it tightened via a 5mm hex driver.

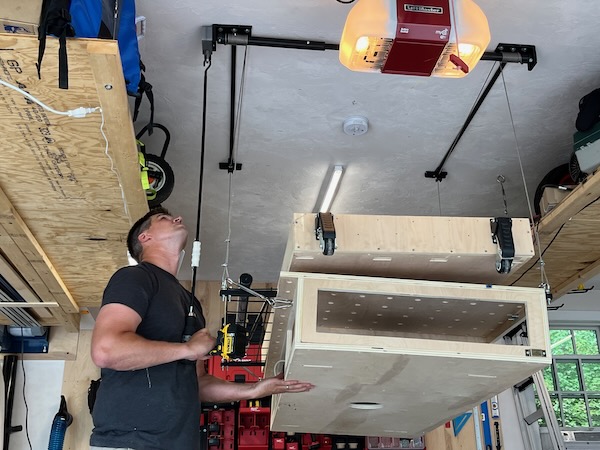
Vertical Storage | Fleximounts Ceiling Lift
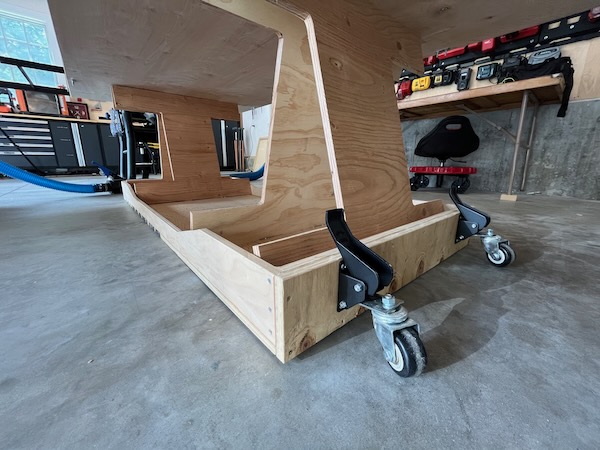
Both workbenches are designed to be as lightweight and modular as possible. The benches are supported by a pair of plywood sawhorses that are hinged together. These can be collapsed down and the benches and stored upright for transportation or storage.
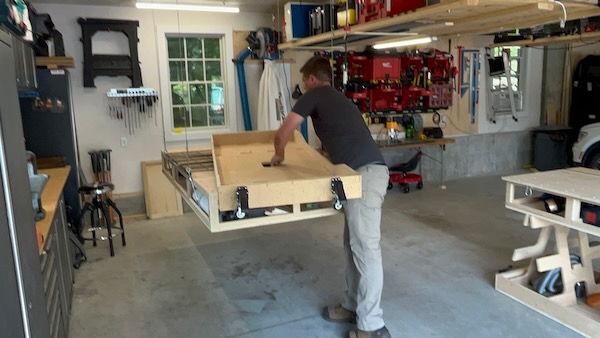

To fully maximize the space available, we wanted to take advantage of as much overhead space as possible. Two sets of Fleximounts GL44B 4’x4′ lifts were installed above the garage bays. Both workbenches had mounting hardware and turnbuckles attached to allow the lift system to raise and lower the benched overhead.
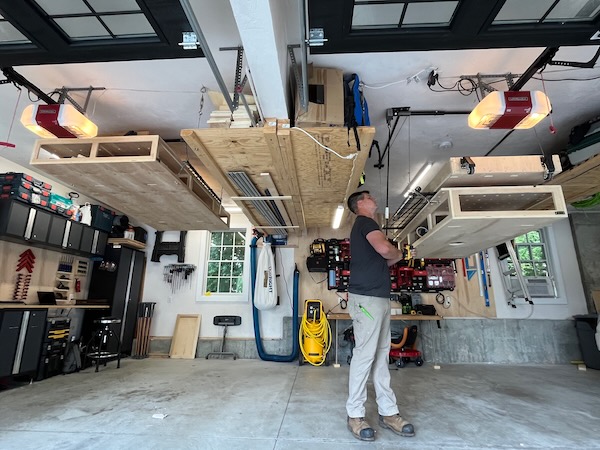
The lightweight packable design makes this possible given the 300lb lifting capacity of the Fleximounts system. Other garage lift systems that have a higher lift capacity would be recommended to allow for growth and additional weight in the benches.
Mobile Tools In The Workshop
The importance of the wheel can not be understated enough. Woodworking and shop tools are by design, heavy. If a tool can safely be placed on wheels or even better, already come with wheels to assist in mobility this can go a long way in helping increase the modularity and the safety of your shop.

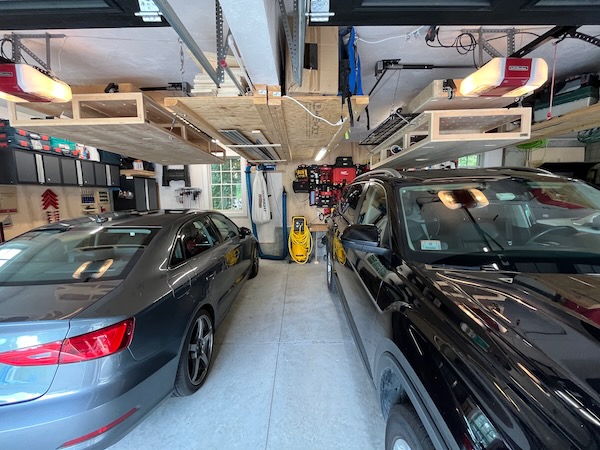
While a cabinet full-size table saw is desired by many and is usually the centerpiece of a well-laid-out workshop, the question that must be asked is all that size, weight, and power necessary for the type of work you may be doing. In our case, the requirements to maintain the use of all three garage bays for vehicles made the option of a full-size cabinet table saw impossible. Instead, a nice compromise was found with the Delta 36-725T2 10″ Table Saw. Weighing in at 220lbs, with a powerful 1.5HP motor but featuring a nice set of easy-lift caster wheels, the Table saw can be moved around easily as well as have enough power to cut through most stock.
Both Work benches in our shop have been put on wheeled carts made from plywood and some locking rise casters. The basic design for the kart can again be found through Ron Paulk’s website. Some modification to consider that we made on our benches was to change the leg heigh and as a result the locking tab positions on the kart, so the tabletop would rest just a few millimeters below our table saw to function as an outfeed table when required.
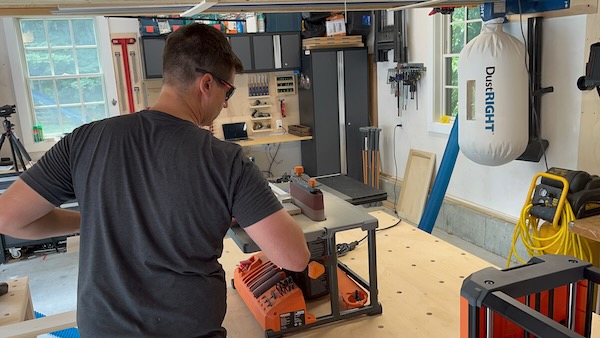
Benchtop Tools
Some tools occupy the space between too small to have their own pedestals/wheel, and too large to mount on the wall. With the limited stationary benchtop space, we have tried to keep the number of benchtop tools to a minimum. The two tools we wanted to start with are a sander and thickness planer. 
The RIGID R4840 Oscillating Belt/Spindle Sander is a new model that builds off the widely successful 4424 model that has been around for years. The sanding head can be swapped between a compact belt sander and 5 different-sized spindles. Having a two-in-one function on a tool is ultimately a great space saver.
For the thickness planer, we also elected to use a RIGID line product, this time their R4850 13 Inch Portable Planer.
Workshop Efficiency
One of the main definitions of the word Efficient is “prevent the wasteful use of a particular resource”. In this case, the resource is space, particularly the volume that this three-car garage with 9’ ceilings provides. By taking advantage of all the wall and overhead space, the efficiency of the garage can be maximized.
This garage space featured some long longitudinal beams separating the bays and providing the main support structure for the overhead joists. A floating shelving system consisting of plywood and suspended cable support from the overhead joists provides a substantial increase in usable storage space.
Modular Storage
Shop wall storage and layout is a topic deserving its own discussion and one that is bound to have many different ideas, opinions, and preferences. The surface you have in your space may be a driving factor in the type of wall storage you elect to take advantage of. One piece of sage advice is to keep in mind that nothing is permanent and your opinions on where tolls and items should live on your walls is likely to change. So having some flexibility in mounting and re-mounting should be a priority.

This garage was finished with plaster walls over a 16″ on center 2x stud structure. To aid in flexibility where we wanted to wall mount our tools and storage solutions, we mounted 1/2′ plywood over the plaster to increase the strength and flexibility of the mounting surface. We also think it just looks great in a woodshop.
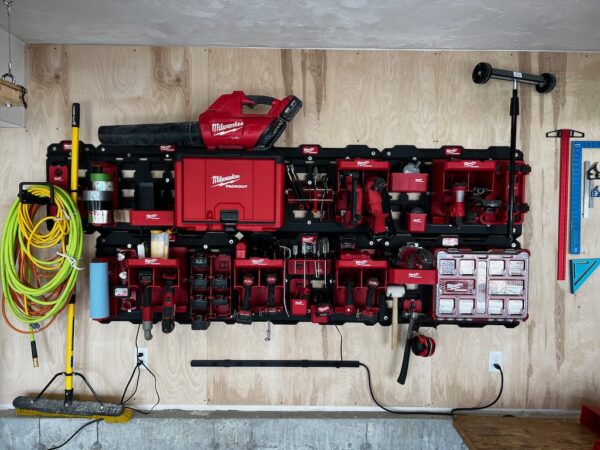
Anchoring one wall of the shop is a the newly released PACKOUT Modular Shop Storage from Milwaukee. Milwaukee’s PACKOUT line of storage solutions has been used in the field for years and has finally evolved to include a line designed to live on the wall of a shop or garage. The PACKOUT Shop storage system uses a series of mounting plates that are designed to index together and provide a solid mounting grid for existing and new PACKOUT storage products. Having the ability to quickly mount, dismount and reorganize the storage wall has been a great feature and addition to the shop space. For more details on the system check out our full review of the Milwaukee Shop Storage to see if this system is right for your space.

Wall Mounted Dust collection
The importance of a dust collection system in your shop cannot be overstated enough. Aside from the obvious mess that saws and sanding can create, the particulates in the air that are generated in simple tasks can be very hazardous to your health. Having a centralized dust collection system with ductwork run across the space and hookups for dedicated tools may be the ultimate goal for your workshop. But having rigid ductwork and hoses run throughout the shop might not be an option in your space or might even be a hindrance to a modular design.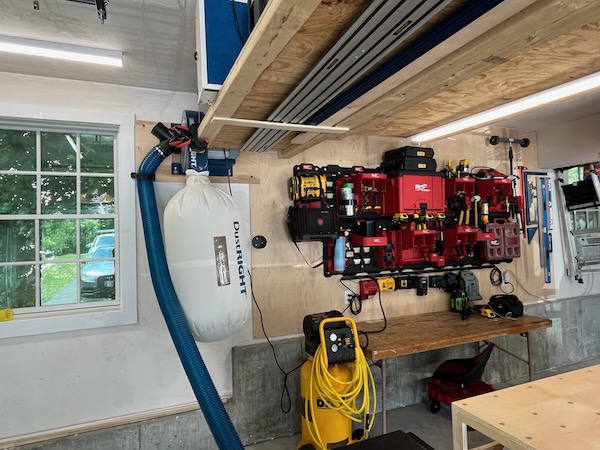
To get us started in our shop we elected to incorporate the Dust Right Wall-Mount Dust Collector from Rockler. This 1250 CFM unit has some serious power to plum a dust collection system across the entire garage. The system is designed to be mounted on the wall and uses 12Amp at 110V so it can be plugged into a stander wall outlet.
Given the modular layout of the shop and the tools, we elected to start slow with the dust collection system and just use a 4″ flexible and collapsible hose with a quick connect system. This way, we could quickly and easily hook up the dust collection to our primary cutting tools regardless of their configuration and location. Over time as preferred layouts are established, we intend to plumb in some dedicated ductwork to improve the efficiency of the dust hookup procedures.

Final Thoughts
We set out to accomplish 3 goals:
- Create a kick-ass workspace that was “Modular,” “Mobile,” and “Efficient”
- Employ all the tricks and techniques we knew to store the tools efficiently and easily
- Keep the garage as a viable vehicle storage space
Not only did we do that, but we opened our eyes to vertical storage as well. We hope you enjoyed this project as much as we did making it.