Custom Fireplace Mantel

Installing a Custom Fireplace Mantel
In the finish carpentry world a Custom Fireplace Mantel is often the aesthetic showpiece of a room. People use mantles to display family photos, treasured artworks, knickknacks and, more recently flat screen televisions.
Do You Need A Stock Mantel or Custom Made?
Many fireplaces built in today’s homes are of a standard size and easily accept a catalog purchased mantel. These mantles usually come shipped in a box in three pieces. The three pieces are easily assembled with twist cam locks and a screwdriver.
This catalog mantle is then nailed to mounting boards that you fasten to the wall.
Building A Custom Mantle
In some situations a catalog mantle will not fit a houses existing configuration, sometimes there are windows, doors or bookcases in the way. In these non-conforming situations special attention is needed, often the solution is a which means you’ll need a custom fireplace mantel. A which means you’ll need a custom fireplace mantel. is generally more expensive but can address irregularities and nuances of your home.
Stock Mantles
Many companies that make stock mantles will also modify their product and make you a semi-custom sized mantle. These semi-custom fireplace mantels are usually based on the existing catalog styles they offer and their sizes are usually restricted.
Semi-custom mantles typically cost twice as much and take approximately 4 to 6 weeks to deliver. When pursuing this option your measurements must be absolutely accurate and communicated to the company in order to fit properly.
It is sometimes easier to build a custom fireplace mantel. Building your custom fireplace mantel on sight as a DIY-er has the advantage of being able to continually check yourself against the existing fireplace.
Building a Custom Fireplace Mantel
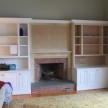
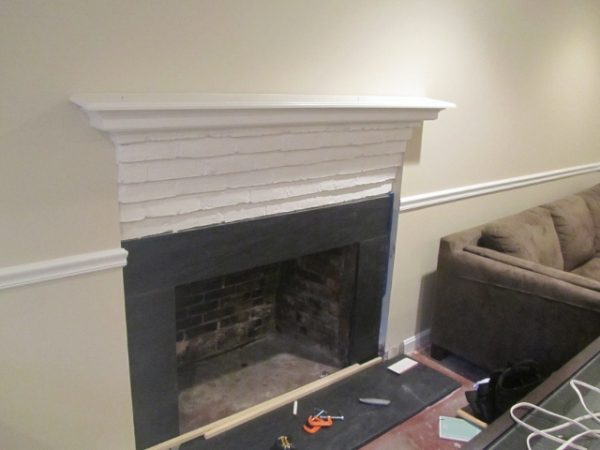
I was recently asked to build a custom fireplace mantel to cover up a painted brick fireplace with a wood top shelf. The existing fireplace brick was corbelled out to create a 6” shelf and the wood shelf projected additional depth to that.
Many times my solution is to order a standard fireplace mantel from a manufacturer and simply install it. In this case, unfortunately, a standard fireplace mantel would not fit.
A few years back the homeowners finished off the basement where this fireplace is located. At that time the remodeling contractor installed 2×4 walls and 1/2” wallboard along the perimeter basement walls.
This resulted in the walls flanking the fireplace and the finished wall subsequently projected out two to three inches past the facing of the brick – an odd situation and one that required making a custom fireplace mantel.
Installing Fireplace Facing Material
Material surrounding a fireplace must be non-combustible materials such as brick, tile, marble, granite and slate are all acceptable.
Typically mortar or thin set is used to install these materials to the face of the fireplace.
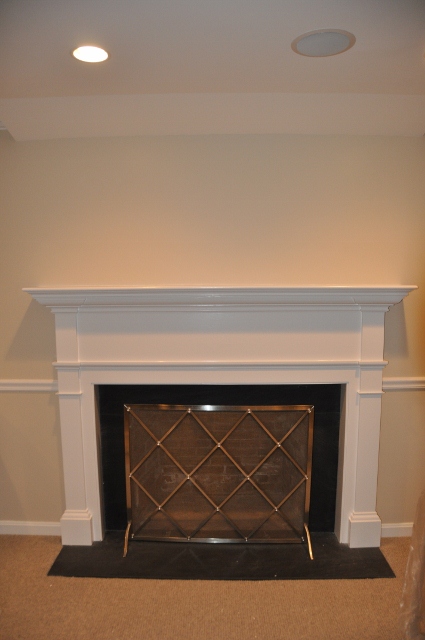
Prior to measuring for and constructing the new mantle we had a local granite shop template the brick wall and hearth area and install a slab of black granite for a hearth and brick veneer wall.
The result was a dramatic face lift.
IRC Code
In the 2009 Edition of the IRC (International Residential Code) Section R1001.11 Exception 4:
“Exposed combustible mantels or trim may be placed directly on the masonry fireplace front surrounding the fireplace opening providing such combustible materials are not placed within 6 in. of a fireplace opening.
Combustible materials within 12 in. of a fireplace opening shall not project more than 1/8 in. for each 1-in . distance from such opening.”
Note that state and local building codes and ordinances can vary from the IRC or may use standards from older versions of the same code.
Check your local building authority first when installing fireplace facing material. Ask about the mantle opening and hearth extensions in order to be compliant with local building codes on fireplace combustible materials.
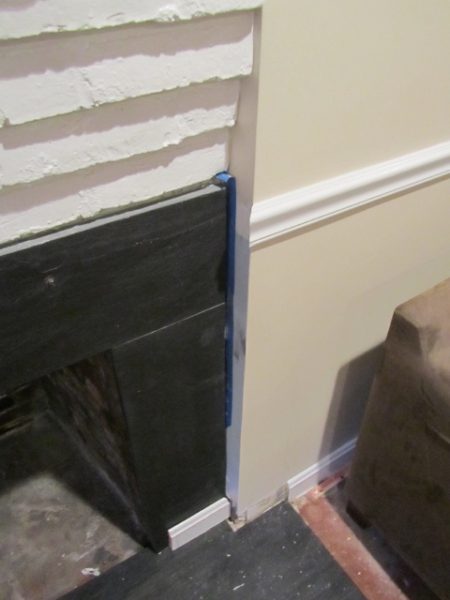
Fireplace Mantel Scribing
When measuring for this mantel I checked the walls and hearth for plumb and level. I decided to allow ¼” for scribing to the walls as needed. I also made one leg slightly longer than the other to compensate for an out of level hearth. It turned out that I did not need to scribe to the wall but I did have to hand plane some off the inner side trim edge that surrounded and covered the granite.
Note: when removing a large amount of wood to scribe to the wall I use a jig saw to cut close to the scribe line and then a hand plane to get to the line. For small material removal when scribing I use a sharp block plane and create a slight back bevel when planning.
Install Mounting Board Nailers
To secure the custom fireplace mantel to the wall, I installed two vertical layers of ¾ plywood on both sides of the mantle legs.
These nailers were attached to the wall corner studs with 2 ½” screws. On some situations I’ve had to install these mounting boards to the brick facing with Tapcon screws and construction adhesive.
These nailers fit into and are covered over by the mantle leg “hollows” and allowed me to install finish nails through the sides of the mantle leg to secure them. The top shelf did not require a nailer since we had cut back the old nailer.
TIP: If your mounting board falls on an area between studs you can secure a small block low at the floor level and secure the block to the wall shoe plate and then use molly or butterfly bolts and construction adhesive in the sections higher up.
TIP: When installing mantles I always bring extra material for mounting board nailers and also for those Oops! situations. You never know when you might need to make an emergency repair or adjustment.
Securing the Custom Fireplace Mantel to the Wall
I used finish nails to secure the mantel to the wall.
TIP: Make sure to keep your mantle tight to the wall when nailing.
TIP: If hand nailing you may want to drill pilot holes before nailing to prevent damaging the mantel when nailing into position.
When finished there were eight finish nails in each mantle leg [inner and outer sides] and six 16-penny finish nailed toe nailed along the top shelf.
I filled and sanded all of the exposed finish nails.
Installing the Inside Scribe Molding
The inside scribe molding is used to cover the gap between the mantle legs and the fireplace facing material of brick, tile, marble, granite or slate.
In the shop I routed a 3/8” radius to the edge of a ¾” x 6” wide board and then used my DELTA thickness planer to bring the board’s thickness down to just about 3/8” of an inch thick.
This scribe molding board was installed along the inner edge of the mantle opening and is scribed and fitted tight to the granite fireplace surround.
The corners are mitered to allow a continuous 3/8” bead on all three sides of the mantle face. I secured this scribe board with finish nails and then filled and sanded the nail holes.
Final Sanding and Caulking:
The goal is for the finished custom fireplace mantel to look like it was always there!
I always fill my nail holes and sand them before walking away from a mantle project.
Once done I dust and HEPA vacuum the project and then install caulking along the wall and shelf seams. This small step is important and helps make that mantle-to-wall connection look perfect.
Measuring for the Custom Fireplace Mantel
In my situation, with the walls built out past the brick facing there were many things to consider. The fireplace top also had the brick corbelling to deal with.
Use A Story Pole
A story pole is a length of narrow board, often a 1×2. It was used before long tape measures were available and was usually cut to the height of a house floor height or a “story.”
It was the quintessential layout tool for measuring, marking and transferring accurate measurements for your custom fireplace mantel. Early carpenters relied on story poles for building all sorts of things and used it to measure and mark heights from the floor platform of a building and up to the roof.
Measurements for windowsill heights, window top heights, headers), exterior door heights (or headers), interior door heights, etc., were all recorded on the story pole.
I was taught to use a story pole when building custom bookcases and built ins as a permanent way to mark and layout for easy, quick and accurate measurement recall.
Using a story pole eliminates the need for a tape measure, is more accurate than paper and once marked can be used throughout the project to continually check your progress.
TIP: I typically use scrap rips of wood from past projects or Birch plywood strips as a story pole – make sure your story pole is straight.
TIP: Depending on the size of the area to be measured I sometimes use different story poles for width and heights. I also use small c-clamp to join the two story pole boards together to make them the length I need. Once I’m done I remove the c-clamps for easier transport.
I used the story pole to mark and locate all of the important measurements for the soon to be built mantle.
Make note of measurements such as depth, height, width, build outs, recesses, etc.
I use all four sides of the story pole to record measurements and label each side appropriately.
TIP: Use a utility knife rather than a pencil to make marks on the story pole. The utility knife blade is thinner than a pencil mark and more accurate. You can use the pencil afterwards to clarify your marks.
Guidelines when measuring your custom fireplace mantel:
1. Determine the mantel opening height:
The opening height of the mantel is determined by measuring the height of the fireplace facing material and subtracting ½” from that height to allow the mantel to overlap the facing material. [Granite]
2. Determine the mantel opening width:
3. Determine the mantel return depth
This measurement ensures that your new mantle will cover your protruding fireplace facing materials. Fireplaces have facings of brick, tile, marble, granite or slate.
On this installation the brick corbelling protruded past my fireplace facing materials. I used the corbelling as my measurement. You want your custom fireplace mantel to be installed flush to the wall and to cover this facing material.
Measure the distance this facing material sticks out protrudes from the wall. Add ¼” to the thickness of the protruding facing materials when figuring your sides on the fireplace opening side to allow the mantle to completely cover the fireplace facing material.

4. Determine your shelf width and depth:
For my project the moldings we were using determined the width. I used a scrap piece of molding to determine the overall width of the molding returns and then added for an overhang.
Make sure you have the room for the shelf length. Sometimes the shelf length can be limited due to limiting factor such as in situations with flanking bookcases, windows or doors.
Building The Custom Fireplace Mantel
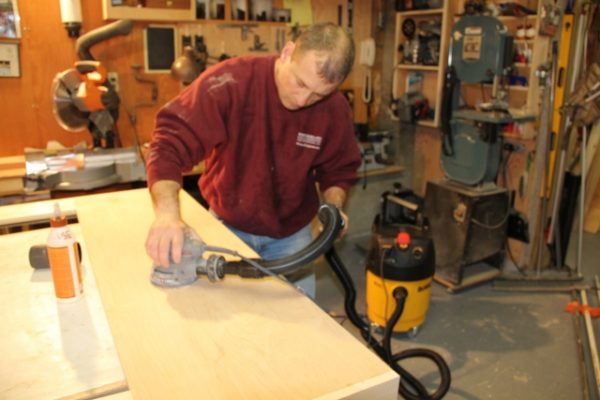
This custom fireplace mantle is going to be painted so I used furniture grade Birch plywood and poplar wood.
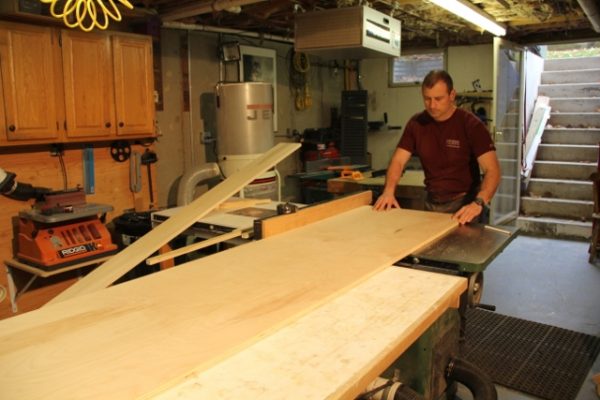
Choose Materials and Start Cutting Parts to Size
I like poplar because it’s reasonably priced, relatively knot free and easy to work with. I start by figuring out what widths I need for stock and rip all of the parts at one time. Once ripped, I then run everything through the edge joiner and start working on the lengths.
Constructing the Mantel Frame or Box:
Follow your local code for fireplace combustible clearances.

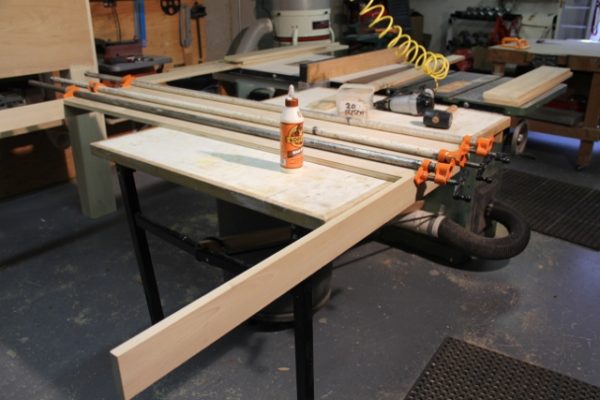
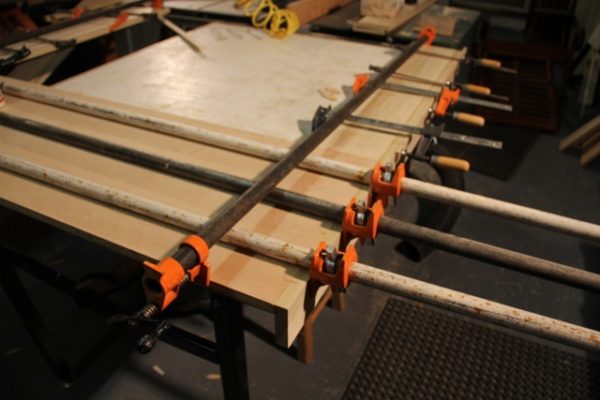
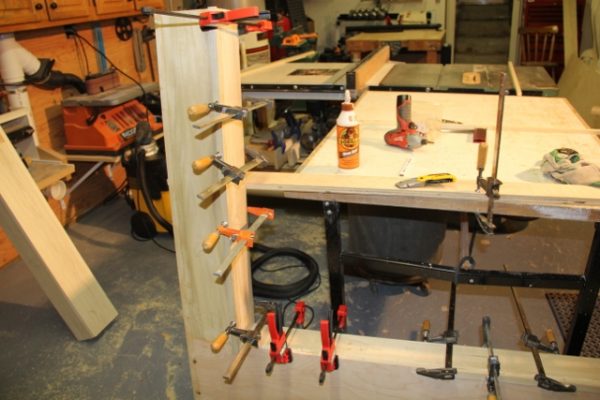
Pipe Clamps Help
TIP: When I need to clamp long parts together I use a double threaded union to join two clamps together. I keep [2′, 3′ and 5′] ¾” diameter pipe clamps in my shop and to make a larger pipe clamp I join them with the threaded union. This trick saves me from purchasing long clamps and then having to store them in my small shop.
The clamping process takes time and the glue drying time slows the project considerably. Once I clamped together parts I try to move onto something else Otherwise, I have to walk away until the clamping process has dried.
On parts that were extremely wide, like the mantle’s top face, or on areas where the edges will be hidden, I use birch plywood.
The plywood is more resistant to movement and is more stable than solid wood. It also saves me from gluing smaller width boards together to get a larger sized board.
Once dry, I rough sand the glue joints and then add the outer and inner side panels. These are the sides that will fit tight to the wall and the granite.
Inner Opening – Custom Fireplace Mantel
I purposely leave the inner panels narrower so they will not contact the granite surround. There is no need for this wood to be tight since I will later be adding a thin trim stock to this area. By leaving it shy of the granite I ensure that it will not be in the way of getting the outer side trim boards to fit tight to the wall.
I use a biscuit joiner and biscuits and glue to add the outer and inner side panels. Very few nails are used. I sometimes use a brad nailer to hold boards in place until I can clamp them.
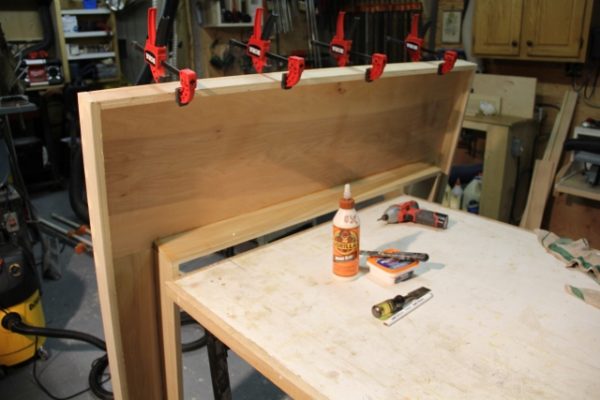
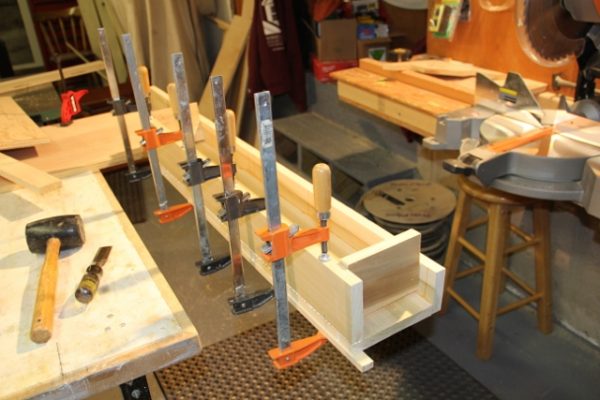
Assembling – Custom Fireplace Mantel
Assembling a custom fireplace mantel with tight seams and without nails requires a lot of clamps. The mantle side legs created a “U” shaped hollow leg. To keep these legs square and in place during clamping I cut and inserted dry “clamp blocks” the exact width of the inside hollow. I removed these blocks when I removed the clamps.
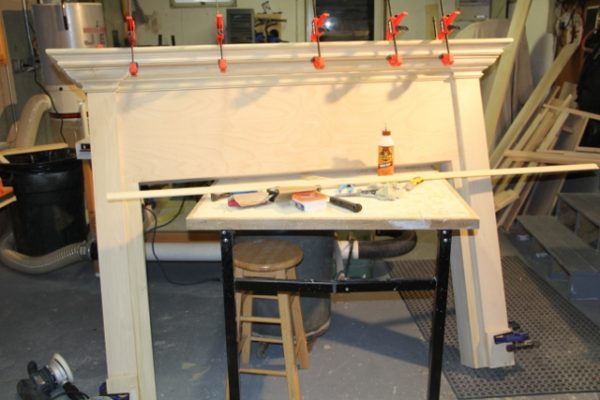
After the mantel box was constructed I then added a 6-inch vertical board on top of each leg to give the legs depth as well as to provide some really cool looking outside and inside miters for the molding.

The plinth blocks were added on top of these boards at the floor level.
Constantly Check Your Story Pole!
It’s extremely important to continually refer to your story pole as you start assembling each part of the custom fireplace mantle.
Custom Fireplace Mantel Shelf
I consider the next step to be the fun part.
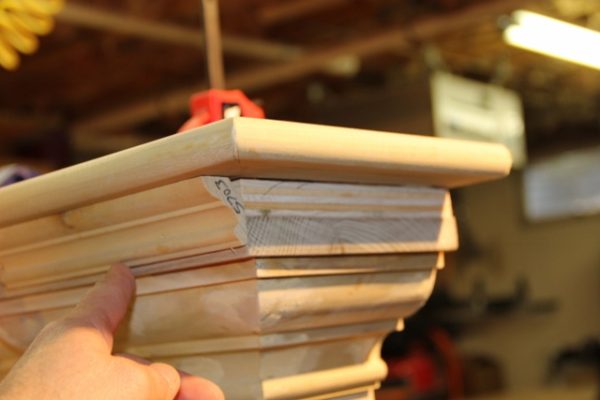
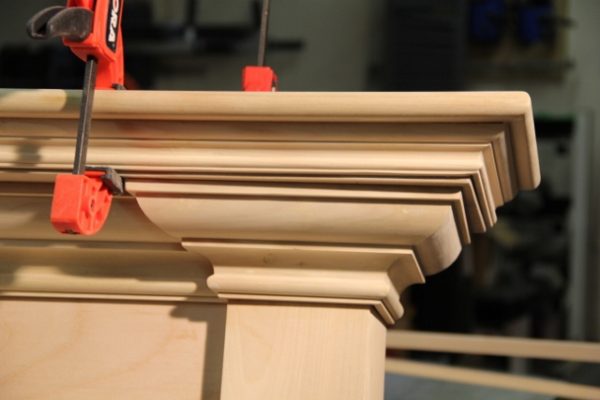
The designer on this project gave me a photo of a fireplace mantle she liked. I placed the photo next to my favorite molding catalog and did my best to get as close as possible molding matches.
After buying the molding from a local mill shop I then began to make the mantle shelf.
This Custom Fireplace Mantel has a large molding and a smaller sub molding so I needed to make a sub shelf of plywood under the top shelf.
For this shelf I used Birch plywood and then added a ½ round Poplar nosing with mitered corners to the edges of the Birch plywood shelf. This gave me a nice radius nosing and a stable, sturdy, deep Birch plywood top shelf.
Adding Moldings
Once the rough shelf is attached I began attaching the moldings. Some of them needed to be built out to meet of match other moldings and this required adding strips of furring behind the molding. Anything that showed was made with
Poplar and anything hidden was plywood. At each glue and clamp step I take time to sand the glue joints and fill any nail holes or imperfections.
I attach all of the moldings with glue and brad nails, making sure to apply the glue to every contact edge of every
joining piece of wood or molding. This way you will ensure a seamless, tight fit that will prevent movement as well as help hide the seams when painted.
The spacing of the lower smaller molding was determined by the designer but we based it on one-third spacing of the larger space.
Filling Imperfections and Seams
I use wood filler to fill all nail holes and I sanded them later. I also used a putty knife to add filler to every glue joint seam. This helps make the seams flush out and disappear when later painted.
Sanding Custom Fireplace Mantel
Sanding is a constant process and I find myself doing it every time I remove clamps or just prior to adding any moldings. It’s a lot easier to sand flat surfaces that it is to sand around moldings.
Adding Plinth Blocks and Base Molding
If I had my druthers I would have changed the baseboard trim and baseboard molding in the room so that it would match and wrap around the mantle plinth blocks. Nothing looks better than a room trim that dovetails with the centerpiece mantle. This particular job did not call for that so I made my plinth blocks to return back into the mantle legs.

Final Sanding
I gave the custom fireplace mantel a final sanding with 150 grit sandpaper and checked for any imperfections, nicks, divots, etc.
The painter will be responsible for sanding further and also for sanding between the primer and top finish coats.
Installing the Custom Fireplace Mantel
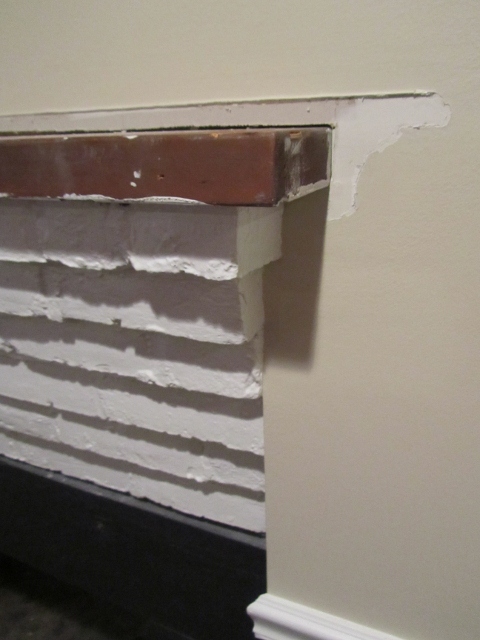
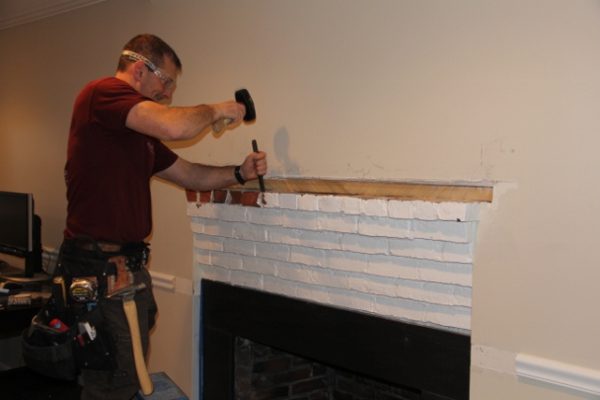
Once on site and ready to go, one of the first things I had to do was to remove the old wood shelf nailer. The nailer was a 2×6 or 2×8 that was installed between two wall studs and buried back behind the wallboard. I used a reciprocating saw to cut this slightly back from the wall’s surface.
We used a HEPA vacuum as we cut this board out to keep the sawdust from flying all over the room.
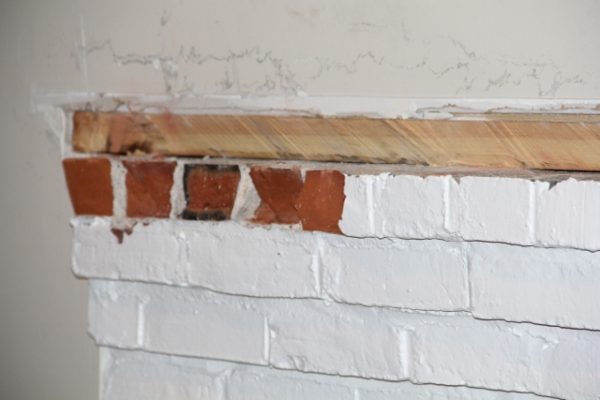
After this was complete I used a cold chisel and 3-pound hammer to break off 3 inches of the top corbelled brick. I needed to do this to allow the custom fireplace mantel “box” to completely cover the bricks and fit tight to the wall.
Place cardboard under your drop cloths to protect the granite hearth floor from falling brick pieces.
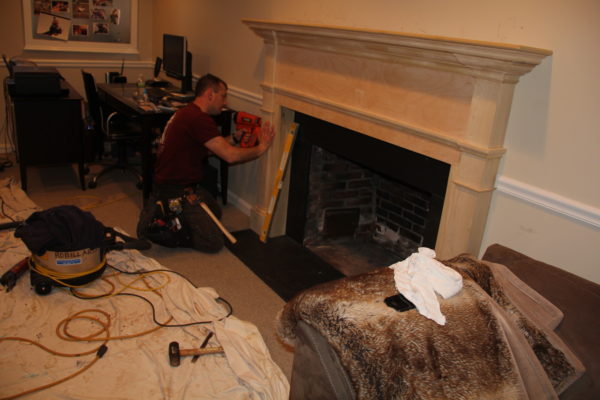
Cutting the Existing Baseboard and Chair Rail
In this installation I needed to cut out portions of the wall chair rail molding and base board molding so the mantle would fit flush to the wall. I pushed the mantle up against these moldings, taking time to center the mantle over the fireplace granite.
Make sure that you have an equal amount of granite showing on both sides. Also make sure you are within your code combustible setbacks.
Once centered, I marked the chair rail and baseboard moldings with a utility knife and then used a multi-tool to make the cuts. I purposely made a slight back cut on the moldings to create less friction when sliding the mantel past these moldings as well as allow me to make micro adjustments with a utility knife if necessary.