Hardwood Floor Border and Feature Strip

 Installing a Hardwood Flooring Border and Feature Strip:
Hardwoods floors offer an unrivaled sense of quality that never ceases to get stale or fade with home building or decorating trends.
Hardwood flooring has many species and finishes ranging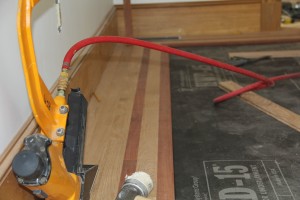 from the more traditional classics such as, oak and ash to modern or contemporary styles like maple or the unusual pattern of an exotic hardwood like Brazilian Tigerwood or African Sapele.
If your style is more cozy and rustic, you might want to consider hickory or cherry hardwoods.
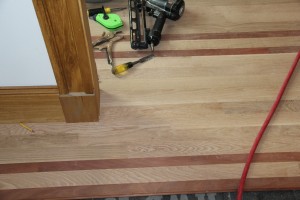
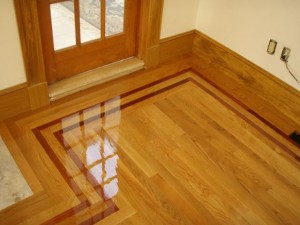
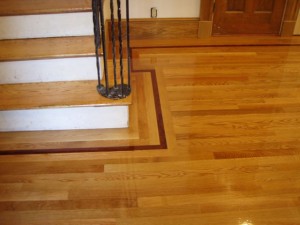
Add to any hardwood flooring installation a hardwood border and feature strip and now you’re talking high end cu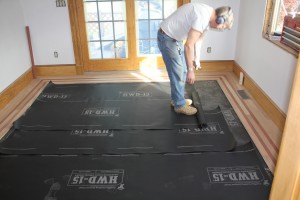 rb appeal. A border usually consists of 8-12” of similar flooring running the walls. A feature strip is an accent strip that highlights and shows off the decorative borders as well as enhances the hardwood flooring installation.
Why Use a Border and Feature Strip?
Adding a border and feature strip to your next hardwood floor installation is a great way to show off your artistic side and create a floor that follows the classic designs or is more eccentric and shows off your artistic flair.
To me when I see a border and feature strip installed in a hardwood floor I immediately think “high end and quality.”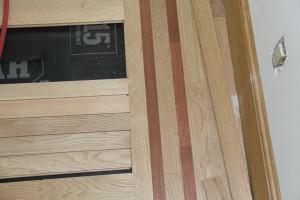
Border and feature strips are becoming more and more popular these days and are mostly seen or associated with higher end homes and remodels. Borders are typically done in the same material as the rest of the floor or “field” as we call it. The feature strip is usually darker and can be many different materials, shades or sizes. Walnut and 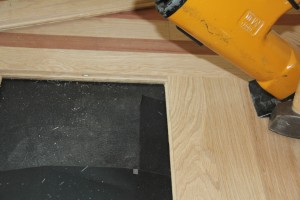 Mahogany seem to be the most popular in my neck of the woods probably because it is offered in so many shades. [This project photos show: Santos Mahogany]
When considering installing a feature strip in your hardwood floor the best time to do it is when the floor is being installed. The cost of installing a feature strip is mostly labor due to the small amount of feature strip materials used.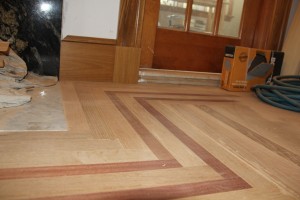
People ask all the time where should I put the feature strip. Its really a personal choice but many if not most features strips run along borders of the walls , typically 6” to 8” to 12” inches off the wall but not too far that it disappears under the outer perimeter of an area rug.
One rule of thumb that I follow is to use one strip in smaller areas and double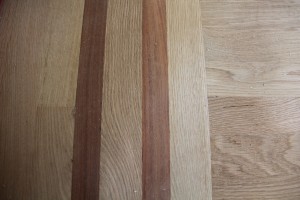 strips in actual rooms or larger spaces. Typically I use standard width boards for blind nailing purposes. Thinner strips can also be used by milling down strip flooring and installing face nails.
Adding a border is usually a separate labor charge and the feature strip can add anywhere from $1.50 to $10.00 a lineal foot depending on the material cost.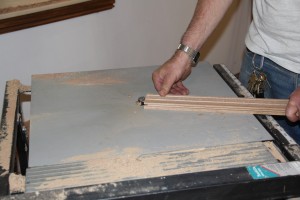
Deciding on a Border and Feature Strip:
When deciding o a border and feature strip make sure to research and choose a feature strip with similar density to your flooring so it will wear evenly. If you choose different density materials you may be unhappy in a few years if they wear at diff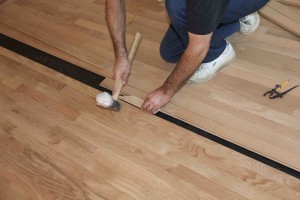 erent rates.
Layout is Important:
The border and feature strip planning and measuring has to happen before a single board is laid. One small mistake at the can grow exponentially into an installation disaster later on.
Use a combination of 3-4-5 triangle measurements, large squares and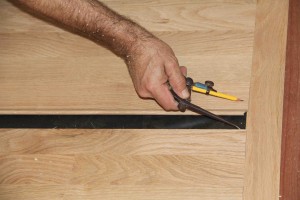 parallelmeasurements to determine and lay out your border and feature strip.
There is an old carpentry saying that a small error in the foundation can compound itself over time and become a big error by the time you build the roof. This is also true for hardwood flooring. There is nothing worse than having your last piece be a pie-shaped board.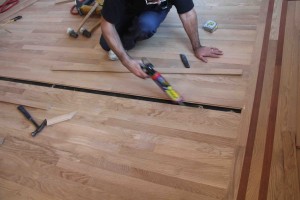
Allow a minimum 3/4″ expansion around all vertical obstructionsColor, Shade and Joints!
Hardwood flooring comes in boxes and many times you may receive different cuts or “lots” of wood from a flooring manufacturer. Take the time to open and install the flooring from several cartons at the same time to ensure good mix of color and shade.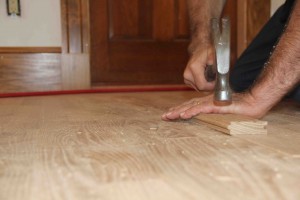
Layout of your flooring is important. Be attentive to joint spacing and staggering the ends of floor boards at least 4″–6″, in adjacent rows. This small detail will make a big difference once the entire floor is in. By randomly installing the floor and spacing your joints you will achieve an overall nicer looking floor install.
When installing floor boards of similar length, begin the rows with starter board. To do this cut a long board shorter length and use that as your starter board. Avoid staggering the rows uniformly to prevent stair-stepping. The boards you cut from the opposite end of the row can still be used for the next starter boards.
Steps To Install A border and Feature Strip:
As with any hardwood floor installation take the time to orient or if needed, cut and scribe, the first border boards to ensure that your first board is parallel to the opposite wall. Check and double check this before starting the install.
Again I can’t stress enough to make sure that as you install the border around the walls of the room ensure that you are installing them square and parallel to each other. Use the same flooring material on the borders as in the middle “field” boards.
When installing the border and feature strip use a consistent and overlapping pattern in the corners. This pattern, not unlike a herringbone pattern, is a pleasing and nice finish detail.
There is no hard or fast rule but I feel 8 to12 inches out from the wall is a good place to end the border and start your feature strip.
Generally you will follow the walls with your feature strip and avoid going into small nooks with your feature strip, it makes it look too busy. In these situations fill in the nook with a larger border, “field” boards.
When installing the feature strip you can either install a full width board and blind nail the board or rip it smaller to a desired width and face nail it in place. Since the feature strip is highlighted in the floor I prefer to hide the nails.
For a good finish, it helps to sandwich the featured feature strip board between two similar direction boards. This keeps all of the “field” joints off the feature strip.
Filling in the field:
Complete the entire border and feature strop on at least three if not all four walls prior to filling in the middle “field” boards.
When you reach the opposite end of the room use a tongue and groove router bit to route the ends of the field board so it fits onto and locks in place. When doing this hold the last two boards slightly off the floor at their joint. Slowly lower the two boards down and then slide the boards into place over the previously installed board tongue.
Routing the last board is better than gluing and nailing it in place. Complete the entire border [All 4 walls] and feature strip prior to filling in the middle field.
Routing this board is a much better joint and allows natural, seasonal movement without breaking apart. If the glue bond fails you’ll end up with gaps.
One method that I find works well is to install both sides of the field at the same time and work toward the middle. Working to the middle ensures that the outer edges are consistent and leaves the last board in the middle. This ensures that you do not install the last, and most likely thinner board next to the highly visible feature strip.
When you get closer to the middle, instead of finishing the field with one really thin narrow strip, you can always rip a little material off several boards and re-groove them to finish the floor without bringing attention to a much narrower strip that will draw attention.
However, most times a slightly narrower board will not be picked up in the middle of the floor and is usually hidden under an area rug.
For the last piece: On a table saw rip the tongue off the second to last piece and install it. Then rip the last piece to the necessary width and install it using construction adhesive and face nails. Many times you will need the assistance of a wood block to “persuade” this piece into place.
Storage and Handling:
Solid hardwood flooring should be stored in the environment in which it is expected to perform. Deliver the materials to an environmentally controlled site. The wood subflooring materials must not exceed 13% moisture content. Using moisture meter, measure the moisture content of both the subfloor and the hardwood flooring to ensure that the difference between the two does not exceed 4% (3% for plank).
Acclimate the hardwood flooring in the area the floor will be installed. Store in a dry place, being sure to provide at least a four-inch air space under cartons which are stored upon “on-grade” concrete floors.
Flooring should not be delivered until the building has been enclosed, with windows and doors in place, and until cement work, plastering and all other “wet” work is completed and dry. Concrete should be at least 60 days old.
Job-Site Conditions:
The building should be enclosed with all outside doors and windows in place. All concrete, masonry, framing members, drywall, paint and other “wet” work should be thoroughly dry.
The wall coverings should be in place and the painting completed, except for the final coat on the base molding. When possible, delay installation of base molding until flooring installation is complete. Basements and crawl spaces must be dry and well ventilated.
Exterior grading should be complete with surface drainage, offering a minimum drop of 3″ in 10′ (7.6 cm in 3.05 m), to direct flow of water away from the structurre. All gutters and downspouts should be in place.
Subfloor Conditions
Clean, level and flat. Sand high areas or joints. Flatten low spots with a maximum 6 layers of 15# builders felt, plywood or shims (not leveling compounds).
Dry – Check and document moisture content of the subfloor with the appropriate moisture test. Install moisture retardant materials, #15 asphalt, grade D kraft paper, or laminated roisn paper. This layer acts as a moisture retarder and may be used to reduce movement caused by changes in subfloor moisture, thereby reducing cupping and warping. Overlap seams 4-6”.
Screw down the subfloor to eliminate squeaks.
Subfloor / Underlayment Requirements:
NOTE: Solid hardwood flooring can be fastened to most existing flooring materials providing they can be penetrated with the fastener and the subfloor/underlayment materials meet or exceed the recommended subfloor/underlayment requirements.
General Installation Tips:
STEP 1: Doorway and Wall Preparation
• Undercut door casings and jambs. Remove any existing base, shoe mold or doorway thresholds. These items can be replaced after installation. All door casings and jambs should be undercut to avoid difficult scribe cuts
• Install the moisture retardant (if used) parallel to the flooring.
• Overlap the rows 6″.
STEP 2: Establish a Starting Point
• Installation parallel to the longest wall is recommended for best visual effects; however, the floor should be installed perpendicular to the flooring joists unless subfloor has been reinforced to reduce subfloor sagging.
• When possible, always begin layout or installation from the straightest wall,generally an outside wall.
• In at least two places at least 18″ from the corner, measure out equal distance from the starting wall the face width of the starter board plus 1″ (do not include the width of the tongue in this measurement). Mark these points and snap a chalk line through them. This measurement allows for the required 3/4″ expansion and the width of the tongue.
STEP 3: Installing First & Second Rows
• Starting from Wall use the longest, straightest boards available for the first two rows. For
• random and alternate width products use the widest plank for the first row. Align tongue of first row on chalk line. The groove should be facing the starting wall.
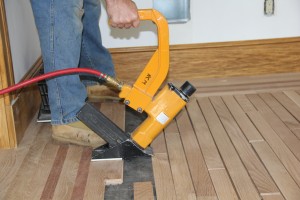
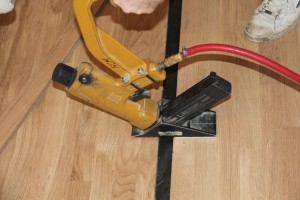
• Use a pneumatic finish nailer to face-nail the groove side ½” from the edge at 6” intervals and 1″–3″ from each end. Then, blind nail using a finishing gun held at a 45° angle. Nail down through the
• nailing “pocket” on top of the tongue every 6″–8″
• If using finish nails, pre-drill the nail holes with a 1/32″ bit approximately 1/2″ from back (groove) edge, 1″–3″ from each end, and at 6″ intervals. Pre-drill at the same intervals at a 45° angle down through the nailing “pocket” on top of the tongue
• Face-nail the groove side where pre-drilled. When complete blind-nail at a 45° angle through the tongue of the first row. Fasten using 6 or 8d finish nails. Countersink nails to
• ensure flush engagement of the groove. Avoid bruising the hardwood by using a nail set to countersink the nails.
• Continue blind-nailing using this method with the following rows until blind nailer can be used.
STEP 4: Dry Lay (Racking) the Floor
• “Dry” lay (rack) materials to cover approximately two-thirds of the room. Begin dry laying (racking) approximately 6″from the edge of the previously installed rows. Avoid pulling boards too tightly together on the sides, as they must move freely when fastening begins.
• Do not cut final board until row has been installed. Cutting the board in advance may result in a board that is too short.
• Visually inspect flooring, setting aside boards that need to have natural character flaws cut out. Use these boards for the starting and finishing rows after objectionable characteristics have been cut out.
STEP 5: Installing the Floor
• Begin installation with several rows at a time.
• Fasten each board with a minimum of two fasteners 1″–3″ from the ends. To ensure a more favorable overall appearance end-joints of adjacent rows should be staggered a minimum of 4″–6″ when possible.
• The last 1–2 rows will need to be face-nailed where clearance does not permit blind nailing with the stapler. Pre-drill and face-nail or use a pneumatic nailer on the tongue side following the nailing pattern used for the first row.
• Rip final row to fit and face-nail. Use glue to the previous board.
• Install or re-install any transition pieces, reducer strips, T-moldings, thresholds, bases and/or quarter round moldings that may be needed.
• Inspect the floor, filling all minor gaps with the appropriate blended filler.
• Leave warranty and floor care information with the owner.
Useful Hardwood Floor Information:
Hardwood floor dimensions will be slightly affected by varying levels of humidity within your home. Care should be taken to control humidity levels within the 35–55% range. Doing this will protect your investment and to assure that your floors continue to look good.
• Heating Season (Dry): A humidifier is recommended to prevent excessive shrinkage in hardwood floors due to low humidity levels. Wood stoves and electric heat tend to create very dry conditions.
• Non-heating Season (Humid, Wet): Proper humidity levels can be maintained by use of an air conditioner, dehumidifier during the summer months.
• Avoid excessive exposure to water from tracking during periods of inclement weather.
• Place a rug under the sink in kitchens with wood floors.