Using Kitchen Cabinets To Fill Niche Locations

Working with dead floor space!

Old Yankees and the Shakers had something in common. They always made the most of available space.
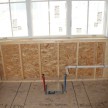
Recently a client asked me to look at her kitchen. She had a 14″ recess in her wall off her kitchen and wanted me to build custom cabinets so she could use the space more efficiently. See picture to right.
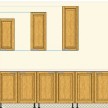
After looking at the kitchen and space I convinced her to buy stock 12″ deep cabinets. More specifically, to use the same company that built her kitchen cabinets. the idea behind this was to get the new cabinet doors and molding to match the existing cabinets.
We ordered extra cabinet filler material to use as “applied trim” over the seam of the wall corner. This Filler strip was to be cut and applied to the right side of the cabinet  and would overlap the wall seam, making the cabinet to appear to have side trim.
Installing the Filler Strip:
1. Rip the filler strip to the desired size
2. Clamp the filler strip so that it is tight and flush to the cabinet edge and face.
3. Remove the cabinet door
4. pre-drill and counter sink for screws. If possible, hide the screws behind cabinet door hinges.

5. Apply glue and screws that are sized properly and do not protrude out of the filler strip.
6. Move clamps as needed to get a super
tight seam.
7. Remove clamps when done.
8. Apply top crown molding.
By choosing 12″ deep cabinets she was able to accomplish her goal of increased and better looking storage.
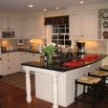
Using the filler allowed us to cover an out of plumb corner seam that would have been unsightly and looked unfinished. Now we have something that looks like it was chosen and installed when the main kitchen cabinets were installed.
 Bathroom Niche:

We utilized this same technique in a bathroom nook or niche.
Instead us using stock cabinets we constructed a face-frame and two custom cabinet doors to close the niches and shelves inside.