Tuck-Pointing A Brick Foundation

Repairing A Leaking Brick Foundation:
DearConcord Carpenter,

Photo source: missouri.inetgiant.com
What about repairing a leaky brick foundation wall? I live in a 110+ year old farmhouse but I have 2 corners that leak water. I know that I should put some kind of mortar in the places where there are a few holes/gaps but what about the places where do not seem to any gaps.
I am sure I cannot afford to have someone come in a tuck-point the brick, but can I do it? I know, you do not know my ability, I am not a professional but I did build my first house and it is still standing. :) All my friends call me for roofing, new windows, doors, siding, etc.
Any suggestions? Will that waterproofing paint work if the major gaps are refilled?
Thanks, Mike
Dear Mike,
Over time all concrete and mortar deteriorates. The best way to solve your issue is three fold:
- Install gutter and slope the exterior grade away from your house.
- Fill all of the gaps and holes with brick or mortar. If water pours into these areas consider using hydraulic cement.
- Remove and replace all of the cracked or missing mortar. [tuck-pointing]
Sloping the grade from the house:
Try to grade the ground around your house to achieve a slope of inch per foot for at least 6 to 10 feet. 10 feet being the best choice!
Does It Work?
A few years back we recently did this on a CIRCA 1863 brick over field stone foundation. The floor up 5 feet was stone and the rest was brick.
We removed as much of the old mortar as we could and added now. Once that was done we parged or plastered over the bricks with mortar. This and some minor grading corrections and water infiltration stopped completely.
Tuck-pointing is considered a maintenance issue and not a structural repair.
Tuck-pointing your brick foundation:
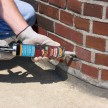
- Using a cold chisel and a 3-5 pound hammer chip away cracked and loose mortar to a depth of approximately half an inch. A faster way when tuck-pointing a brick foundation is to use a grinder with a diamond blade. This method is super dusty and can leave your home a mess.
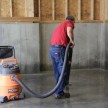
- Brush your joints clean. Use a shop VAC if needed.
- Mix your mortar and let sit for five minutes.
- Brush the joints with water to prevent the existing mortar from sucking up all the moisture out of the new mortar.
- Apply the mortar using a trowel and press the mortar into the joints.
- Use a brick jointer tool to smooth out and press the mortar into the brick joint.
- Work in 3 x3 areas, in a methodical fashion by filling all of the vertical joints first then the horizontal joints or vice-versa.
- Consider parging over the bricks when done to add extra protection.
I’m not a fan of the paint on waterproofing paints. I feel the best approach is to move the water away and make sure your foundation is intact.
Good luck and report back on your results!