Repairing A Window Sill
Rotted Marvin Window Trim and Sill
Sixteen years ago I put these windows in and have always maintained the paint on them. Unfortunately the finger jointed wood trim that window manufacturers use these days is far inferior to that used in days past and now required repairing a window sill.
Repairing A Window Sill
I noticed that some of the paint appeared wrinkled. This is usually a sure sign of paint failure or rot.
Most of the time I see window sills that are rotted to the point of the window needing to be replaced.
Every once in awhile we luck out and find that the rot has not traveled too far into the window sill or frame. This was the case on my bedroom window.
Below I test the trim for rot with my nail punch . . . the trim failed the test!
The round top window unit is actually four windows that were mulled together on site and installed to look like one unit. As a result this window has three window sills that “butt” into each other.
The butt joints are vertical joints, see below yellow nail punch below, and this is where water entered and the rot started.
Most of the rot is at the seam of the two windows. I identified solid wood, drew that line and started cutting out the rot.
Below I am using a Japanese pull saw to cut along the recessed sill line.
The rot stopped before this line but I thought it made for a good location to make a seam and would allow caulking to go over it as a redundancy layer of protection.
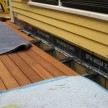
First section of the rotted sill is removed.
I made sure to remove enough wood to get into solid wood so the repair had something solid to attach to.
This spot was more difficult to cut out. I had very limited access with the hand saw so I used my utility knife to score the lines and a sharp chisel.
Cutting out the right side of the rot. I still have the left side to cut out – see pencil marks.
Here I am test fitting my cedar “Dutchman” repair patch. I use that term lightly as a Dutchman is simply a piece of wood set into a recess that has been routed to conceal a surface imperfection.
I re-cycled 2×4 scrap cedar from an old job for this repair…. I love re-using stuff. Below I duplicated the profile angles and drip edge of the window sill on my table saw.
Dry fitting the cedar Dutchman patches.
I used Gorilla brand, polyurethane glue, galvanized 16 penny finish nails and screws to attach the “Dutchman” patch.
After repairing the sill I replaced the rotted trim, repaired flashing, primed and painted the entire unit. If you look close at the clapboard and trim meeting you can see where my clapboard paint touch up is and the contrast against the faded house paint.
When doing repairs like this it is important to remember to save the screen hardware that is attached to the rotted trim so it can be reused. In my case I have long ago bought a carton of the hardware and replace it with new as needed.
Close up of the repair.
Now on to two other locations……
~ concord carpenter
Subscribe to A Concord Carpenter Comments by Email


