Concord Carpenter Concord Carpenter

Concord Carpenter

Construction, Remodeling, Pro Tool Reviews, Best Practices, How-To Tips, Tool Buying Guides, Home and Garden, and Solutions to Remodeling Problems Targeted to the Professional and Do-It- Yourselfer

Menu
  • Home
  • About
  • New Client Contact
  • The Team
  • Topics
  • Videos
  • Newsletter
  • TV Show
  • Ask The Carpenter

Removing Pet Urine Odor From Wood Sub-floor

By Robert Robillard on Remodeling

Tweet

Photo Source: www.petbacker.com

How to Remove Pet Urine Smell From a Sub-floor

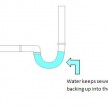
Steps involved in removing pet urine odor from wood sub-floor is a question I often get asked. Pet urine is a made up of ammonia, nitrogen, uric acid, bacteria, and hormones. Uric acid contains crystals that are left behind even after the urine has dried. It is those crystals in the impregnated wood that will linger.  High humidity days tend to activate these crystals, they become reactivated haunt us later, after the carpet is replaced. Removing pet urine odor from wood sub-floor can be difficult.

Using Enzymatic Cleaners

One solution for removing pet urine odor from wood sub-floor is to apply an enzymatic pet cleaner to the soiled areas, and allow them to dry thoroughly for 24 hours. It’s important that you allow the area to dry completely in order to give the enzymes time to remove the stain and odor.

These cleaners contain special enzymes that convert organic waste materials such as urine and feces to carbon dioxide and water. These enzymatic cleaners continue to eliminate the odors and waste materials even when dry.  Repeat this step if odors remain after initial application.

Choosing an Enzymatic Cleaner

Choose an Enzymatic Cleaner has the appropriate enzymes for the types of stains your dealing with. If you plan to use the cleaner on a variety of stains, it’s best to choose a product that offers multiple enzymes.

The following are the three main types of enzymes in these cleaners:

  1. Amylase: This breaks down starches, including eggs, sugar, and some sauces.
  2. Lipase: Lipase breaks down fats. It’s effective on oil and grease stains.
  3. Protease: This eliminates protein-based stains like wine, urine, and blood.
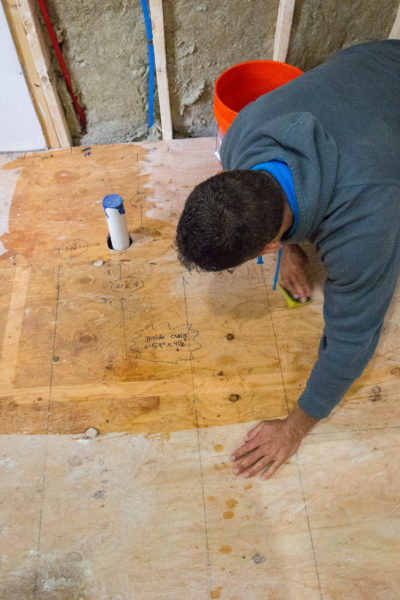
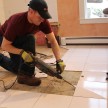
 

removing pet urine odor from wood sub-floor

Cleaning subfloor

Cut Out And Replace Sub-Floor

In some cases, removing pet urine odor from wood sub-floor is impossible. The most fool proof approach is to, cut out and replace the stained sections; treat the rest of the sub-floor with a cleaner specially formulated for pet urine; and replace the pad and carpet. If the sub-floor is particle board I would ALWAYS replace the damaged area.

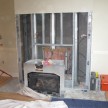
If the sub-floor is plywood or solid boards, an alternative is to seal the odor into the wood with KILZ Complete or Zinsser B-I-N, mildew-resistant, oil-based primer.

Before you can paint anything, the sub-floor MUST be completely dry.  The best thing is to remove urine soaked wood.  This removes any chances the smell could leach out from the underside or thru the paint. To help dry it out, use a fan to keep air moving over the top of the area to dry it out.

water damage sub floor rot

How to Remove Pet Urine Smells From a Sub-floor – Steps

The following 8-steps are useful for removing pet urine odor from wood sub-floor

  1. Remove carpeting, padding and other flooring around the areas you suspect urine has leaked into the sub-floor.
  2. Apply an enzymatic pet cleaner (like Nature’s Miracle) to the soiled areas and allow them to dry thoroughly for 24 to 48 hours. These cleaners contain special enzymes that convert organic waste materials such as urine and feces to carbon dioxide and water. They continue to eliminate the odors and waste materials even when dry. When you apply the enzymatic cleaners, do not over-saturate the wood to prevent it from warping. Repeat this step if odors remain after initial application.
  3. Paint the stained sub-floor areas with KILZ Complete or Zinsser B-I-N, mildew-resistant, oil-based primers and sealants that block odors and stains.
  4. Allow the paint to completely dry. Repeat the application after one hour.
  5. If any stains bleed through after the second application, re-apply and let dry until you completely cover the stains. Follow manufacturer directions for drying and ventilation.
  6. Used a fan to help dry the floor. A second fan in the window can assist with ventilation.
  7. Allow to completely dry.
  8. Replace the flooring with new carpet, wood or tile.

Install A Pet Door

Sometimes the problems is that the pets are left indoors too long. Installing a pet door, is a great feature for pet owners who work long hours and want their pets to have free access to a fenced in yard or other location. A pet door eliminates the need to rely on neighbors or friends to let your pet out.

If you enjoyed this post, make sure you subscribe to my RSS feed!

More on Remodeling

  • Warmup Electric Radiant Heat
  • RYOBI 21-inch 40-Volt Self-Propelled Mower
  • Router Maintenance
  • Master Mechanic 18 Volt Drill-Driver
  • Renew Wire Shelf Covers

About the author

Robert Robillard

Carpenter / Remodeler / Editor

Rob Robillard is “The Concord Carpenter” Rob is a builder, general contractor, carpenter, woodworker, and editor of Concord Carpenter and ToolBoxBuzz As a General Contractor and carpenter, Rob owns and operates Concord Carpenter LLC. A full-service remodeling and construction company. Rob is a recognized leader in home building best practices and a source for how-to information for building professionals. On this website, Rob covers all aspects of home construction, building science, home improvement, woodworking, remodeling, and some of the best product and tool reviews. Rob is in charge of our Tool and Product Review series - Concord Carpenter Videos where we post all of our tool reviews and video tutorials. Rob approaches remodeling and building construction with a pragmatic and problem-solving approach. He enjoys using his knowledge and experience to help and educate building professionals as well as DIYers on best practices in the construction and remodeling industry. He's a strong advocate for "raising the bar" in the construction trades and promoting the trades to youth. #BeAMentor #Green2Great Craftsmanship, quality, and pride guide his journey on this channel The Concord Carpenter's motto: "Well done is better than well said!" : Read more about Rob

Robert Robillard Carpentry @robertrobillard Facebook

All posts by Robert »

Recommended articles

Washing Machine Odor

Locating A Plumbing Odor

Dead Animal Smell

How To Remove A Tile Floor and Underlayment

Gas Fireplace Retrofit

Removing A Gas Fireplace

Not what you're looking for?

Search for more articles here. Enter keywords like roof leak, bookcase, deck, etc to find your topic.

  • Topics

    • ACC Gear
    • Bathrooms
    • Contractor Advice
    • Dealing With Dust
    • Decks / Porches
    • Design
    • Electrical
    • Energy Saving
    • Exterior Repairs
    • Finish Carpentry
    • Home / Personal Safety
    • How To
    • Interior Repairs
    • Insulation
    • Kitchens
    • Landscape
    • Plumbing
    • Remodeling
    • Roofing
    • Reviews
    • Tools PLUS!
    • The ACC Team
    • Weekend warrior
    • Workshop tips
    • Tools PLUS!
    • Home Maintenance
  • Connect

    RSS feedTwitter Facebook LinkedIn YouTube
  • concordcarpenter

    Building and renovating custom homes in Boston’s metro-west area. Product and tool reviewer at ToolBoxBuzz.com.

    Concord Carpenter
    Who doesn’t wish they had a 3rd hand? Check out Who doesn’t wish they had a 3rd hand?  Check out this 90-degree clamping jig

#Workshop #WorkshopTip #ShopTip #Woodworking #Carpentry #Clamping #ClampingJig
    Cutting perfect circles on a bandsaw #Circlejig # Cutting perfect circles on a bandsaw  #Circlejig #CircleCutting #Workshop #ShopJig##
    Ryobi 40 V HP brushless auger with 8 inch auger bi Ryobi 40 V HP brushless auger with 8 inch auger bit. Comes with a 4.0 8H battery and charger

Runtime is 30 holes on one charge, Ryobi claims that it is more powerful than a 52 cc gas auger. #auger #cordlessauger #postholes
    Custom built-in. Complete video and article is o Custom built-in. 

Complete video and article is on concordcarpenter.com. 

#CustomBookcase #CustomBuilt-in #Built-in #Bookcase #FinishCarpentry #EntertainmentCenter #Cubbies #Cabinets #ConcordCarpenter
    Monson Road, Update:- We covered up the concrete f Monson Road, Update:-
We covered up the concrete footings with natural stone and bluestone taps. Herringbone tile installed. Monday we will start painting and probably hopefully within a week we’ll have the cabinetry.

#ConcordCarpenter #Edition #FinishedCarpentry #Remodel.
    Thanksgiving message from our crew to yours. #Tha Thanksgiving message from our crew to yours.

#ThanksgivingMessage #GivingThanks #Thank you
    Warming Box Update :
——————————

Outside of box: 37° F
Inside box: 72° at

A lot of you were concerned that the small oil pan heating pad that reaches 160° would be too hot for this box. There’s a couple of things going on that seem to be working in my favor.

I will keep checking at different intervals and try to catch the heating pad at hottest point.

Here’s a few cumulative reasons why I think the heating pad reaching 165° does not negatively impact the batteries or interior contents.

1.  The heat pat is on bottom, adhered to a ceramic tile
2. A metal grate  keeps  3/4” air space above pad
3. The size of the Track-saw Packout interior airspace
4. The foil insulation R-value is probably R-3 and less in corners

#PackOut #WarmingBox #Hotbox #BatteryWarmer #CordlessBatteryWarmer #HeatedBox #SiteHeatedBox #AdhesiveWarmWarmer
    Running this experiment: Converted my tracksaw #Pa Running this experiment:
Converted my tracksaw #Packout into a battery | Adhesive warming box.  For the heater I  used an oil pan heater pad attached to a ceramic tile and shared by perforated mending plates.

The 150W/120V oil pan heating pads have a built-in automatic thermal protector that keeps the temperature around 60~70°C. When the temperature reaches 194°f/90°C, this product will automatically power off. When the temperature drops to about 40°C it will start heating again, effectively preventing safety hazards caused by high temperatures. ##batterywarmer #warmingbox #hotbox #adhesivewarmer #toolbatterywarmer
    Load More Follow on Instagram
  • Youtube Channel

  • My Carpentry Website

    A Concord Carpenter, LLC Remodeling
    Robert Robillard Finish Carpentry & Renovations, LLC
    "Well done is better than well said"
  • A Concord Carpenter Gear

    A Concord Carpenter Gear
  • Contact
  • Advertise
  • Disclaimer & Privacy Policy

© Copyright 2019 A Concord Carpenter · All Rights Reserved

This website uses cookies to improve your experience. By clicking on 'Accept' or continuing to use this website, you agree that cookies can be placed. For more information, check out our Disclaimer & Privacy Policy. Accept
Privacy & Cookies Policy

Privacy Overview

This website uses cookies to improve your experience while you navigate through the website. Out of these, the cookies that are categorized as necessary are stored on your browser as they are essential for the working of basic functionalities of the website. We also use third-party cookies that help us analyze and understand how you use this website. These cookies will be stored in your browser only with your consent. You also have the option to opt-out of these cookies. But opting out of some of these cookies may affect your browsing experience.
Necessary
Always Enabled
Necessary cookies are absolutely essential for the website to function properly. This category only includes cookies that ensures basic functionalities and security features of the website. These cookies do not store any personal information.
Non-necessary
Any cookies that may not be particularly necessary for the website to function and is used specifically to collect user personal data via analytics, ads, other embedded contents are termed as non-necessary cookies. It is mandatory to procure user consent prior to running these cookies on your website.
SAVE & ACCEPT
Go to mobile version