Reducing Remodeling Dust

 Image: myco-tek.net
Remodeling Dust
Construction dust can wreak havoc on a home and one’s lungs. It seems that no matter how careful we are that fine remodeling dust seems to find its way deep into the farthest parts of the house.
If you’re planning an extensive, long term remodeling project consider taking steps on reducing remodeling dust and preparing a dust-containment system.
Dust containment falls into two general categories:
- Protecting floors
- Confining dust to the work area
No matter which phase of remodeling you’re in – there’s DUST!
Confining dust to the work area is often where contractors are penny wise and pound foolish. Time spent here is time and money saved later during clean up or worse paying someone else to clean an oriental rug!
Floor Protection
Hardwood floors:
For long term remodels or where heavy foot traffic and construction is expected as well as for protection against falling tools cut sheets of 1/8-in. hardboard to fit the room and duct-tape them together at the seams. Also tape around the perimeter with blue masking tape so grit can’t get underneath the hardboard and scratch the floor. Homosote also works well.
Protecting stairs is tricky because you don’t want to use anything that will cause a slip or trip. Rosin paper is a good choice for wood stairs because you can crease it over the edge of the tread and tape it securely around the entire perimeter. Taping separate sheets to the risers.
Carpeted Stairs:
For carpeted stairs, use a long, narrow drop cloth (called a runner). Secure the runner by driving small nails right through the carpet and into the treads.
On smaller jobs with less traffic anticipated the floor can be covered with Rosin paper, taping the edges and seams. Rosin paper does not protect the floors from impact but will prevent scratches and protect from spills.
There are also commercially available films that can be applied to either carpet or hardwood or tile flooring.
Carpeting :
Reducing remodeling dust on carpets can be tricky. One way to approach carpeting that will be saved is to cover the carpet with 6 mil plastic and hardboard and homosote.
Elevators:
Most buildings that have nice elevators also have service elevators. If not, the building management will often wrap the elevator with moving blankets or other protections for you. This requires advance notice and planning.
Doorway Trim & Doors:
Areas that will have a lot of foot traffic and activity like lugging big equipment through may need protection measures.
Use cardboard to wrap door jambs and cover wall corners, or even shield large sections of wall along main pathways and baseboards. To make sure the cardboard stays in place, crease it thoroughly to fit corners and don’t be stingy with the masking tape.
Doors can take a beating during remodeling too. The best protection is to remove them from the work zone. If removing a door isn’t practical, clad it with cardboard.
Dust Containment for extended projects
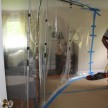
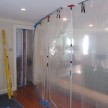
Doorways:
Before the project starts, always designate one doorway as the entry and exit to the work area. To seal up the other doorways, consider creating a zippered door. Use 6-mil poly, a $ 20.00 Protective Products zipper and blue masking tape.
Blue tape – double wide the walls surrounding the doorway. Then Duct tape the 6 mil plastic to the blue tape. This blue tape protects the wall surface / paint from peeling when the tape is removed.
Once the plastic is installed tape the zipper to the plastic and as your open the zipper cut the plastic between the zippers with a utility knife – VIOLA – your done!
 Image: RD.com
Depressurize the Room:
 Image: RD.com
HVAC System:
Cover any registers in the work area with plastic or Kraft paper and tape. Consider advising the homeowners to replace filters weekly during the project.
Cut & Sand Outside:
Once the job is under way, the main source of dust comes from cutting wood. Cut outside whenever possible, or attach a vacuum to the tools inside. A shop vac can solve most of these issues. Some Vacs come with a switch that power on the vacuum when the tool powers on and keeps the vacuum on for a few seconds after the tool is shut off – to clear the hose of dust.

 Sweep and Vacuum:


Sweep several times a day and at the end of the day. Be thorough.
Hire a Professional Cleaning Service:
Factor in a few hours of cleaning to be done at the end of the project. Hire someone to come in and do that for you. It’s great for customer service and perceived value!