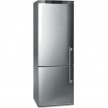
How to Maintain Your Refrigerator

Simple maintenance and cleaning procedures can greatly extend the life and efficiency of your refrigerator.
Tools Needed:
- Flashlight
- Vacuum with nozzle attachment
- Coil cleaning brush
- Damp cloths or paper towels
- Screwdriver (depends on model)
- Something to protect the floor, such as a cardboard, furniture sliders or 1/4-inch luan plywood
Condenser Coil Cleaning Tips:
Roll out the refrigerator:
Place your floor protestant in front of the refrigerator and rill the fridge onto it. If your kitchen has hardwood floors doing this step can prevent the fridge wheels from marring or leaving an impression in the wood. I’ve seen this happen – protect the floor.
Unplug the refrigerator during cleaning and be careful moving and working around any copper water lines.
Access the Condenser Coil.
Dusty condenser coils cause a refrigerator to work harder; which translates into bigger energy bills and a shorter life expectancy for the fridge – not good.
Most modern refrigerators have condenser coils at the base of the appliance, either in the back concealed behind a cover (often cardboard) or in front behind a kick plate.
Some fridge models have a cover that either snaps off or unscrews to access the coils. Most models can be accessed from the lower front by removing a plastic grill.
Note: Some refrigerators, usually older ones, have the coils mounted on the outside back of the refrigerator. If that’s the case for your model, the coils will be easily accessible when you move the refrigerator out from the wall.

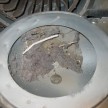
Cleaning the Coils
Use a vacuum to clean out the loose debris and hair. After vacuuming use a coil brush attachment to gently clean the coils while running the vacuum to capture the dust that the brush releases into the air. Work the brush in and around the coils to loosen hardened dust and debris.
The coil brush attachment can be purchased for $7.00 at a local hardware store.
I recommend cleaning your coils at least once a year and more frequently if you have pets.

To access coils located underneath, remove the grill at the bottom front of the fridge. To access coils located behind, pull the unit out from the wall.

Clean the drain hole and drip pan
Most refrigerators rely on a drain hole and drip pan to remove condensation, so it’s important that these function properly.
Remove any food particles and mineral deposits from the drain hole according to the instructions in your owner’s manual. Then, scrub out and clean the drain pan.
Clean the Condenser Fan
Locate the fan near the coils and compressor and clean and debris and dust from it as well. Wipe off the fan blades with a damp rag or paper towel.
Check and Clean the Gaskets
The gaskets on the refrigerator and freezer doors are designed to seal the cool air in and to keep the warm air out and are super important to the efficiency of your fridge. So, it’s important to make sure that seal is as strong as it should be. Look over the gaskets to see if there are a spots that are cracked or otherwise damaged. Then, shut a dollar bill in the door, and see if you can pull it out easily (the seal should create resistance). If either test turns up problems, consider replacing the gasket. Clean the gasket with an all-purpose cleaner, and wipe dry.

Change the Water Filter
Does your refrigerator have an ice maker or a water dispenser? If so, it probably also has a water filter that needs to be changed regularly. Replace your filter every six months or as recommended by the owner’s manual. Most manufacturers are online. Once you order from them they will send you a reminder notice every six months or once a year.

Check for the refrigerator for level
If your refrigerator isn’t level the doors may not close on their own or may not seal as tightly as they’re supposed to – yet another opportunity for energy loss. Check to see if your fridge is level, by placing a carpenter’s level on top of your unit. Then, if necessary, adjust the feet (with a wrench) until you achieve level.