How To Create Three Piece Cornice Molding

By Robert Robillard on Design

Image: worthingtonmillwork.com

Achieve A Beautiful Finish with 3-Piece Cornice Moldings

Many years ago I installed a 3 piece molding with another carpenter at 300 Main Street. It was a lot of fun!!

Lately I have seen more and more folks opting for this look.  It typically demands a high ceiling but the finished result is spectacular.

Cornice Molding

By following this plan you can create the look of a large, expensive cornice moulding without breaking the bank

Dressing up a foyer, dining or living room doesn’t have to mean spending a lot of money.  This simple home decorating tip will give you a formal and elaborate finished look without breaking the bank.

How To Create Three Piece Cornice Molding

  1.  Start with an astragal molding on the ceiling about 8″-12″* in from the wall.
  2. Add a crown molding or a cove molding in its usual location.
  3. Now add a panel molding about 6″-8″* under the crown or cove.
  4. Finally, paint the 3 piece moldings and the wall and ceiling between all the same color – typically the trim color of the room.

This process has been used for hundreds of years, starting when most cornices were made from plaster.   Many mill shops have replicated many of these moldings over the years and can help you create a cornice to fit any style for your project.How To Create Three Piece Cornice Molding

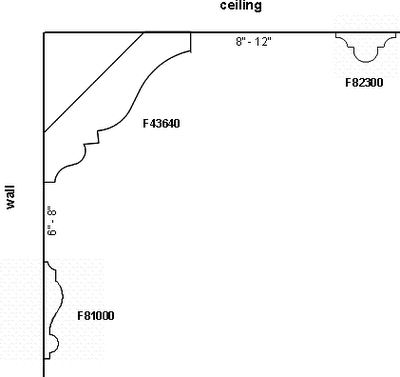
*The spacing and size of the moldings you should use depends on the size of room and the ceiling height. We can make recommendations based on your dimensions.

Moldings shown are from Forester Mill work in Littleton, Massachusetts.

If you enjoyed this post, make sure you subscribe to my RSS feed!

About the author

Robert Robillard

Carpenter / Remodeler / Editor

Rob Robillard is “The Concord Carpenter” Rob is a builder, general contractor, carpenter, woodworker, and editor of Concord Carpenter and ToolBoxBuzz As a General Contractor and carpenter, Rob owns and operates Concord Carpenter LLC. A full-service remodeling and construction company. Rob is a recognized leader in home building best practices and a source for how-to information for building professionals. On this website, Rob covers all aspects of home construction, building science, home improvement, woodworking, remodeling, and some of the best product and tool reviews. Rob is in charge of our Tool and Product Review series - Concord Carpenter Videos where we post all of our tool reviews and video tutorials. Rob approaches remodeling and building construction with a pragmatic and problem-solving approach. He enjoys using his knowledge and experience to help and educate building professionals as well as DIYers on best practices in the construction and remodeling industry. He's a strong advocate for "raising the bar" in the construction trades and promoting the trades to youth. #BeAMentor #Green2Great Craftsmanship, quality, and pride guide his journey on this channel The Concord Carpenter's motto: "Well done is better than well said!" : Read more about Rob

All posts by Robert »

Not what you're looking for?

Search for more articles here. Enter keywords like roof leak, bookcase, deck, etc to find your topic.

© Copyright 2019 A Concord Carpenter · All Rights Reserved