How To Build a Wine Cellar: 5 Tips
Building a Wine Cellar
We recently set out to build a cellar for a client in which we faced a unique set of historic challenges. Here’s our top tips for building out the space.
Before we get into our top tips, the house we were building a wine cellar for is a 17th century colonial in an historic local town. Its basement is brick over old fieldstone, mixed with a new poured concrete slab, and old wide plank floor boards. The client wanted to build something that didn’t stand out but matched the house. This presented a fun challenge.
For that, we used wood we had leftover from a prior job that was sourced from Parlee Lumber of Littleton, Mass. While it was operating, Parlee had the pride of being the oldest continually running sawmill in the United States. Sadly it closed, but we had a few wide plank boards left, on the face of which you can see sawtooth marks from the mill. This is the sort of thing that’s impossible to replicate, and it looks perfect in this particular home.
For every client or person it will be different. There is a trend for modern glass enclosed wine cellars, but these introduce more challenges in regards cooling loads, and so we opted for a space with built-out walls.
Storing Wine
Ask people about the relationship between wine and temperature and most will say white is best served cold. While that’s right, there is another question that precedes the question of how best to drink wine — and that’s how best to store wine.
When it comes to wine storage, the answer for white and red and everything in between is the same: a stable cold is the best and, really, only solution. But rarely do people have basements as deep and therefore as cold as those from European wineries, so we build wine cellars to mimic those conditions: stable, cold, dark, and fairly humid.
Wine Cellar Construction | 5 Tips
1. When it comes to walls, go thick.
The rule of thumb with wine cellar walls is that you want to build to at least an R-21 wall standard. Translated into thickness, this means you’re aiming for a 2×6 construction.
But why is that?
You’re working back from a goal temperature of around 55 degrees Fahrenheit, or 12-13 degrees centigrade. A few degrees warmer or colder is fine, but here’s the thing: you want for it to be as stable as possible, maintaining as consistent a temperature as possible. If to build thinner walls, this is going to be a challenge.
For ceiling, you’re aiming for even higher of R-30 or more. And remember: these are minimum recommendations. If you can exceed these numbers, even better.
What’s worse? A little bit more cost up front and a little bit less room inside, or wine that is degraded over time by fluctuating temperatures?
It’s imoprtant to note that a vapor barrier is REQUIRED if a climate control cooling unit is installed to keep the cellar at the correct temperature. We recommend using 66 mil. plastic sheeting, installed to the warm side of the cellar walls.
2. Mind the cracks.
With wine cellars, you’re aiming to maintain both temperature and humidity. Why the latter?
If you think about a cork, it essentially maintains an equilibrium between inside and outside. The lower the humidity in the room, the more easily the cork will dry out – and, with it, the more wine it will allow to evaporate out of the bottle. Worse, bottles can leak. You want to aim for 50-75% humidity. Any more and you’ll invite rot, any less and you’ll invite cork damage.
Given this, creating an airtight vapor barrier is important. These should be considered in three primary areas:
- When it comes to your walls and ceilings, you should be sure to add a 6mm plastic sheeting adhered to the walls with construction adhesive. Yes, this is a pain and can be messy. And yes, it is worth it.
Note: As an alternative, you can use closed cell spray foam, but you need to be vigilant about sealing all areas with it. As a backup, 6mm plastic, while redundant, can still be useful.
- When it comes to your door, be sure you seal not only around the door but use a small foam door sealant. These come in rolls and are easily installed. If you select one that makes your door stick ajar by ⅛ or less, forcing you to apply pressure to close the door, you know you’ll have a good seal.
- Finally, you want to make sure you seal around where the cooling unit pierces the walls of the cellar. This is a common mistake: again, use foam and or caulking to ensure that no air escapes. For our use, this was a through wall unit. We sealed it from both the front and back side to ensure no air leakage.
3. Choose the right cooling unit for your space. | N’Finity Cooling Unit
Choosing how you’re going to cool your wine cellar is a critical decision – and, for many, it can seem really complicated with all of the options. But at its simplest, there is the option for a through wall unit – which, in many ways, is also the best.
Why the best? Wine cooling units are like appliances: many are well-built and will last years – but none will last truly forever. When it comes time to replace a unit, replacing a through wall unit can be as simple as buying a new one as simply swapping the old unit out for the new one using the same hole cut through the wall. Our client wanted this optionality, and so we opted for a through wall unit.
When purchasing a unit, you need to make sure you buy one that is properly sized to your space. In many cases, you can do a cubic foot estimate of the cellar, but it can be helpful to consult with the manufacturer who can do calculations of your required cooling load based upon not only room size but wall thickness, materials, insulation, etc.
N’Finity Cooling Unit
For our purposes, we went with an N’Finity 3000 cooling unit. This brand is the brand name of coolings made by Wine Enthusiast, the popular magazine that also has a custom cellars business. It offers similar functionality and warranty as other units, but at a slightly lower price point.
Upon opening the packaging, we found the unit to be well built. The box also contained packing materials from another, higher priced unit, suggesting a shared facility and high quality manufacturing standards. The packaging also contained everything you would need and more – the box contained extra supplies in case you messed something up in the install. A small generosity, but a welcome one.
With a few weeks of run time under its belt, the unit is cooling the space sufficiently without too much noise and has been draining properly. The only thing we encountered was needing to lower the set point by 2 degrees to achieve the desired temperature of 55 degrees — a common initial set up practice.
The unit looks great, is quiet, and has a simple user interface. All in all, we’re very happy with the N’Finity 3000 cooling unit to date.
4. Build wine racks for different sized wine bottles
You’re not just going to drink one kind of wine, are you? Then why build only one sized rack?
Bottles come in a variety of different shapes and sizes. A lot of shapes, in fact. From splits to magnums, you’ll want to create racks that will hold the wine bottles you want to store.
There’s no one rule here. For this wine cellar, we built the racks mostly to suit Bordeaux, Burgundy, Turley and the famous thin Riesling bottles. These comprise approximately 440 slots. There are another 40 slots for magnums – because, wine is fun and why the hell not?
Conclusion: Overbuild your wine cellar and enjoy it for decades to come
If you’re building a wine cellar – for a client or for yourself — you will want to enjoy it for years if not decades to come.
Projects that skimp on materials try to shrimp on quality — but if there’s a lesson implicitly to wine aging it’s that there is no shortcut to quality. If you want to enjoy tour wine cellar for the long term, build the walls thick, seal it tight, choose the right cooling unit, and build the racks to maximize your enjoyment, whatever that is.
- N’Finity wine cooling unit installed. Be sure to seal tightly around the cooling unit.
- Enjoy for decades to come. Cheers!
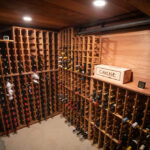
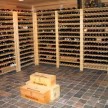
- A full cellar – a beautiful sight.
- Wine racks completed.
- Detail of the wall build, with the lower shelf built of 2×6 to support the weight of the cooling unit.
- Framing in the through wall N’Finity wine cellar cooling unit.
- Old school door locking mechanism.
- Finished exterior with sawtooth marks on beams.
- Vapor barriers are a must. 6mm plastic shown on left is a common best practice.
- Framing out the 2×6 walls.
- The wine cellar space before construction.


