How To Build A Stone Cairn With Rebar


Build a Safe and Sturdy Stone Cairn for Your Garden
If you’re looking for a way to add a natural, sculptural focal point to your garden or backyard, a stone cairn is a beautiful and timeless choice. But unlike the stacked stones you see on hiking trails, a permanent garden cairn needs to be secure—especially if children or pets are nearby. In this article, I’ll walk you through how I built a 3-foot tall stone cairn behind my pool using rebar to safely pin the stones together.

Step 1: Choosing and Preparing the Rocks
I had a pile of leftover rocks on my property from when the coping stonework was done around my pool. Because these stones matched nicely in color and texture, I decided that would make them ideal for a stone cairn garden feature.
I sorted through the pile and selected rocks that gradually descended in size—from large base rocks to smaller ones ending at the top. I wanted the finished cairn to be about 3 feet tall, tall enough to stand out behind lower-growing flowers along the pools edge.
While sorting, I found a unique heart-shaped rock that I knew would make the perfect topper.

Step 2: Drilling the Rocks
To make the cairn safe and secure, I decided to run a vertical length of ½-inch rebar through the center of the stack. This would keep the stones aligned and prevent tipping.
Using an SDS rotary hammer drill, I started with a pilot hole through each rock, first with a 3/8” masonry bit and then following with a ⅝-inch masonry bit to widen the hole. The larger hole gave me enough clearance to slide the rocks down over the ½-inch rebar during assembly.
Tip: Wear eye and ear protection when using an SDS hammer drill.

Step 3: Leveling and Building the Base
With all the rocks pre-drilled, I moved them to the site behind the pool and began work on the cairn.
The first step was to set a solid, level foundation. I placed the largest base rock where I wanted the cairn, leveled it, and hammered the rebar vertically into the ground through the hole using a 3-pound sledge. I used a small torpedo level to keep the rebar plumb throughout the build.

Step 4: Stacking the Stones
One by one, I slid the drilled rocks down over the rebar, adjusting their orientation for the most pleasing look and best symmetry. This part takes some patience—there’s an art to finding which rocks fit best together, both visually and structurally. I went back to the rock pile many times swapping out stones.

In some cases, I used the 3 lb. hammer to chip off a bit of excess stone or to create a flatter surface so the rocks would sit more securely. The goal is a natural yet stable appearance.

Step 5: Setting the Top Rock
When I reached the top of the stack, I drilled a 3-inch-deep hole into the bottom of the heart-shaped capstone. I measured and cut a piece of rebar using a grinder with a metal cut-off disc, ensuring it fit snugly into the hole and allowed the heart rock to sit cleanly on top—securing it as the cairn’s final feature.
Note: I went back and forth on whether to use ½” rebar (which I already had on hand) or a galvanized or stainless steel threaded rod. Using threaded rod would have required drilling all the way through the heart stone and securing it with a washer and nut. While that might have offered a tighter and possibly safer connection, I felt the visible rod protruding from the top would detract from the aesthetics. In the end, I chose the rebar for its cleaner look. I can always epoxy the heart stone to the rebar later if needed.

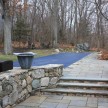
The Finished Look
The result is a visually striking, 3-foot-tall stone cairn that serves as both a garden sculpture and a tribute to the beautiful materials already on-site. Thanks to the rebar running through the core, it’s safely anchored—no risk of it toppling over onto curious kids or pets.
Whether you’re building a cairn as a decorative feature or a symbolic marker, this approach combines craftsmanship with safety, giving your garden a durable and meaningful new addition