Fail Safe Footer System
 Fail-Safe Form Footer System
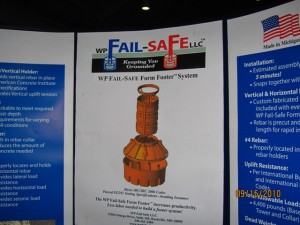
When at the 2010 Remodeling Show in Baltimore I came across a booth that had a pretty cool footing system called the Fail-Safe Form Footer. The Fail-Safe Form Footer was invented to reduce the risk of footer failure in the building and deck industry.
Designed to conform to the I.R.C. 2006 Building Codes for Piers the Fail-Safe Form Footer is the of the only footer systems on the market that conforms to the new code requirements regarding Vertical Rebar for Uplift, nor Horizontal Rebar for Lateral Load. Other options available are products that require alot of time and labor with inconsistent results.
The Fail-Safe Form Footer is a complete system for building piers and footings. The self-aligning system is designed to snap / lock together, is stackable to a depth of 54″ and is easy adapted to accept rebar. The base is 25” diameter and narrows to 10” high at the top.
The Fail-Safe products are bright orange plastic for easy inspection even in deep excavations.
The Fail-Safe Form Footer looks like a convenient, durable, and easy to use system and I am hoping to use it on a project sometime soon. I’ve said this before time saved is money earned and this innovative product promises to save time with superior results.
Specifications:
- Easy snap together assembly.
- Stack-able for frost depth up to 54”.
Self aligning snap lock mechanism. - Integrated wire tie holes for added protection.
- Factory Tolerances create a reliable product that will perform consistently in all types of construction conditions.
- Integrated horizontal rebar holders that will secure (6) pieces of rebar securely in place every time.
- Creates lateral load.
- Creates horizontal load.
- Creates seismic load.
- Diameter Height Bags of Redimix Weight (Pounds) Area (SF) Total Allowable Load (Pounds) # Rebar and Size
25” 10” 6 360 3.41 5,111 (6)#4 Rebar
Suggested uses for the Fail-Safe Form Footer:
- Decks
- Retaining walls
- Bridges
- Post and beam foundations
- Temporary fencing
- Flag pole base
- Mail boxes
- Commercial and residential Carports
- Observatories
- Gas station canopies
- Pavilions
- Scaffolding
- Mobile home foundations
- Additions
- Communication antennas
- Playground, equipment
- Fencing
- Greenhouses
- Pergolas
- Porches
- Large art projects i.e. sculptures and statues
- Billboards
- Patio and sun rooms
- Canopies
- Basketball hoops
- Portable office trailers
- Portable school classrooms
Installation Process for the Fail-Safe Form Footer System:
- Layout project to determine footer locations.
- Excavate/dig footer holes.
- Call for footing inspection per your local code requirements.
- Place gravel at bottom of excavated footer hole as required by governing building code. This will assist in the final leveling process and drainage.
- Layout parts for assembly of the Fail-Safe Form Footer.
- Place the horizontal rebar into base section of the Fail-Safe Form Footer.
- Insert the vertical rebar into rebar guides in the reducer.
- Place the reducer on the base footer and attach by applying downward pressure to the outer edge of the reducer. Make sure that all snap lock mechanisms are tightly engaged.
- Place tower over rebar and attach the tower to reducer by applying downward pressure to the outer edge.
- Slide collar over rebar and attach to tower by applying downward pressure to the outer edge. Snap rebar into collar.
- .If more than one tower is needed to reach grade you can just snap one tower to another and then snap the collar to the top. Vertical rebar should be flush with the rebar snap-lock mechanism in the top collar. ***Ensure rebar does not extend past the top of the snap-lock mechanism.
- Lower assembled tower system(s) into excavated footer hole(s).
- Level the form as required by code on to the previously placed gravel.
- Mix concrete per manufacturer’s specifications and local code requirements.
- Before filling with concrete back fill around the Fail-Safe Form Footer at least to the middle of the first tower.
- A reducer can be used as a funnel at the top of the Fail-Safe Form Footer system to aid in the placing of the concrete.
- Fill base and reducer with concrete and rod 5-6 times.
- Fill the rest of system with concrete and rod 5-6 times to ensure proper concrete placement.
- Level and smooth concrete at the top of the Fail-Safe Form Footer .
- Install post connectors per your approved building plans.
RELATED POSTS:
Is Your Deck Safe?
Cutting A Door Through A Concrete Wall


