Deck Maintenance

")
It’s Never too Late to Clean Up the Deck
By Joe “the Pro” Sainz at www.BeThePro.com
Early summer is a great time of year. The weather’s good, it’s time to grill a few burgers and you can do a few things around the house, including cleaning up the deck.
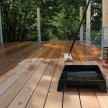
For much of the U.S., the deck is where the family lives in the good weather months. But during the bad weather months it gets a real beat-down from wind, rain, heating and cooling, and moisture that seeps into any exposed crevice.
Deck Maintenance Where to Start
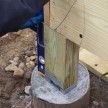
When you’re ready to reclaim your deck from the elements, look at the support structure first – floor joists, beams and support posts and footers. Start at the bottom, looking for any settling or major cracking of the footers that the support columns, and ensure that the post is firmly attached. Continue up the structure, looking for rot, cracks or loose joints. Look for any temporary repairs that may have been done before to ensure that the structure is intact and in good shape. Now is the time to address that temporary fix with a permanent solution.
Search out rotten and cracked boards; get down on hands and knees and feel around for any spongy areas. And then assess the fasteners – if nails are popped up, consider a new fastener like a wood screw or a ring shank nail. Replace anything that’s seriously corroded.
If the finish is looking old, power wash the surface to remove debris and chipped paint. Let it dry thoroughly before any next steps. Sand down any rough areas.
Look for temporary repairs top side – evaluate whether the deck needs to be resealed. Moisture should bead on the surface on a well-sealed deck. Address chipped paint or faded stain before sealing.
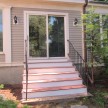
Stairs
Stairs are often a sticking point in deck repairs because they’re exposed to more abuse than the rest of the structure. If any part of the stairs appears damaged (deep cracks and splits, missing wood), first make reference marks for the location of the existing framing, then take out all the fasteners and disassemble the stairs down to the damaged portion. If the wood’s particularly good or well treated, you can consider reuse, but in many cases it’s better to start with new treated wood. Be sure to block off access to the stairs on both ends, both for canine and human.
You can use the old stringer as a template for cutting the replacement. Screw or clamp it down to a new board and trace; you should get an accurate reproduction. In cutting out the stringer, best practice is not overcut the corners with the circular saw, finish the cut with a jig saw or a hand saw.
You want to maximize the throat depth of the stair stringer (at least five inches) – that’s the length from the bottom of the bottom edge of the stringer to the closest portion of the stair cut. Reassemble the stair with new fasteners, using galvanized screws. Use 2-1/2” to 3” screws for tread and 1-¾” to 2” for risers to the stringer (if applicable). Also, use 3” to 4” screws and galvanized staircase hangers to attach the stairs to the rest of the deck.
Deck Maintenance The Final Steps
If the deck isn’t free standing, check out the flashing along the upper edge of the intersections with the house. Flashing should seal out water from running between the deck and the house, by starting under the siding and bending out past the deck’s framing. Sealant should be present along the bottom of the siding where it is intersecting with the flashing. If there’s no sealant or the sealant used is deteriorating, consider using silicone sealant to replace or augment what’s there.
The deck is where it’s at during the warm months of the year. Ensure it’s ready for action by ensuring that stairs, floor boards and supports are in good shape. Just a little TLC on the deck means great fun and good times for years to come in a space that’s not only beautiful, but safe.