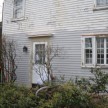
Copper Window Roofs


Built Out Windows Receive Copper Roofs
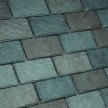
Copper Roofs
Copper has been used as a roofing material for centuries and is viewed as having along life span with a standard of quality.
Like many folks, I have always enjoyed the verdigris patina that develops over time on copper.
Copper sheets are sold by weight with common designations of 20 oz. or 16 oz. the weight refers to the approximate weight of 1 sq. ft. of sheet copper. The lighter of the two is most commonly used in residential work; the heavier 20 oz. is seen in historic-restoration work or on commercial projects.
Preparing To Add Copper:
For this project we stripped off the asphalt roofing and removed the 1/2 plywood sheathing below it.
Because we were adding crown molding to the sides and front edge of this window we needed to raise the structure to allow room for the molding. doing this also had the added benefit of allowing us to add additional insulation and foam any air leaks.
After raising the height with framing lumber we added the crown molding and then topped this off with a new layer of 1/2 plywood.
The plywood was then covered the entire roof with a membrane called WeatherLock which is made for metal roofs.
To do a project like this you will need a metal bending brake.
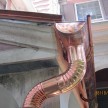
Adding A Flat Seam Copper Roof
A typical flat seam copper roof has tabs and clipped corners to create and interlocking joint. Our small roof only had interlocking seams at the three edges.
Because it was such a small panel I knew that one piece would suffice. Any larger and I would have had to do this in two pieces to accommodate movement.
I bought preformed drop edge and cut and installed it with copper nails in oval slots. [allows for some movement]
When installing the drip edge, I cut the fascia side an inch or so long and taper it slightly to form a tab. I then bent in the tab at the corner to overlap the joining joint and cover any gaps.
Drip-edge joints were finished with a hand-crimping tool and then a copper rivet hold the two overlapping joints together. I also used the hand-crimping tool to make the outer edges tighter.
Bending The Copper:
First order of business was to measure and cut my copper roof panel.
I used an awl to mark my copper and made my panel so it would bend up the side wall 4-6 inches.
All three sides of the outer edges were left 1 inch longer to bend over the drip edge.
Once I had my panel dry fitted properly I then cut the corners and bent the three edges slightly more than 90 degrees. I secured and finished these edges on the drip cap with the hand-crimping tool
Finishing the Window
I then overlapped my Tyvek house wrap over the copper on the side wall and taped everything off with 3M flashing tape. Clapboards then were filled back in.