Anderson A-Series Window Replacement

 Window Replacement Using Anderson A Series

On this recent project we were hired to replace four wood casement windows that had rotted. These windows were fifteen years old and high quality when bought.
Water infiltration is a major issue with homeowners. I get complaints each week about water that leaks in and around windows. Flashing’s are transition materials that capture water and redirect it safely back keeping it outside the building.
There are three reasons that contributed to the windows rotting:
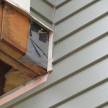
1. Location:
These windows are located under a small roof overhang with no gutters. Plus two roofs meet on the left side and water from both roofs drain off the copper valley. [left in photo]
The rubber roof below the windows is very close which means in the winter these window sit in snow and lastly rain or melting snow draining off the roof hits the rubber roof and splashes up onto the windows.
2. Window Style And Material:
The windows are made from wood which under certain conditions will eventually rot. The window style was an Casement style. This meant that the window hinges were on the side and opened like a book swinging open. During rainstorms when the windows were left open the interior jamb sill would get wet and water eventually found its way through seams and into the house framing.

3. Improper Or Lack Of Flashing:
Fifteen to twenty years ago we did not have the super flexible rubber flashing that is available today. Today we install rubber flashing or a sill protector to protect the framing and drain the water outside of the building.
To address these issues we ordered vinyl clad, double insulated, maintenance free exterior, Awning windows and pvc trim and sill. The interior of the windows is wood with applied muntins glued to the glass.
We chose an Awning window because it open from the bottom [hinged on top] This will prevent rain from getting into the building if the window was left open in a rainstorm.
Below is the steps we took and what we found after removing the old windows:
1. Remove the interior trim.
2. Remove the exterior trim
3. Remove the windows and insulation.
4. Inspect the framing for damage;
On the window under the roof valley we found the 1/2″ plywood sheathing and several 2×4 vertical and horizontal studs rotted. The insulation was also wet. We carefully removed the rot taking precautions not to disturb the rubber roofing membrane that overlapped the wall from below.
We were able to cut out the rotted framing and not disturn the interior plasterboard.
6. Make necessary repairs: 
To make the structural repair we installed new 2×4 vertical studs and sill studs. 1/2 cdx exterior grade plywood was installed to replace the rotted house wall sheathing. We used 2-1/2″ and 3″ screws as well as a cordless framing nailer to avoid damaging the interior wall while attaching the framing and plywood. Using a hammer here may have cause too much vibration and increased the potential for wall damage.
7. Install rubber flashing:
Flashing is super important. Many times I feel that windows aren’t installed correctly is from an unrealistic expectation about the effectiveness of siding in keeping moisture out of the wall cavity. What many window installers don’t realize is that no matter how well siding is installed, moisture finds its way between it and the house wrap.
When moisture ends up on a layer tar paper or housewrap, it runs down the wall. Once that moisture reaches the window,

it easily finds its way into the rough opening through even the tiniest holes or nail holes. Moisture that leaks
into a wall cavity causes mold to grow, rots the wood and attracts carpenter ants.
We used Vycor flexible rubber flashing to flash the window opening. All flashing’s must overlap in order to ensure that water does not infiltrate the building envelope. The first layer of rubber is installed on the window sill and overlaps the rubber roofing. all subsequent layers of rubber overlap the previous.
We also installed overlapping rubber in the house corner directly below the roof valley. It is at this location that a deluge of

water drains during rainstorms.
8. Install the window units:
We purchased Anderson A-Series Awning windows. Like I said earlier an awning window pen from the bottom and will not allow water into the building. these windows are vinyl clad with nailing flanges.
The windows are plumbed in the opening and also spaced evenly so the same size trim board will fit between all four units.
9. I used my Duo-Fast cordless roofing nailer to install these windows. The Duo-Fast nailer easily inserted 1-1/2 galvanized roofing nails into the holes of the nailing flange. The nailer does not damage the flange at all. this is a huge time and energy saver. Plus there is less banging on the house walls with hammer.

10. Install rubber flashing over the nailing flanges:
Vycor rubber flashing was installed over the bottom nailing flanges first, then the vertical flanges, followed by the top flanges. This creates an overlapping coverage described earlier.
11. Install drip cap flashing on top of the windows.
12. Trim out windows:
We used a pvc sill and pvc trim to wrap these windows. Wood crown molding was replaced under the sofit to match the existing molding.
13. Fill in cedar clapboards, using stainless steel nails.
14. Caulk seams and fill nail holes.
We use an acrylic latex caulk. I find that this type of caulking takes paint the best and is flexible in the joints.