Replacing A Rotting Porch

 Everything has a lifespan ~ choose your materials to last:

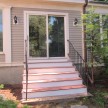
This week we were called to a home to repair a porch. As soon as I saw this porch listing to the right it was obvious that non-pressure treated wood was used.
I broke the news to the homeowner that we would no only bey replacing a rotted porch, but rebuilding it to last three times as long. What many people do not grasp is that it sometimes involves more money trying to repair something that is too far gone, than it is to just tear it out and do it over.
Its tough to place a percentage on when to do this but my rule of thumb is if more than 50-60% of a structure is rotted it usually makes sense to tear it down.
Building a new porch steps:

This is not a difficult home repair and the do-it-yourself home owner can do this with just a little bit of carpentry knowledge.
On this project the wrought iron railings were permanently set into the concrete pad so we needed to work around them. We completely removed the porch and disposed of it.
We were delighted to find that the rot had not found its way back into the house sheathing and structural rim joist.
Flash the house:
To keep the main house from rotting you need to install flashing at the house and porch connection. We always install two layers of flashing; a redundant rubber flashing layer and a pvc, copper or aluminum preformed to fit the ledger board flashing.
The picture on the right shows the Vycor rubber membrane installed on the side wall of the house wall prior to installing a new 2×12 pressure treated ledge board. We run this flashing down below the level of the 2×12 to make sure water drains past the house framing and onto the ground.
Installing the ledger board:
The porch ledger board is what attached the stairs [stair stringers] to the house.
Attaching the ledger board to the house is the most common method of attachment. You should be installing fasteners directly into the house rim joist.
To determine where to install this ledger board you need to know what you will be installing for decking as well as side trim and lattice. Your porch ledger board relates to the location of the concrete pad below.
To determined the height: measure down from the threshold the distance of your skirt or kick board as  well as your decking thickness. In our case we had a six inch skirt trim board under the sliding door and were using a 3/4″ thick mahogany deck board.
We installed our ledger-board 6-3/4″ down from the sliding door threshold and leveled it.
The side to side measurement needed to account 1/2″ pressure treated lattice and 3/4 pvc trim, on both sided.
Once all of those measurements are done I used a cordless Paslode framing nailer with galvanized nails to tack the ledger board level in place and then installed 4′ ledgerLOK framing screws for the final connection.
LedgerLOK fasteners attach deck ledger boards to a wooden house structure with no drilling and are approved in ACQ pressure treated lumber. The built-in washer head eliminates the need for an additional washer, saving time and money. Fasteners should be installed at a minimum of 16″ on center.
LedgerLOK is engineered to attach deck ledger boards to the rim joist with no pre-drilling. It is approved in ACQ pressure treated lumber. The lag screw has a The built-in washer head which eliminates the need for an additional washer.
A drip edge flashing cap is then installed over the ledger to direct water away from the house. This flashing piece would normally be installed under the house wrap but in this situation there was none. Rubber tape will be installed over it before installing the skirt or kick board trim.
Cutting the stringers:
It is important to follow IRC building requirements or in my case Massachusetts building code requirements when laying out the porch stringers.
The maximum riser height is 7-3/4″ and the minimum stair rise is 4″. The minimum stair tread d depth should be no less than 10″. Each and every step should be the same height and width as well as level across.
Stair stringers should be cut from 2×12 pressure treated lumber and spaced no further than 16″ on center. If your installing composite decking you may want to install your stingers at 12″ on center.
Apply the trim before the decking:
I find it alot easier to install the lattice, skirt and riser trim before the decking is applied.
At this point you need to decide whether you will butt or miter your riser trim to your skirt boards. Butting is faster. Mitering has a more “finished carpentry” look but the ends typically open up. I find when using pvc I can get super tight glue join ts easier and faster when butting. I can also sand them flush so the joint typically disappears when painted.
After the lattice is installed I installed the skirt and stair riser trim. I find that installing the riser trim last allows me to “work” the skirt trim to get a perfect joint / fit. Using my cordless Paslode finish nailer I pvc glue and nail one end first and then push or pull the opposite end skirt to get that tight fit.
I then use stainless steel trim nails to nail into the stringers. Stainless steel nails are used on all of the trim.
Once the trim is installed we flash the tops of the stringers with tar paper strips or strips of peel and stick rubber. This protects the horizontal sections of the pressure treated lumber stringers from water and debris that accumulates between the porch deck boards. These horizontal surfaces usually take the biggest beating from the elements.
Preparing the porch decking:
We chose to use 1 x 4 [actual size 3/4″ x 3-1/2″ ] mahogany decking. Prior to installing this decking we back-primed the bottom face and edge of the boards. Once installed it is impossible to do this and back priming helps with the longevity of the decking.
After installing the porch deck boards we will apply a top coat.
Installing the porch decking:

The decking is installed in such a way that it overhangs the trim left and right. I choose a 3/4″ overhang on each side. We were also planing on applying 3/4 Scotia molding under the decking and wrapping the sides of the steps. You need to incorporate this additional molding into your deck board overhang measurement or you’ll end up cutting your board too short.
The front porch decking edge will overhang approximately 1/2″ past the Scotia molding.
We use 2-1/2″ trim head, stainless steel screws to install the decking. I’ve found that nails can loosen their grip over time but screws keep everything super tight.
If you find the need to rip one or more porch deck boards narrower on a table saw try to rip the ones closest to the skirt trim, leaving the full width boards closer to the outside step edge.
When installing the porch deck boards I use my Swanson speed square as a spacer gauge. The square is slightly larger than 1/4″ and I find it allows the perfect deck board spacing to drain water and snow melt it also allows for ventilation under the deck.
Preparation for painting:
Once finished we fill all of the trim nail homes, sand all joints and apply a top coat of porch deck stain. The pressure treated lattice will need a coat of primer and then paint. The pvc can be painted without primer.
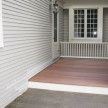
With proper maintenance this porch should last some time!