Deck Building Basics


Basics for Deck Building
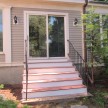
This job was on Partridge Lane in Concord, Massachusetts and was a good opportunity to discuss deck building basics.
Our job was to repair rotted siding on a deck alcove built about 20 years ago. As you can see from the pictures below, the siding runs down behind the decking and below the deck out of view.

Siding Problem
House clapboard siding runs below the decking and can not be replaced with out removing all of the decking.

The original builder was trying to create an air space to keep the deck and siding dry but what he failed to account for is that everything has a lifespan…. and so how do you now replace the siding when it rots?
Below the siding in rotted.
In order to access this rot I needed to remove 40 eight foot pieces of 1×4 mahogany that was in great shape. A waste of many hundreds of dollars in materials.

Properly Flashed Ledger-board
Below is a diagram of a properly flashed ledger board on a deck. My plan was to install a ledger board on each side of this deck and install new decking to run the full length.

Solution:
My approach to repairing this deck was the following:
1. Remove all of the alcove decking.
2. Remove the two 2×8 floor joists on either side of the deck, closest to the house wall.
3. Remove the offending siding.
4. Install two new 2×8 pressure treated joists against the house as “ledger boards.”
5. Install rubber flashing behind as back flashing, under and over the new 2×8 joist.
6. Install copper flashing.
7. Install new decking against the copper flashing
8. Install new clapboards, keeping them 3/4″ off the decking.
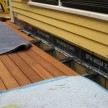
Removing the decking. What a waste!

In the photo below I have cut away a portion of the old 2×8 joist that was spaced 2″ off the house. The new 2×8 pressure treated joist sit directly on top of the ledger beam below.
I will install the 2×8 deck joist tight to the house and be flashed similar to the above diagram.
Click on photo to enlarge.

A close up of the area after I removed the 2×8 joists close to the house. This joist needed to be removed so I could remove the rotted siding and repair flash the wall. Clapboards seen below the decking level will be removed.
The horizontal beam seen at the bottom of the photo is attached to a 2×8 ledger on the house wall. This beam ledger was “underflashed” and protected by a 1″ aluminum drip cap and the overlapping clapboards.

In this photo: I have removed the 2×8 joist, the exposed plywood will have a rubber flashing installed which will run down and over the 2×8 beam ledger below.

This is the only flashing protecting the deck. It was installed way below the decking on the ledger beam.

Old drip cap flashing. This was removed and rubber flashing installed on the wall above and over the ledger beam below.

A new pressure treated 2×8 deck joist was installed over the ledger beam below and tight against the house.
Rubber flashing was then applied to the wall above and over the new joist. Copper flashing will top off the flashing layer.

The most critical concern while installing the ledger board should be how to prevent water from entering the seams into the house. If water can penetrate into the house framing it can result in severe mold, decay, and overall serious and expensive damage
Deck Repair and Flashing
Photo below: New joist with rubber flashing and copper drip cap flashing installed.
We installed tar paper flashing to the deck joists to further protect them. Leaf and pollen type debris collects in between these board gaps and accelerates rot. The tar paper or rubber flashing provides a real nice barrier.

Several layers of rubber and copper now protect this house wall.
Copper is the best quality, best looking and most expensive flashing available. Due to the high risk of galvanic reaction between the copper-impregnated pressure treated wood and any dissimilar metals, fasteners and flashing’s should be stainless steel and copper whenever possible.
The most important point to keep in mind relating to copper-based pressure treated wood and galvanic corrosion is to avoid aluminum flashing’s altogether. Aluminum corrodes quickly in the presence of high copper concentrations.
For this reason it is important to separate the flashing and the pressure treated lumber with a layer of rubber.

House wrap [ Tyvek] then overlaps flashing providing positive drainage to any moisture that gets behind the siding.
Make sure that you overlap and seal any seams with 6-10” of overlap and that you never allow the flashing to become punctured by nail and screw holes.
We did not apply any fasteners to the joists against the house to keep the flashing free from punctures.

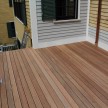
Stainless steel screws were used to apply new 1×4 mahogany decking. We used our speed squares to space the boards 1/4″ which is plenty for drainage.

Getting ready to install new clapboards. We kept the clapboards 3/4″ off the deck to help keep them dry. The copper will patina to a nice dark brown.

Finished.

New alcove decking ~ properly flashed.

Ready for paint and a coat of deck preservative.

~ concord carpenter