Porch Railings

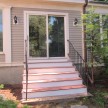
Converting a porch half wall to porch railings
This story starts with a homeowner asking us to repair a half wall on their front porch. After discovering a lot of rot the customer then decided the house and porch would look better with full length posts and porch railings.
Supporting the roof:
Supporting the porch roof in during the process of installing the porch railings was easy since we only had to support two posts at a time. We used two pair of sister-ed 2″ x 6″ -14′ framing boards as supports, running them from the ground to the roof area.
We started on one end of the porch and worked toward the other end, moving our roof supports as we went.
The Post and Railing Process:
1. Support the roof prior to removing the posts
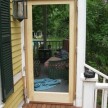
2. Remove one post and the wall between the next post
3. Install a new 4 x 6 pressure treated post from the porch header to the porch foundation rim joist. Plumb and secure the posts to with proper fasteners and metal connectors.
4. Repeat this process for the next post then move the roof supports over.

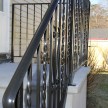
5. Continue with this process of removing one post at a time and replacing it until all the posts are complete. Make every attempt to evenly space the posts so the railings have the same number of balusters and are consistent looking.
6. Replace and repair any trim removed at the porch header and beam between the posts.
7. Make a list of all the lengths of railings needed.
8. Cut and dry fit all of the top and bottom railing rails.
Note – We use an open bottom rail that is comprised of two 1×4 cedar boards that sandwich the balusters. We prefer this method since it prohibits rain and snow from accumulating and allows airflow on both sides of the board.
It’s always a better result if you prime and paint these boards prior to installation.
9. Cut and install all of the balusters on sub rails.
10. Permanently install the bottom rail and then install the sub-rail and balusters.
11. Permanently install the top rail.