How to Make a Crown Molding Jig

How To Cut Crown Molding
Recently I was installing crown molding and was having trouble holding the crown molding which was affecting the accuracy of my cuts.To make this job easier I constructed a crown molding jig for my miter saw. This allowed me to place the crown molding in the jig snug, which allowed me to focus on the cut as opposed to straining to hold the molding still.
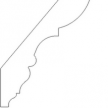
The molding sits in this jig “upside down and backwards” for consistent and accurate cutting.

When working alone with 16 foot crown molding lengths I try to eliminate error as much as possible. For me that means being able to support and hold the crown molding nested on the saw securely and consistently.

Crown Molding Jig – A Third Hand:
Crown molding jigs are designed to the crown molding safely in a “sprung position” so you can cut it the way it hangs on the wall. This means you are cutting the crown molding upside down and backwards on the saw.
This jig holds the crown molding perfectly sprung, the way it would be on the wall except upside down.
Making the Jig:
- Determine the size of jig you want. I made mine 48 inches long.
- I also made two “L-shaped” stands so I could run this jig long off the miter base and support it on a plywood table.
- Note – When cutting in the field I make sure to secure my saw to my work table and then secure the saw to the jig from the rear with screws. I Also secure the two L-shaped legs to the work table and then the jig to them. Everything gets secured. Safety first!
- The jig is basically 3 pieces of materials. The first two boards are cut as wide as the cut depth of your saw – hopefully ifs around 6 inches.
- The third piece of wood is a stop strip to hold the molding in the nesting position.
- Make sure both parts of your crown are flat against the fence and base of your jig.
- You need the molding in place to mark a line and then simply screw this smaller stop in place.
- Now all of your cuts will be made in the same position.

Crown Molding Jig Tips:
- The back fence must support the crown & be low enough for the saw blade to cut all the way through the crown.
- Screw the miter saw down to the bench. Make the jig longer than shown above for longer crown.
- When working with saw horses and a plywood base, screw “L” shaped legs to the workbench and to the jig to hold up the jig.
- I use rollers on the left and right side of the saw to hold up the long molding lengths.
If you enjoyed this post, make sure you subscribe to my RSS feed!