Clopay Garage Makeover

Adding Trim and Siding To ConCrete Block Garage Wall
My recent customer and friend Jon S. asked me to help him give his cinder-block garage a makeover. This is how he described the garage before the makeover:
“We’ve always loved the charm of our classic New England village colonial style; it’s the kind of house a kid would draw. Do you know what we don’t love? Cinder blocks!
On the charm scale, our cinder block garage was a zero – and detracted from the curb appeal (and value) of our beautifully renovated 100-year old home wrapped in classic cedar clapboard.
Could we give this cinder block encrusted garage the proper make-over to match our home?
We weren’t sure it was even possible – or financially viable.  For years we debated the proper fix. Meanwhile, the two original doors were slowly falling apart. One finally stopped working altogether – stuck closed (“sorry kids, that door doesn’t work anymore”), while the other was literally turning to sawdust in our hands each time we open and closed the door.
Aesthetics aside, the garage had become a safety hazard for a family with three kids. Plus, there was the security concern: if the neighborhood wildlife had a free pass in and out of our garage via the failing garage doors (which they did), well… you get the picture.” ~ Jon
Clopay Garage Door Make Over Plan:
Jon told me he wanted his garage to look like his house which was sided with cedar clapboards and wide 1×8 corner board trim. Inspecting his garage it was easy to see that all we had to do is install new garage doors and clapboards nailed to vertical nailing strips.
The front and rear of this garage have cedar clapboard already installed in the upper gable end section of the building nailing strips [similar to a rain screen wall] to the concrete block and nail on the trim and siding – easy as that!
Well . . . not exactly.
The detail that needed to be worked out was the fact that any nailing strip we added to these sides would automatically make our new trim and siding stick out.
What we needed was a transition point to terminate the lower trim and siding and then blend with the old siding.
Shopping For New Garage Doors: 

Selecting a garage door that matched the look and feel of the home seemed overwhelming – so many styles to choose from!
Jon would tell me that he knew he had embarked on a home construction project when he and his wife began eyeing previously-unnoticed details on every neighbor’s home.
Jon related that he and his wife would drive around town, incessantly pointing and calling out, “Hey, look at that garage door!” Cue the kids’ eye rolls.)
Jon told me he found an online tool that was very easy to use and that he had come up with a design that he and his wife immediately liked.
The website was the Clopay garage doors website. Jon became fond of Clopay’s Garage Door Imagination System which is an interactive online design tool that is easy to use. This online tool was invaluable in helping Jon and his wife visualize and choose different style doors.
When he found a design option he liked he simply printed it out in full color.
This wasn’t just an online catalog of pretty pictures. The interactive system allowed him to upload a photo of his existing garage and then choose among different door shapes, styles, hardware, and construction materials, inserting them onto his garage for a visual picture.
I’m no techie, were talking simple drag and drop stuff. Jon was able to go through about half a dozen different designs to show me what he was thinking.
TIP – If you’re spending a couple of thousand dollars on garage doors, this tool really helps in making you feel comfortable with your final decision.
Now back to the makeover plan . . .
Install Nailer Strips:
In order to install clapboards and corner-boards onto the garage concrete block walls, we had to install one-inch nailer strips to the concrete block wall. To do this I first ripped 2×4 stock into three 1″ strips. I then drilled 5-6 holes in each nailer strip and then held them plumb to the building and used my Milwaukee SDS hammer drill to drill the concrete block.
Once all of the holes were drilled I used 1/4x 2-1/4″ Tapper Plus concrete anchors to secure the nailers to the wall. Most people refer to these fasteners as the brand TapCons. We used approximately 250 concrete anchor fasteners on this project.

We cut enough strips to provide each corner board with two nailers and then installed the rest of the strips at each end of the clapboards for a nailer and then every 16″ on center. Pressure-treated nailer strips were installed horizontally along the bottom of the vertical strips to keep out bugs and bees.
Install Window Jamb Trim:
The garage had recessed windows and in order to apply trim around them, we needed to install jamb trim. I made one piece of window jambs for each window and installed them by toe-nailing into the window frame and then nailing into the vertical nailer strips. Later the window  trim was nailed to the jambs as well.
Trim goes on before Siding:
The next step was to install the corner boards and window trim. We chose to use PCV trim for this entire project. The nailer is 1″ and the trim is 3/4″ so we had to use a 1 5/8″ galvanized nail to install the trim. That’s all the nailing room we had.
We took the time to plumb the corner boards and window trim to make the clapboard installation easier.
The Clopay garage makeover also included trimming out the garage doors as well. We used 1 x 12″ PVC to top off the 1×6 vertical garage door trim boards.
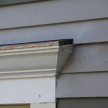
We decided that the best look for the transition above the garage door was to continue the bed molding from the side of the garage around to the front. The garage side wall bed molding was used to covered any gaps or irregularities between the last, very top clapboard and the overhanging roof soffit.
We used the same style bed molding that was on the main house and ran it over the corner board, mitered, and returned it to the front of the garage.

After the beveled PVC trim was installed we applied a rubber self-adhering tap on the garage sheathing and onto the slanted boards. We counter flashed the rubber with lead flashing and then overlapped the Tyvek house wrap onto the lead flashing.
Once all of the flashings were applied we installed the clapboards above the slanted trim board.
Installing Clapboard Siding on the Garage:

To nail on the siding and not hit the concrete clock we had to use 3d galvanized nails.
Once the front of the garage had the clapboards installed it was impossible to tell from the street that the front of the garage had two different wall planes.
Clopay Garage doors:
Shortly after the start of this project Jon and his wife decided on the Clopay Coachman Collection for the garage doors.
The next phase of this garage makeover is to install two insulated Coachman Collection garage doors. The doors are definitely on the higher end of the price scale and are both functional can be fashionable. Each door will have a LiftMaster door opener.
One thing I want to impress upon is that is is super important to take your time and research your choices. Most people replace their garage door once or twice in their lifetime.
A well-chosen garage door design will increase the curb appeal and value of your home. Let’s face it when selling a house, curb appeal gets people out of the car and into the house. Today it’s easy to choose both attractive doors and still not sacrifice durability and energy efficiency, Clopay has all of these covered and with their Door Imagination System, it’s easy to pick out your door.
The Door Imagination System is a great tool to find the best look, but you still have to consider material an d insulation. Using the Clopay Door Imagination System was easy. Just upload a photo of the garage or house and try on different Clopay door styles to find the perfect match.