Little Proteus II Power Feeder

Little Proteus II Power Feeder | Performance Review
Hey folks. When we ran the cordless table saw head-to-head in November of last year, we used a Little Proteus II Power Feeder for the performance testing during that Head-to-Head testing. We’ve had a number of inquiries about the Little Proteus power feeder, and we thought it would be a good opportunity to spotlight that device on its own.
In fact, a new review is timely considering Al Ladd, the inventor of the Little Proteus, released a second-generation Little Proteus II power feeder after we finished the Head-to-Head. The new power feeder is dramatically improved since we used the first-generation Little Proteus.
When we ran the portable saw competition, we needed a power feeder to give the performance tests a consistent way to feed materials into the saws and take the human element out of the testing. We researched which available power feeders were on the market.
Wow! What we found were the offerings on the market not only extremely expensive but were difficult to mount, to dismount and to use. Since Al Ladd had previously reached out to TBB, we thought it would be a great fit to use the Little Proteus power feeder for the Head-to-Head test.
We knew we would need to mount the Little Proteus power feeder on six different machines during the single day of testing. As a result, we made the decision not to alter the saws by drilling into the beds of those machines or altering their rip fences. That meant we would do the best we could to quickly mount the Little Proteus onto each of the different saws.
As you can see, we sandwiched the Little Proteus and table saws between two pieces of plywood with long clamps. The power feeder rested on top of the rip fence, and we adjusted the feeder in that position and secured it with the clamps. This setup was functional but awkward to fine tune adjustments. The key for us was to position the feeder in place and to be able to reposition it quickly.
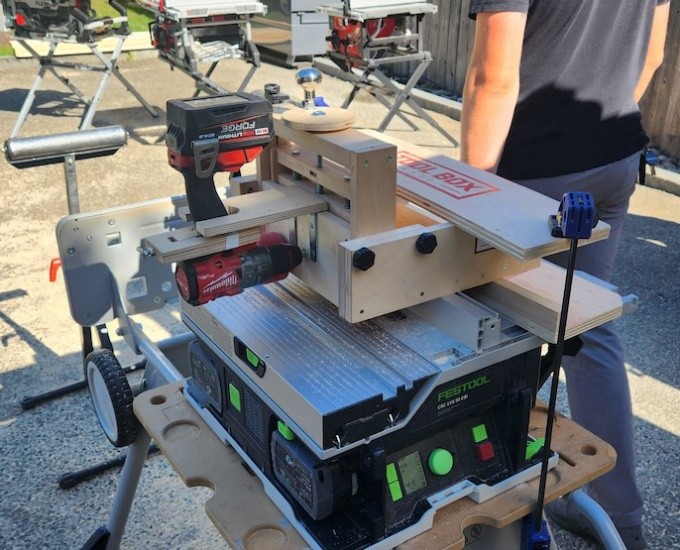
Figure 1 – Little Proteus @ Table Saw Head-to-Head
Not surprisingly. we were more concerned about testing the saws than we were with testing the power feeder. You can see the Little Proteus resting on the Festool saw fence and the clamps we used to secure it to the table.
Due to our mounting methods and lack of experience with the Little Proteus, we did experience minor quirkiness and inconsistencies in its use. Learning to use the Little Proteus as the same time that the Head-to-Head testing was live was a very steep learning curve. However, the Little Proteus performed for us and the table saw testing went on.
Clearly the Little Proteus is a tool that is best used by careful mounting and permanently affixed on a specific piece (or pieces) of woodworking equipment. That way, the user can fine-tune Little Proteus for that equipment combination and use case. This review will concentrate on our experience of using the new generation Little Proteus II in a shop with the time, attention, and intention of using the power feeder with a specific set of tools.
The results are in on this in-depth review of the Little Proteus II and it is clearly a power feeder with an excellent value and outstanding performance.
Why buy a power feeder?
Why would a craftsman want or need a power feeder? In this question, need and want are closely related. Craftsmen need to keep their hands safe and away from the spinning blades, whether it’s a table saw, a router, or a bandsaw. Also, craftsmen want their cuts to be consistent and without burn marks, fuzzy edges, or edges that need further work to finish. Finally, craftsmen all want to prevent fatigue and want relief from repetitive concentration and motions from long duration cutting operations.
Let’s look at these issues in more detail:
Safety – keeping the user’s hands and fingers away from the cutting blades on various machines. In addition, keeping concentration on the finished results and not having to concentrate so hard on making a safe cut.
Consistency – how often do we speed up and slow down the manual advance of the material when repositioning hands to get a new purchase on the material. C’mon – how many times do we see the burn marks from the saw blade in the piece because we had to stop advancing the materials to change grips? I know I often see burn marks when hand feeding.
Feed Speed – Can you really hold a constant and optimal speed when ripping a board or plywood through a table saw? Most users lose constant speed when switching hands during feeding operations. And the results show in the as-machined wood.
Tedium – Relieves the mind-numbing boredom of feeding large numbers of pieces into a machine. A power feeder allows you to step back and see and correct, if needed, while the piece is being cut.
Efficiency – In this review, Little Proteus II shows that it could cut more than two times the lineal footage of product in the same amount of time vs hand-feeding.
Automatic feeding– No more guiding with both hands. Power feeder pushes every cut straight and ensures pressure against the rip fence or other jig.
Secure hold-down– The Little Proteus power feeder offers anti-kickback capabilities and grips its material tightly.
What is on the market for power feeders?
If you do a google search for woodworking power feeders, the search will give you a page remarkably like the one displayed here.
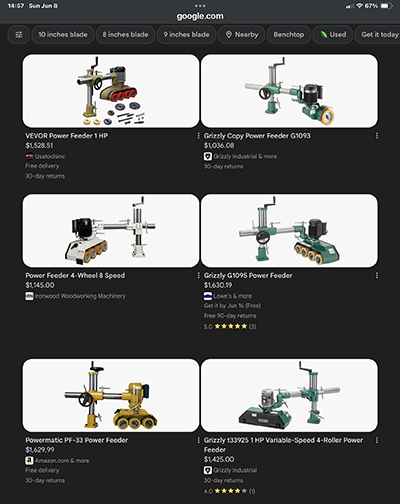
Figure 2 – Google Search for Power Feeders
As you can see, the power feeder market is largely comprised of machines that have a heavy vertical mast, a fixed length horizontal arm and require fixed mounting to the table. These types of machines are relatively inflexible and cannot be easily moved from machine to machine, nor are they able to be conveniently mounted in a vertical alignment to be used for ripping on a bandsaw or for vertical router table work In addition, you will note that the prices in this Google search vary from a little over $1,000 to over $1,600.
A notable exception is a feeder known ambiguously as “The Baby Feeder” that weighs 27 pounds, less than half the weight of any other and costs about $450. Our internet searches told us that it is so notoriously fussy to mount and adjust that some vendors are now offering a magnetically powered mount for it that costs $300, and isn’t going to help on an aluminum job site table saw or router table. Plus the assembly is now $750.
We recently saw an Instagram offering by newcomer SMITOOL for around $900 that is an interesting variation on the theme. We understand it is a newly minted Kickstarter-funded tool with a lot of electronics parts that may not like the woodworking dusty environment. It looks interesting but it may be hard to configure to work with various tools.
The Little Proteus II power feeder, by comparison is $409.00, delivered anywhere in the Continental United States.
Little Proteus II Power Feeder
Features
Super lightweight, about 12 pounds,
Mounts easily on small router tables, small band saws, even job-site table saws.
Quickly mount and remount, and move to new tool – less than a minute after initial fittings
Fence mounting – eliminates feeder base interference and deflection from feeder force.
Portable Power No need to plug it in! Power provided by battery powered brushless drill)
Low mounting impacts – No need to drill or tap your machine tables.
Inexpensive. Lowest cost power feeder in the world. $409.00 delivered in 48 states
Resawing – power transmitted at top and bottom of 6” wide contact length
2” Wide Feed Rollers similar in size to the 100 pound+, $1,000+ machines.
American-made (the only one!) and designed and manufactured in Massachusetts.
Magnetic Dust Hood and vacuum adapter included.
Extruded Aluminum Structure – a true second-generation device.
Instruction Manual – Full and informative. A must read to set it up.
Feed Speeds – As slow as 2-3 feet per minute (depends on drill performance)
Feed Speeds – Measured at the max drill speed just over 94feet per minute!! NOT RECOMMENDED!!
Little Proteus Compared with Little Proteus II
We will not dwell on the differences between the two versions. The following two pictures should tell the great differences between the first- and second-generation machines. One feature of the updated design is the smaller structure offering the ability to see much more of the saw blade and the clearances between the saw body, fence, and the feeder. In addition, the second generation has a sawdust port – a great additional feature in addition to easy vertical adjustment.
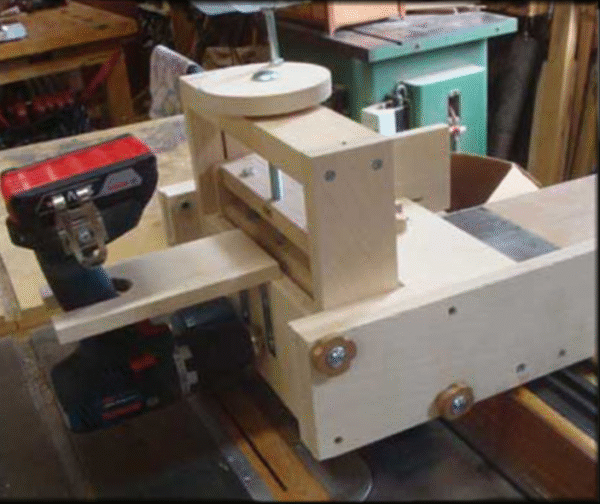
Figure 3 – Little Proteus Original Design
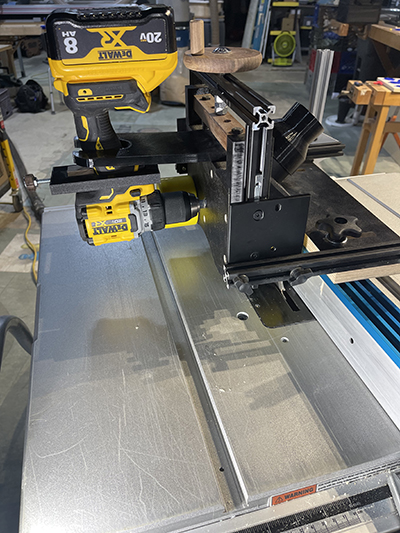
Figure 4 – Little Proteus II
Little Proteus II Power Feeder | Initial Setup
Assembly of the little Proteus was quite easy. We unboxed all the materials and as you can see in the accompanying picture, we had a lot of piece parts that made up the entire kit.
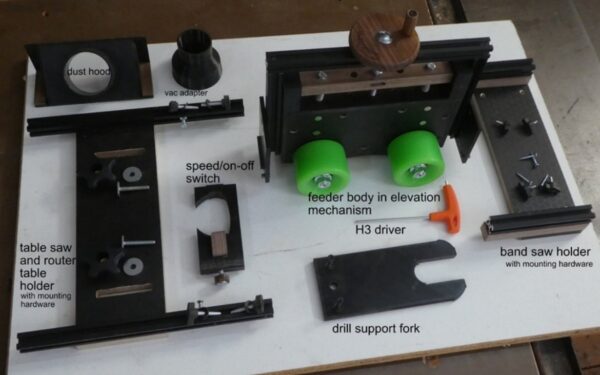
Figure 5- Unboxing the Shipment
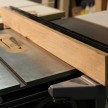
We had previously installed two t-tracks on top of my Makita rip fence that I used for hold-downs and stops. We installed these tracks before the receipt of the Little Proteus II Power Feeder. These two t-tracks made the installation of the little Proteus quite simple.
The t-tracks accepted the supplied bolts and within minutes we had the little Proteus installed on top of the rip fence. Next, we fitted the DeWalt DCD708 brushless drill to the Little Proteus device. The drill support fork was a tight fit, but the DeWalt drill had a rubber over mold and it was a secure installation when persuaded to go into the support fork. The Little Proteus manual suggests that the user fit the drill to the drill mount prior to mounting the drill support to the main body.
In fact, the only modifications we made to the kit was to shave off the peaked material at the top of the on-off trigger mechanism. Removing that material was the only way we could put the speed on/off switch onto the drill without activating the drill motor. This is a common need as shown in the Little Proteus operator manual. The instructions show that this is something that users may need to change to ensure that the trigger mechanism provided by little Proteus and the drill are working safely. Many drills have slight differences between them that can require slight customizations to the ’switch’.
With the trigger mechanism in place and the drill installed on the Little Proteus II Power Feeder, the next installation item was the addition of two legs that counteracted the tipping motion of the device when feeding material under the drive wheels. With the little Proteus attached on top of a narrow fence like our Makita, as the material progresses underneath the wheels, it tends to tip the assembly toward the saw’s surface on the opposite side of the fence. Again, the operator manual discusses this topic. To counteract this tipping motion, we installed two legs on the other side of the fence from the blade. The manual discusses other ways to brace the underside of the Little Proteus structural members with a vertical board, The following image shows the position of how our legs are positioned.
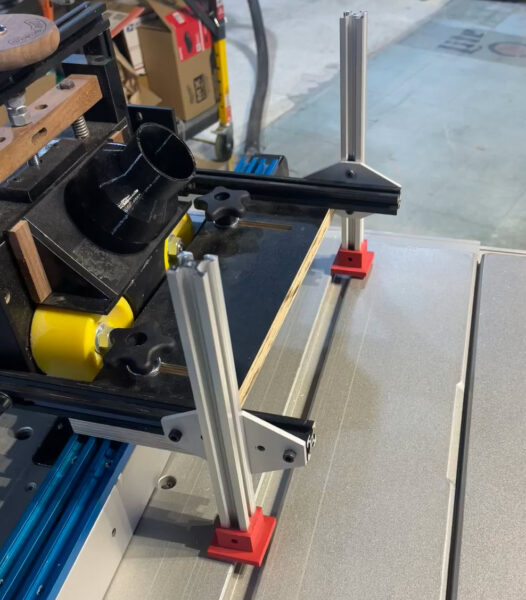
Figure 6- Added Leg Supports
We made these out of 20mm extruded aluminum and put a foot on the bottom of the aluminum extrusion to help bridge the gaps when those legs are over the miter slots. In addition, we used the 20mm extrusion to enable us to adjust the vertical height of the Little Proetus installation in the future and still use these legs. Note that the support legs may not be needed when mounting to a wide Biesemeyer of SawStop fence. With all that installation work in place, we were ready to try the first cuts with the little Proteus.
Little Proteus II Power Feeder – First Work on the Table Saw
The first work for the Little Proteus II Power Feeder was ripping quarter inch strips, quarter inch by one and a half inch strips from two by fours. We needed to do several hundred feet of these strips, and the little Proteus was an excellent tool to use. We had a bit of a learning curve when using the little Proteus for the first couple of pieces because we did not have the wheels engaging hard enough on the surface of the material. This resulted in a noticeable variation in the feed speeds of the material through the saw.
We used the elevation adjustment wheel of the Little Proteus and made a couple of turns to tighten the purchase of the drive wheels. . The drive wheels raise and lower by 1/16” per revolution of the adjustment wheel. The reduced clearance made all the difference in the world. The little Proteus carried the material through the balance of the stock with no other adjustments needed. We ripped several hundred feet of material, and the little Proteus worked flawlessly.
One issue we did encounter had nothing to do with the Little Proteus. The DeWalt drill has a five-minute timeout feature. At the end of five minutes of runtime, the DeWalt drill times out and shuts off. As a result, after each five-minute period the little Proteus stopped working.
This was no big deal because the Little Proteus held the material very securely in place. When we re-engaged the on/off switch the drill began again and the little Proteus went to work feeding material just like nothing had happened. The Little Proteus II operations manual suggests simply turning off and on the drill between boards to avoid such a timed-out shut-down.
One More Tweak
We saw the drive wheel upstream of the saw blade ran through a large amount of sawdust on the stock. We thought that this accumulation would have an adverse impact on the grip that the affected drive wheel exerted on the material.
The vacuum system worked well as manufactured, but we thought we could improve the exhaust flow and provide better traction by 3D printing a small baffle to direct the sawdust away from the surface of the material and away from the wheels. This baffle made the sawdust extraction more effective. The sawdust went into the extractor before it could reach the board surface or the wheels. We believe this mad a difference in the traction of the power feeder.
As we understand, Al Ladd has now adopted a similar idea in his new dust hood designs.
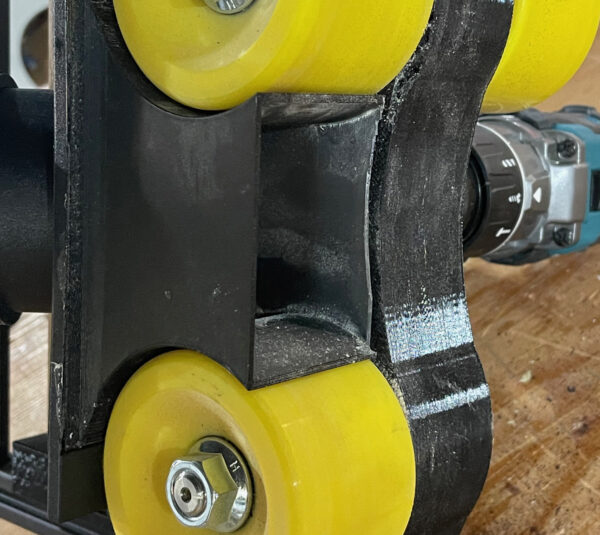
Figure 7 – Additional Dust Chute
We saw much less quantity on the approaching material. The Little Proteus performed extremely well in feeding hundreds of feet of material into the table saw. One user-induced error prevented a perfect run of material.
Oh No! We had a Crash!
Our “Crash” was 100% user error and nothing to do with the operation of the Little Proteus II Power Feeder.
We have a dust port on the bottom of the Makita saw at the underside of the trunnion housing. In addition, Little Proteus has a dust extractor port on top of the power feeder. Added to the electrical current draw for the two dust extractors, we had the electrical load of the table saw itself. We worked a long while without any issues, but a problem suddenly occurred.
We did not check the circuit numbers which served the saw and the two dust extractors. Unfortunately, we had them all on one circuit, and the circuit breaker blew. That immediately halted both dust collectors and the table saw.
However, the Little Proteus II Power Feeder does not know about the power failure, and that is where the issue came up – the Little Proteus II Power Feeder continued to feed the material. The 2×4 material rode up the stopped blade. The Little Proteus was powerful enough to push the 2×4, the Little Proteus II and the rip fence vertically. Before we could stop the feeder, the plastic part at the back of the rip fence that holds the fence to the table saw bed snapped off. The entire assembly lifted off the table by a good 3 inches before we could stop the power feeder.
That crash was not a fault of the Little Proteus, but nevertheless we learned a valuable lesson. In the future, the user/operator should be incredibly careful and understand that the little Proteus is going to continue to work even if the saw shuts off. In addition, we learned that we could twist the speed on/off switch very quickly to stop the power feeder.
To work around the broken fence part, we used a Bessey clamp on the front and rear of the fence to hold the fence in place while we continued to rip material.
The plastic part was very inexpensive, and it was a lesson that was worth learning. It is quite a safe circumstance when the little Proteus stops working. But if the machine that is doing the cutting stops, the little Proteus will continue to feed material towards it. One needs to be careful and be ready to turn off the little Proteus if the cutting machine stops unexpectedly.
We continued to use the power feeder and ripped some strips from some plywood sheets that would serve as the cushion supports for an outdoor couch. Again, the Little Proteus II worked without any issues.
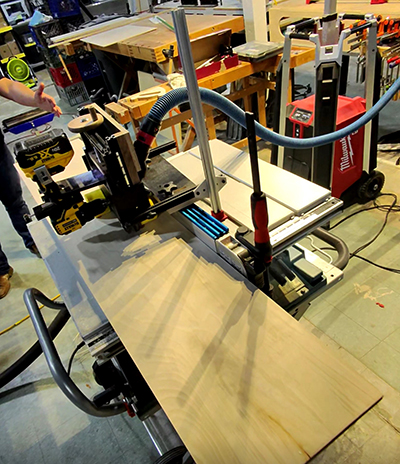
Figure 8 – Ripping down plywood on the Table Saw
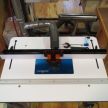
Little Proteus II Power Feeder on the Router table.
With a piece of spare aluminum angle iron, four holes and some nuts and bolts, the Little Proteus installed easily on our router table. With the table saw experience behind us, we next used the Little Proteus II Power Feeder to feed materials through the router to place a 45-degree chamfer on the sides of the resawn strips.
Since the router table fence had an existing heavy-duty fence, the installation was remarkably like the attachment of the table saw. We made sure to angle the power feeder so that it put continuous pressure on the piece to nest up against the router table fence.
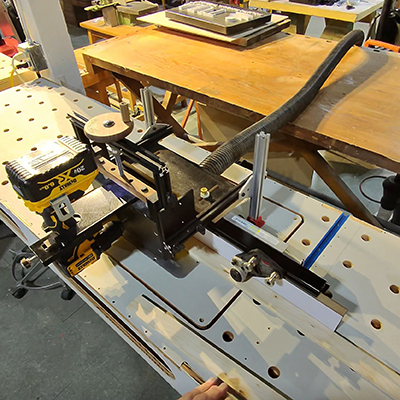
Figure 9- Mounting on Router Table
Because these cuts would be finished edges, we decided to outfit the router fence with JessEm Clear Cut Guides. In addition to the force that the Little Proteus exerts on the piece to hold it against the fence, the JessEm guides always ensure a tight contact.
That way, the chamfer cuts will be consistent the entire length of the piece. The Little Proteus had no problem carrying the materials through the added resistance of the JessEm devices.
We milled over eighty strips in this way. We chamfered each piece on all four long edges with no defects or blemishes noted. The power feeder made this operation and workflow efficient and perfect.
Little Proteus II on INCA 342 Band Saw
The shop has an INCA 342 Band saw that is a small 10” machine. This saw is also known as the INCA Euro 260. It is a high precision Swiss-made machine that has one oddity. the Inca 342 is mirror image of most band saws, with the column to the right of the blade, as if it were designed for left handed woodworkers. This positions the two rear drive wheels to the cut side of the blade.
In addition to a reversed configuration, the INCA has its own design flaws when it comes to resawing tall lumber. The INCA fence configuration is great for working with small pieces, but it is not particularly ridged when used for resawing lumber. The fence is only 1-3/4” tall and only attached to the table at one end. We have not had too much success resawing with the INCA in the past, so this was a wonderful opportunity to incorporate the Little Proteus II with changes to the fence system to enable resawing.
On a band saw, for resawing, the Little Proteus is placed on a different mount, and turned 90degrees, so it presents two feed rollers on one shaft, one above the other, putting feed pressure on the top and bottom of a 6” wide board. For less wide work, the top feed roller can be removed by loosening a single nut.
We created a new fence utilizing aluminum extrusions In addition we needed to build a new mounting platform to attach the power feeder to INCA table. TBB is skilled at creating testing jigs with this aluminum extrusion system and that knowledge helped us create the INCA fence components.
We took off all of the INCA fence pieces and built up the new components. To perform the initial testing of the power feeder, we held the device onto the INCA saw table with f clamps. In addition, we used a framing square to ensure the new fence was square to the table and band saw blade.
While this will not be the permanent configuration, we were pleased with the fence and power feeder attachment to proceed with our initial testing. For this trial, we selected a 1 ½” x 4” x 4’ piece of Oak to rip down to 6mm thicknesses. We installed a new ¾” wide 4 TPI Wood Slicer Saw blade from Highland Woodworking to use for this test. That is the most aggressive blade we currently have.
We clearly learned that using the Little Proteus on the band saw introduced two aspects of which we were not aware. aware. First, because of the Inca’s mirroring of the typical band saw configuration, what would usually be an infeed wheel in front of the pair of rollers that bear against the bandsaw’s resaw fence, instead placed pressure behind the cut.
This means that the INCA band saw requires a riving knife behind the blade to prevent pinching the saw blade when the trailing wheel puts force against the workpiece. We found a thin piece of metal and a thin pry bar to serve as the ad-hoc riving knife during our testing. This is not a permanent solution though. In the future we may move the entire Little Proteus II assembly to the in-feed side of the saw blade. If the revised configuration works, we will not need to worry about a riving knife.
. We also realized we could have cocked the feeder non-parallel to the fence such that the outfeed rollers wouldn’t have even made contact with the board after the cut. None of this is an issue with a band saw that, like most, has the column to the left of the blade.

Figure 10 – Band Saw Mount
The other thing we discovered was that the DeWalt drill that we used in the earlier testing does not have a low enough speed to be compatible with resawing oak. The drill advanced the material too fast for the INCA saw to keep up with the load. As a result, the saw stalled three or four times per board. To mitigate the stoppage, we used the Little Proteus to reverse the material and free up the saw blade. Then we restarted the process and continued to resaw the material until the saw was over-powered again. The Little Proteus held the material firmly against the fence during the resetting process. It held the material so well that the bandsaw blade in the stopped position made only the slightest of marks. We easily removed these marks with a light sanding.
We ran a speed test on the feed rate and determined the little Proteus’ lowest speed with the DeWalt drill was 5.6 l-ft per minute. That is a fast feed rate for the INCA saw.
Due to its less density, we had no issues resawing kiln-dried pine with the INCA and the Little Proteus II. In his online site, Al Ladd mentions the need to have a drill motor that can operate at a low enough speed (2-3 l-ft per min.) to enable an effective use for resawing. Since a beefier motor from INCA is not an option. We knew that our DeWalt drill was feeding the material at a rate nearly double what we would set if we had a lower speed range..
On his web site, Al Ladd recommends using a number of drills as a potential solution for low-speed work. He recommends a Makita XFD131 to get down to 2 ft/min and also the Ryobi PSBDD01B for low-speed work. Most powered power feeders only go down to around 6.5 ft per minute. That speed is nowhere slow enough for resawing on a band saw. It is so interesting to be evaluating a capable portable power feeder that is clearly able to deliver such low speeds. The only limitation is the choice of the drill motor itself.
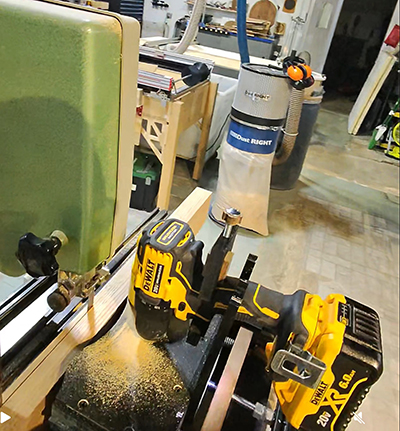
Figure 11- Resawing on INCA Band Saw
In any case, the Little Proteus II did exactly what it was designed to do. It fed materials into the cutting blade of the various woodworking tools. We used it successfully on the table saw – cutting both 1 ½” thick materials and ¾’ plywood rips. Little Proteus worked very well on the router table cutting chamfers on wooden strips. Finally, it fed materials into the bandsaw – but the bandsaw was not up to the task of ripping down 4” oak at the lowest speed of the drill we used.
In our shop, we did not have a drill that operated at a significantly slower speed than the DeWalt or we would have tried it. The Little Proteus will manage the low speed of a drill and if the user intends to rip hardwoods on an underpowered band saw, he needs to find the slowest powerful drill to handle this assignment. This circumstance is a function of the available drill and not the Little Proteus II.
Pull Test – A Real Eye Opener
While we were in the middle of testing, one of the guys asked if we had any idea how strongly the Little Proteus II pulled the materials through the machines. We had no objective measurements for the answer to this question, so we decided to see if we cold rig up a force gauge to measure that actual pull. We cleaned off the wheels from any saw dust. We ensured that the wheels were properly engaged, and we hooked up a scale to a Unistrut piece that we attached to the lumber on one end. The other end we secured to an immovable object (the building column). We took a high-speed video reading of what the force showed on the scale. To ensure a representative reading, we set the tightness of the Little Proteus close to the maximum compression of the springs on its frame.
We zeroed the crane scale and started the workpiece into the feeder with no tension in the lines. We manually operated the power feeder for this test as we did not want the risk of not being able to shut the drill motor down quickly.
That decision was fortuitous as the first time we tried the setup, the Little Proteus II had enough pull to begin to overturn the table saw sideways. Another tester standing on the frame of the table saw to counteract the overturn force was all that it took to get the final test data.
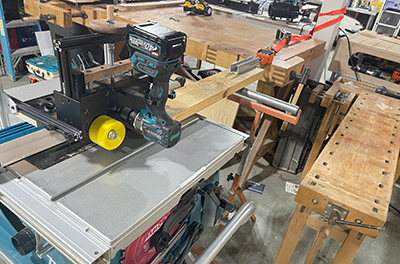
Figure 12- Pull Testing Rig
The results are impressive. The little Proteus II pulled the materials at a maximum force of 59.86 lbs. We were pleased to get these high readings as it validated the power of the Little Proteus and gives the reader a sense of its capabilities. We repeated the test at various drill speeds and found the speed does not impact the maximum pull strength. We believe the slippage between the drive wheels and the material is the determining factor in the maximum force equation.
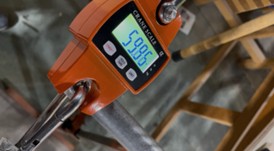
Figure 13- Maximum Force Reading of 59.86 lbs.
The tighter the power feeder grips the materials, the higher the pull force it will generate before slipping. We did not push the Little Proteus to its limits in this test, meaning we did not attempt to determine its maximum pulling capacity.
In hindsight, it is no wonder that the Little Proteus overpowered the INCA band saw. I would not have guessed that the pulling force would be in the vicinity of 60 lbs.
Any alternates to using a drill?
One of the positive features I see to the Little Proteus II Power Feeder is using a brushless drill motor to drive the wheels. Brushless drill motors are effective in delivering torque over a wide range of shaft speeds. Because they are manufactured in huge quantities, the cost of a good drill motor is relatively inexpensive. And these drill motors do the job!
Some craftsmen may look at the inverted drill motor sticking out of the side of the Little Proteus II and think it is an awkward assembly. At first, it may seem that way, but after using the device with a drill motor, we can see the logic and effectiveness of choosing brushless drills as the motor to drive the power feeder.
I am certain that Amazon sells some type of a geared electric motor with the right speed range. But then the user has to deal with mounting the motor, shaft couplers, a speed controller with problematic reduced torque at low speeds and fuss with a power cord draped in or near the work area. That is not a combination I would like in my work area. We are in the area of personal preference with such a choice, and we are comfortable using the drill motors. Brushless drill motors are only about a decade old and they are engineering marvels in delivering torque over a wide range of speeds.
Value for the money
Bottomline for our review of the Little Proteus II Power Feederis that it does exactly what it is designed to do – push or pull material into a woodworking machine. In terms of what is out in the marketplace for competitors, the Little Proteus II is a bargain. At $409.00 shipped to anywhere in the continental US, it is far below the other power feeders we saw. The typical power feeder is a heavy and cumbersome tool to mount and use, requiring permanent modifications to the cutting machines. In addition, many of the masted power feeders cannot be turned to feed material like resawn lumber on band saw.
While the Little Proteus II necessitates the use of a brushless drill, it means that the portability of the Little Proteus is independent of, yet another electrical circuit and the user does not have to shell out money for the electrical motor in the initial purchase cost Take the drill off the Little Proteus and you have your drill to use again.
When the user takes the time to carefully mount the Little Proteus II Power Feeder and work out the subtleties, he or she will have a power tool accessory that enhances safety and productivity for a very attractive price.
In summary, we recommend woodworkers and contractors with the need to rip down or process many linear feet of materials to strongly consider the addition of the Little Proteus II Power Feeder to their tool lineup. The Little Proteus II power feeder is an excellent value and works v