Mudroom Makeover

Mudroom Improvements
Generally, a mud room has easily cleaned floors made in materials like tile, concrete, or Linoleum. A mudroom makeover need not break the bank and can be as simple as trim and shelving. Or more involved like new flooring, fixtures and built-ins.
Mudroom Necessities
A well designed mud room also has ample hooks and racks for damp, wet clothing, as well as racks, a closet or cubbies for shoes.
In addition, benches are a good option for people to sit on while they remove their shoes.
All of these measures are designed to encourage people to remove sodden or dirty layers before entering the house.

Primary Entrance
Mud rooms are not usually the primary entrances of homes, since they tend to be informal in nature. In the job below this mudroom is a side entrance to the kitchen and garage.

Mudroom Makeover
This beautiful home is in Wellsley, Mass. Our job was to spruce up the existing mudroom. We were working with Sandra Stout from Creative Design Solutions # 978-505-7447.
The grand plan is to change out the tile and put in slate for the flooring. The walls will receive vertical bead-board wainscoting with a chair rail and molding detail. Hooks to be added to the bead board.

One thing that bugged me with the old floor was that the previous contractor tiled around the bi fold door hardware.
A better solution is to remove this tile under it and install the hardware over the tile. this is a better option in case the door or hardware are removed later.

Dust Containment
After sealing off the kitchen entrance with plastic and providing ventilation, we got to work demoing the old ceramic tile. Ceramic tiles in mudrooms are not always a good solution as they can become slippery when wet.
We cover how to control remodeling dust in detail in a separate article: Best Practice For Controlling Remodeling Dust

Positive ventilation to keep the dust out of the kitchen and garage.

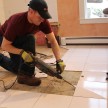
Tearing up tile and sub floor is never a fun job and is often very labor intensive. I removed the baseboard trim and was ready with a sledge hammer and hammer chisel to tear up this tile when I was pleasantly surprised.
The tile broke easily with a hammer……..
Procuring a dumpster on a small mudroom makeover project like this is not cost effective. Instead we use a dumpster bag.
Dumpster bags have saved me time and money on my remodeling jobs. It’s a perfect solution for small renovations or clean up jobs that are too small for a dumpster or where the location or the budget sustain a steel dumpster and its long term rental costs.

Apparently the previous contractor did not install a tile backer board or underlayment and used very little thin set. The tiles were barely adhering and once the first was removed I was able to lift up the rest of the floor with a pry bar and hand pressure.
For more information on removing tile and underlayment read this article: How to remove a tile floor and underlayment

An easier removal than thought.

The mudroom tiles all but two were removed on one piece. This is a sign of less than quality tile installation.

Very little evidence of thin set on the plywood. The tiles had plenty on them but the adherence capability of the plywood was the weak link.

All the tiles were removed and the remaining thin set left on the sub floor was scraped off to make the floor flat and smooth.
Deal with Floor Squeaks
The sub floor was checked for structural strength and screws installed into the joists as needed. We always add screws to sub floors at this stage. May times we find that nails were originally used and can loosen and cause squeaks.

Problem Solving Is Always Needed on A Mudroom Makeover
One reason why the prior contractor did not install a tile underlayment may have been this radiator.

The addition of an underlayment would have added 1/4″ at a minimum. That would have made re-attaching the radiator to the pipe exiting the wall impossible.
I also had that concern as well as there was no clearance on the left side of the radiator to add the bead board. The steam valve was almost touching the wall.

Our problem was that the underlayment we were going to use was the same thickness [1/4″] as the tile we removed. The new slate tile was 3/8″ so we would need to raise the pipe 3/8″ for it to go back together.
Moving Plumbing Pipes
After spending some time chasing this pipe in the basement a decision was made to attempt to raise the pipe, and move it to the right 1/2″.

After breaking through the wall we discovered brick and concrete fire blocking.

Close up.

Once this concrete was removed we were able to move the pipe to accomplish our tolerances.


Tile Underlayment
Preparing for tile means following a proper subfloor fastening procedure and usually installing cement board underlayment. [CBU]
Installing cement board underlayment is recommended to provide a flat, smooth and durable surface for tile installation and adhesion. Underlayment ensures tile longevity and is specifically designed to resist moisture and mold growth.

I used Fiberock underlayment. It is a fiber-reinforced gypsum product that for wet or dry areas. This durable panel offers superior performance and tile bond in addition to an integral water-resistant core.
The backer board can be finished with ceramic tile or painted, and has a 20 year limited warranty. It is environmentally friendly, made from 95-percent recycled materials, earning it Green Cross Certification from Scientific Certification Systems.
Read more on How to prepare a tile floor and install underlayment.

The board was installed per manufacturer specs and the seams were filled, taped and covered flush with thin set.
The next stage of the mudroom makeover is installing the slate tile. See the slate install here.
Related Articles:
If you enjoyed this article you might also like How to plan a bathroom remodel and installing and Installing electric radiant heat under tile

~ concord carpenter