Repairing A Power Tool Cord

Repairing A Cut Circular Saw Cord:
I’d be lying if I told you I’ve have never cut my tool power cords. The Milwaukee circular saw in these pictures had barely an hour on it when I lowered the tool to the ground and the cord got sucked into he blade.
Repairing a power tool cord was i order before I could finish the job I was doing. I temporarily repaired the cut cord with two wire nuts and a boat load of electrical tape!
Cutting Out The Damage
The Milwaukee’s cord was long to start with, and the cut section was a little over a foot from the tool handle. I made the decision to cut out the damaged cord and continue to use the same cord instead of buying a new cord.

Steps to Replace or Repair a tool cord:
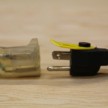
1. Remove the plastic housing to expose the cord and connections.

2. Remove the trigger and unscrew the power cord from the on-off switch

3. Cut the damaged section of service cord away.
4. Using a utility knife I cut back the insulation to expose the black and white wires.

5. Cut the indivigual wire insulation to expose the copper
6. Feed the wire through the tools rubber cord protector
7. Add electrical connectors and attach to on-off switch with original screws

8. Reassemble the tool.

9. Test.