Installing Decorative Fypon Millwork

Installing Polyurethane Decorative Millwork

When your looking to define the character of your homes architectural detail or simply trying to match old details installing decorative Fypon millwork is a viable option.
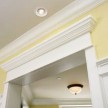
Fypon Polyurethane foam decorative millwork is the perfect choice for either interior or exterior applications and is one brand I use because they offer a wide variety of brackets, corbels and gable pediments, ceiling medallions and domes.
Fypon also will make custom millwork for customers to create a completely unique design or like I mentioned above match old, no longer available millwork often found in older homes.
What is Polyurethane Millwork?
Urethane molded millwork is constructed with urethane foam created by mixing isocyanine and resin. The mixture is kept under pressure in a mold as it expands. The result is a high-density, thermoset material that is perfect for interior or exterior trim. The material developed has a closed cell structure that prevents water intrusion and absorbs in.

Lightweight and maintenance free is once benefit of polyurethane millwork. The best feature that I like about polyurethane millwork is that they and resist rot, mildew, insects, warping and splintering and is super easy to work with, tool and install.
Polyurethane millwork pieces do not need to be primed and can be painted, stained once installed.
Installing Decorative Fypon Millwork Gable Brackets
Last weekend I helped the editor of HomeConstructionImprovement, an online remodeling and construction publication, install custom gable brackets onto a custom home. My friend, also a builder, supplied Fypon with architects drawings of a house he was building and Fypon custom built and supplied him with half dozen brackets that perfectly matched the homes gable angle.

Installing decorative Fypon millwork brackets is simple. My buddy had them pre painted and all we needed to was glue and screw them in place.
Installation Steps:
You will need a cordless drill and driver, pilot drill bit, appropriate length corrosion resistant fasteners, urethane glue, fastener hole filler and latex caulking.
Step 1:
Test fit your millwork prior to investing any time and effort into painting and installing them. Once you have determined that they fit in the location you planned for then more to step 2.

In this step, pay attention to where the fasteners should be placed and determine what length they should be.
Step 2:
Paint the brackets prior to installing them. The brackets in these photos have a lot of detail and would have been infinitely more difficult to saint on a ladder. Painting them on a work bench or saw horse at waist height is far safer and easier. I argue that the paint application quality will be better as well.
Step 3:

Determine how the bracket will sit against the house and pre drill a holes for your fasteners. I recommend using a drill bit with a countersink so you can fill the fastener hole.
Step 4:
Apply a high quality, exterior grade polyurethane caulking to the surface of the bracket that will contact the house.
Step 5:
Install the bracket. In our situation it was important to hold the bracket tight against the fascia board while installing four [4] 2.5″ galvanized deck screws.
 Failure to hold the bracket tight to the fascia board will result in an unsightly and unprofessional looking gap.
Step 6:
Use a drill driver to install the screws, setting them approximately 1/8″ beneath the surface of the bracket.
Step 7:
Caulk all visible seams for aesthetics and fill fastener holes.
Step 8:

Touch up paint.
Installing decorative Fypon millwork will not only help you fine the character of your homes architectural detail it will make your home stick out and make a statement – better curb appeal!