Using the Schluter Shower System

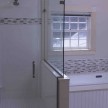
Waterproofing a Shower With the Schluter System
What Clients Really Think About
When remodeling a shower, the most important thing to consider is waterproofing. Unfortunately, many people do it wrong or cut corners. We all know countless shower pan and waterproofing horror stories. Leaks and call-backs take time, cost you money, and will hurt your company reputation.
While clients ask a lot of questions during a bathroom remodel, one that never seems to come up is properly waterproofing the shower. Maybe they don’t understand the process — or maybe they just trust us to build and install our systems according to industry best practices.
But with bathrooms the reality is that they are botched more than any other room in the house. The clients I know spend too much time and money on decorative features and fixtures, and not enough thought or money on waterproofing their shower, which affects the overall quality and longevity.
Effective Shower Waterproofing
Effective shower waterproofing methods exist. I recommend installing a complete shower system that includes a drain. When properly installed, these systems create a 100% waterproof and moisture-proof envelope from showerhead to drain.
Old vs. New Shower Waterproofing Technology
There are many acceptable methods to construct a quality tile shower, all of them involve different proprietary products and methods.
Traditional Shower – My Old Way
The typical waterproofing process is complex, but it’s not impossible to understand. Most shower installations used to involve copper shower pans, mud floors, cement backer boards, mesh tape, thinset, and liquid waterproofing sealer. Later, remodelers began installing PVC shower pan liners to eliminate the time and cost involved with mud shower pans.
Regardless of the exact details, a traditional shower installation requires at least three tradespeople taking part in a 5-step process.
Cement Board Process
- The remodeler has to frame the walls and install blocking between the studs
- The plumber has to install a drain and the copper pan or PVC liner, and flood-test it.
- The remodeler then applies the cement board.
- The tile setter next installs the mud floor, and tapes and coats the cement board seams with thinset
- The remodeler applies 2-coats of the waterproof coating to the cement board and the mud floor.
And yet the reality is that cement backer board, thinset mortar, and liquid sealers just aren’t fully waterproof, even after tile and grout are applied. Cement board only offers dimensional stability in wet areas. In other words, they won’t swell after repeated exposure to moisture in your shower.
Thinset mortar, tile, and grout aren’t waterproof either. Some tile absorbs very little, while grout and natural stone are porous. And lastly, sealers don’t make your shower waterproof; they only protect the grout from staining from body oils and soaps.

Problems with the “Old Way”
Standing water can get trapped in the shower pan below the tile level. The shower floor tile and grout will appear to dry in 24 hours, but if your shower was improperly constructed, the 1.5 inches or more of deck mud under the floor tiles will never dry.
Eventually, the moisture wicks up the walls behind the tile, and you’ll see mold lines at the wall-to-floor transition, on the curb and even in recessed niches if they’re exposed to enough direct water.
You may also see efflorescence in the floor tile grout joints.
Efflorescence is a chalky white substance that starts by staining your grout and can grow to almost stalagmite conditions, where it appears to be growing out of your shower floor grout.
Schluter Shower System – My “NEW” Way
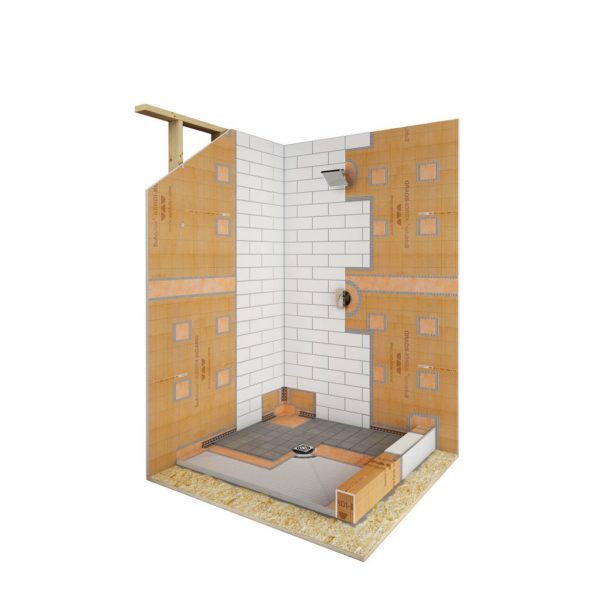
Schluter-Systems provides an integrated family of products in which the individual components collectively form a bonded, watertight assembly.
The appeal to me was that the Schluter System dramatically reduces total installation time, is lighter than cement board, and is easy to cut with less mess. It is also an all-inclusive package containing each of the components required to create a watertight shower assembly without a mortar bed. And it’s an ideal bonded waterproof system for both traditional tiled showers and residential steam showers.
Waterproof vs Moisture Proof
Waterproof means water won’t pass through. The tile, setting mortar, grout, caulk and sealers might be water-resistant, but they aren’t waterproof.
The Schluter shower system goes further, offering a complete line of components including shower curbing, waterproofing strips, seamless corners, and pipe and mixing valve seals help complete the waterproofing process.
Schluter Waterproofing Options
Schluter offers two ways of water proofing a shower.
- KERDI membrane
- KERDI-BOARDS
They have solid KERDI-BOARDS that are applied similar to cement board, and fastened to studs, and they have a KERDI membrane that can be applied over a backer substrate. These two options allow you to deal with many different shower applications and situations.
The Schluter KERDI waterproofing membrane is designed to be applied over solid backing. It’s an 8 mil (0.2 mm) pliable, easy-to-install, sheet material that is suitable for use in showers, bathtub surrounds, and residential steam showers.
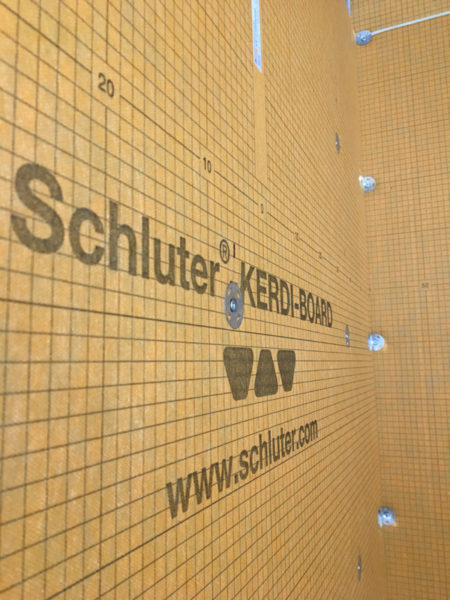
Schluter KERDI-BOARD waterproof building panel is a lightweight, easy-to-cut XPS foam panel that provides a waterproof barrier.
In addition to being useful in showers, surrounds, and steam showers, KERDI-BOARD can also be used to create waterproofing assemblies with tile coverings such as shower benches, niches, shelves, etc.
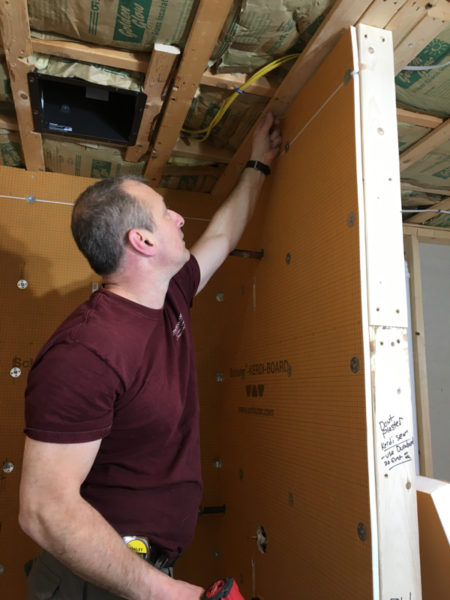
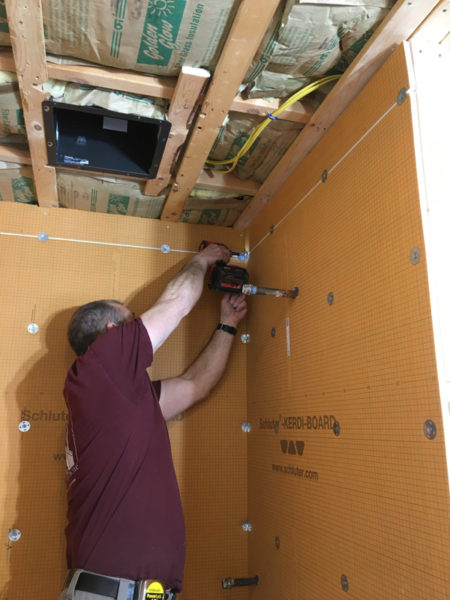
As a remodeler, I prefer using the KERDI-BOARD because I’m less skilled with a trowel. These boards are easy to use because they are installed similar to drywall or Durock but way lighter. They also cut easily with a utility blade and are less messy than cutting cement board. For me this means I can cut inside the house, saving time.
KERDI-BOARD Coverage and Cutting
Each grid-lined KERDI-BOARD come in large sheets for fast coverage. If you’re careful in your installation, the grid lines can be used to line up your fasteners along the studs. Taking the time to lay out fasteners in the same plane looks neat and gives clients the impression of professionalism.
Note – you can cut KERDI-BOARD with a knife, saw or table saw. If you have repeat cuts or a process that you do, pre-cutting parts in your shop may be an efficient exercise.
Pro-Tip
If the wall is not plumb you apply fast setting LHT mortar [LHT= Large, Heavy Tile] to the studs and apply the board with a level to achieve plumb. You can use screws to temporarily hold the board plumb until the thinnest is dry. Then return to install your fasteners no more than 12″ vertically apart.
Available KERDI-BOARD Panel Thicknesses
- 3/16″ 5 mm
- 3/8″ 9 mm
- 1/2″ 12.5 mm
- 5/8″ 15 mm
- 3/4″ 19 mm
- 1″ 25 mm
- 1-1/2″ 38 mm
- 2″ 50 mm
Pro Tip
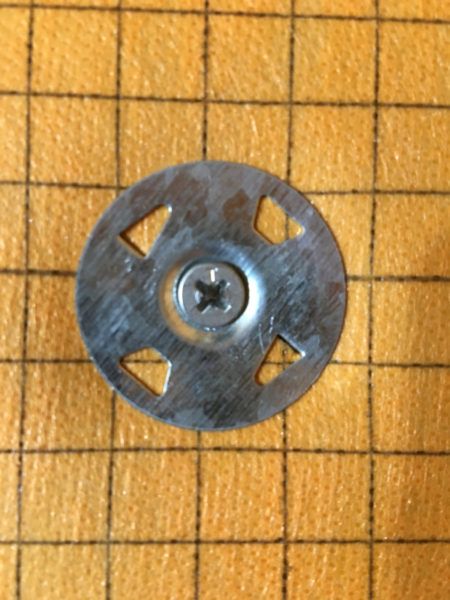
Kerdi-Board seams should be placed on wall studs. Use one washer at seams to secure two panels.
KERDI-BOARD Panel Sizes
- 32″ x 48″ x 1/2″(KB121220812)
- 64″ x 48″ x 1/2″ (KB1212201625)
- 96″ x 48″ x 1/2″ (KB1212202440
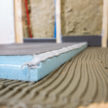
KERDI Membrane
If KERDI-BOARD is the spaghetti, then KERDI-BAND is the meat sauce. The KERDI-BAND, combined with preformed inside and outside corners, [KERDI-KERECK] is used to seal all seams, corners and fastener locations. The band is applied with a 2-inch overlap, with thin-set, and smoothed out with putty knives creating a waterproof seam.
(5″ wide – used to connect KERDI membrane or KERDI-BOARD with 2″ overlap)
- 5″ x 16′-5″ (KEBA100/125/5M)
- 5″ x 33′ (KEBA100/125/10M)
- 5″ x 98′-5″ (KEBA100/125)
- Inside Corners: (KERECK/FI2 – 2 pack or KERECK/FI10 – 10 pack)
- Outside corners: (KERECK/FA2 – 2 pack or KERECK/FA10 – 10 pack
PRO Tip
When using the KERDI-BAND you must ensure a two inch overlap everywhere it overlaps—corners, outside shower curbs, joints between sheets, and run the sheet from the drain to above the shower heads.
KERDI-BAND membrane
- 3′-3″ x 16′-5″ (54 ft2) (KERDI200/5M)
- 3′-3″ x 23′ (75 ft2) (KERDI200/7M)
- 3′-3″ x 33′ (108 ft2) (KERDI200/10M)
- 3′-3″ x 65′-7″ (215 ft2) (KERDI200/20M)
- 3′-3″ x 98′-5″ (323 ft2) (KERDI200)
- 6′-7″ x 98′-5″ (646 ft2) (KERDI200200)
Pro Tip
To play KERDI-BAND use a 1/4 x 3/16 trowels and keep notches in one-direction. Use a putty or tape knife to smooth banding and squeeze out all air bubbles between the band and the thinnest.
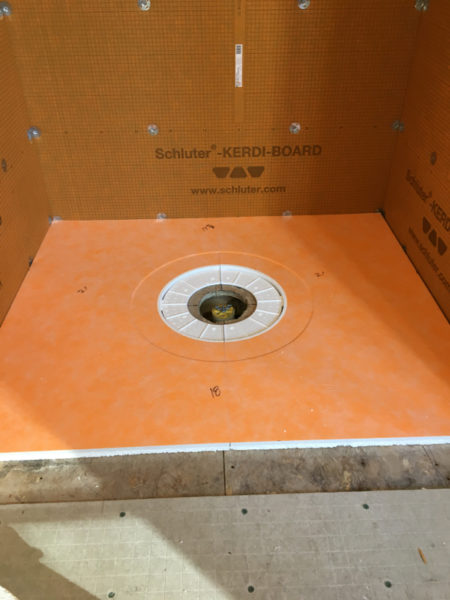
Drain Options
Schluter offers a complete system and their drains come with integrated bonding flange that ensures waterproof connection at the top of the assembly. These drains [square or linear] can be installed with prefabricated foam shower trays or mortar bases. Their drain grate assemblies accommodate different tile thicknesses.
Curbs
Schluter sells premade curbs in three sizes and one ramp.
- 38″ L x 6″ H x 4-1/2″ W (KBSC 115 150 970)
- 48″ L x 6″ H x 4-1/2″ W (KBSC 115 150 1220)
- 60″ L x 6″ H x 4-1/2″ W (KBSC 115 150 1524)
- Ramp: 48″ L x 15-7/8″ W x 1-1/2″ H(SR 122)
These curbs are super convenient and if they don’t fit your needs you can always use the KERDI-BOARD and custom make your own curb.
Tip: Using your left over KERDI-BOARD to make your shower curb is a great way to use up scrap material and save money.
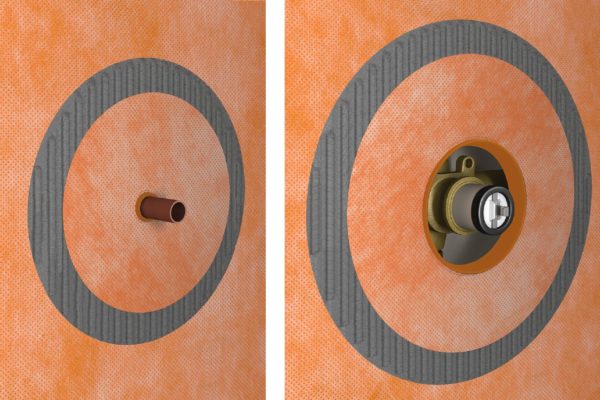
KERDI-SEALS
Unlike the traditional method that leaves a gap around pipe penetrations, which I’ve always seen as an Achilles heel for cement board shower systems. The KERDI-SEAL is a rubberized gasket that slides over the pipes and shower valve making it a waterproof connection.
- Pipe seal: (KMS185/12 – 1/2″ opening or KMS185/20 – 3/4″ opening)
- Mixing valve seal: ( KMSMV235/114 – 4-1/2″ opening
Note: The Schluter drain Kit includes 4 inside and 2 outside corners, and 1 pipe seal with 3/4″ opening and a large mixing valve seal
Pre-sloped KERDI Shower Tray or Mortar Bed
The last part of the Schulter shower system is the shower tray. The trays can be modified by cutting to a custom size, or you can use a dry-pack mortar bed.
Waterproof Shower Installation Tip
If you are considering a tile shower installation, make sure your installer outlines a waterproofing plan. Research this plan, and make sure you’re comfortable with it. Insist your shower pan be flood-tested prior to installing any tile. If the water level drops in 24 hours or moisture is visible (wicking) above the water line, do not let your installer proceed until this issue is resolved.
Is Schluter Worth it?
With tile installations, various unexpected issues can arise, especially if things aren’t done correctly. With today’s YouTube videos, more and more DIYer are tackling projects like tiling and shower installations. While I’m a fan of DIY, I’ve been around long enough to see that many DIYer, and some contractors too, look for ways to eliminate expenses by cutting corners. Cutting corners when waterproofing a shower can be one of the costliest mistakes one can make when remodeling.
I feel that the Schluter system assembly provides superior moisture management as it does not permit moisture to penetrate into the mortar bed or solid backing, allowing the assembly to dry completely between uses.
It also has fewer steps involved and thus is more likely to be followed, as opposed to the traditional cement-board, multi-step process.
The entire process took me 3.5 hours and less than $750.00
Bottom line
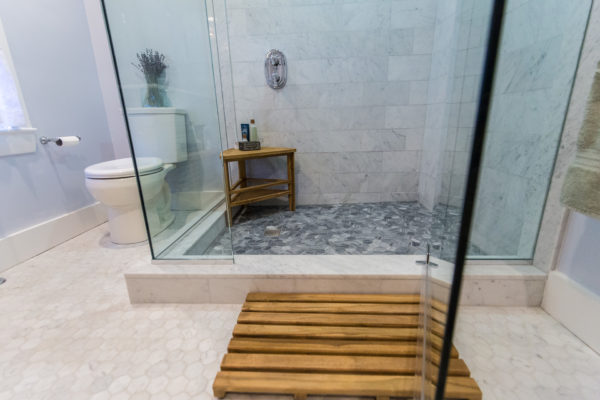
The integrated Schluter-Shower System eliminates leaks, reduces the potential for efflorescence and mold growth in the system, and dramatically reduces total installation time to ensure success and make shower installation easier than ever.
Installing a Waterproof Shower With The Schluter Shower System – Video