

Mudroom Makeover
On this part of the project we will discuss a installing a new mudroom door and tile. Prior to this we discussed tile removal and tile underlayment in our article Mudroom Makeover.
Adding Plinth Blocks
Day 2 actually started the night before in the shop gluing up poplar to make plinth blocks. A plinth block is a decorative block of wood often used at the bottom of door casings where the baseboard meets the door
Sandra Stout from Creative Design Solutions, the designer we were working with decided to add plinth blocks to the bottom of the door casings.
I agreed with this decision because the addition of 1/2″ wainscoting bead board and a 3/4″ baseboard would have stuck out “proud” of the door casings, necessitating that we cut a bevel on the baseboard and base cap.
Adding a plinth block avoids this issue and allows the baseboard and molding to butt into the block.
Early on the second morning I cleaned off the glue, cleaned off the edges on the jointer and cut the blocks to a rough length so I could rout a chamfer edge on the blocks.
Below is a picture of a chamfer router bit set into my router table.

Running the blocks thought he router.

A router table with dust collections is an absolute necessity. Below is a picture of the plinth block material before cut to size. I run the chamfers on both sides before cutting the plinths to size. This allows for less handling of smaller wood pieces and is safer.

Chamfers plinth blocks ready for sanding.

Scrap piece of wood used to check chamfer detail. Pencil marks highlight detail for camera.

Installing A New Mudroom Door and Tile
Later that morning at the job site I installed this 9 lite Simpson brand fir door into the mudroom. Simpson makes a beautiful door.

Door installed. We ran band molding around the outside trim edge to match the trim on the house.
Protect Your Investment
Blue tape is covering the oak sill during construction.

I covered the door in plastic to protect it from threatening rain.

I use a tap and drape system to quickly install the tape and a few staples to hold it in place.

Protected!

Tile Installation
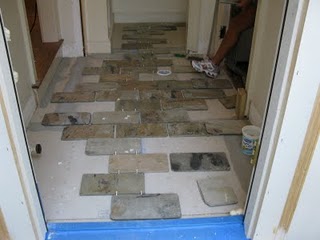
Meanwhile inside we were laying out the running bond pattern of the slate tile. The slate comes as random colors and is intended to be pulled out of the box and installed.
Having worked with Sandra Stout before I knew the color of the tiles was important. She was present to assist us in laying out the tiles for color and blend.
Custom Cut
These tiles were originally 12″ x 12″ and much smoother. Sandra had the manufacturer cut the tiles in half, 6″ x 12″ and tumble them to give the tiles a more rustic country look. Essentially these are one of a kind custom tiles as they are not sold anywhere.

Cutting the slate on the diamond blade wet saw. Continue reading . . .

~ concord carpenter