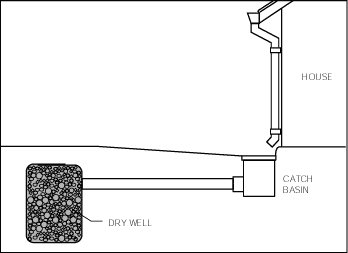
Dry wells give downspout water a place to go if existing grading does not allow for water run off or if there are hard scape issues. [patios, driveways, walk ways] If installed correctly they will also work in freezing temperatures. Installing a dry well is not hard but it is labor intensive if you do not have access to a backhoe or digging machine.
The dry well allows downspout water a place to percolate into the ground away from the foundation of the house. A dry well is an underground structure that disposes of roof runoff water, by dissipating it into the ground, where it percolates with local groundwater.
What Is A Drywell?
A dry well is a passive structure. Water flows through pitched pipes and into the well under the influence of gravity. When a dry well is installed above the water table, most of of the time it will contain air. This way the dry well can accept an initial inrush of rain water very quickly, until the air inside it is displaced. After that, the dry well can only accept water as fast as it can dissipate water.
Location Of Drywell?
It is important to choose a location that allows water to percolate well.
I installed the dry well [photo below] and used 4″ solid flexible drain pipe hose to connect the house downspouts to the dry well. The picture does not show it well, but I pitched the pipe 1/2″ per foot for fast positive drainage.
Depth Of Drywell – Installing A Dry Well
I chose a location 10-20 away from the house foundation and made the dry well pit hole well 6-7 feet deep. I wanted to install this dry well below the Frost line for my area. Frost in this area can go as deep at two feet. Installing the dry well this deep ensures that it will continue to drain even in cold temperatures.
If a backhoe or excavator machine is on site consider having the tench installed deeper than the frost line as well. In the photo below, after the finish grade is established this pipe was approx 16″-20″ deep.
Drywell Pit – Installing A Dry Well
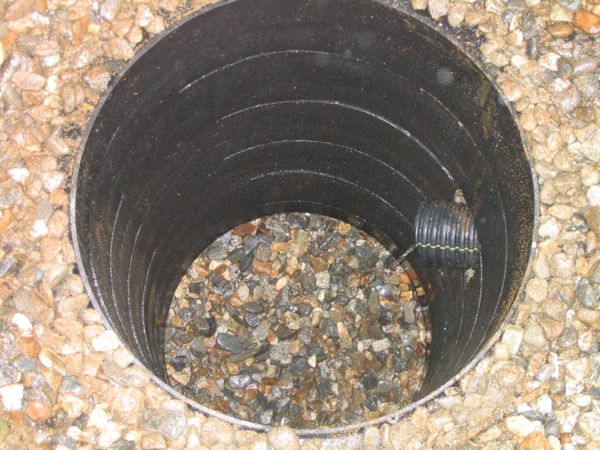
The dry well for this pit was a 36″ round by 48″ deep heavy plastic culvert pipe with a heavy duty plastic lid for future cleaning and inspection.
I drilled 3/8″ holes all around the sides of this culvert pipe. The bottom is open and will sit on gravel.
I dug the dry well pit approx 12-24″ larger all around, lined the dirt pit with landscape fabric to keep dirt from clogging the pit, filled in the bottom approx 12″ deep with 3/4″ stone, installed the plastic dry well and surrounded it with 3/4″ stone.
Protecting The Drywell Pit
Before filling in the final grade I covered the lid and stone with landscape fabric to keep the stones clean.
I purposely kept the dry well empty, not filling the container with gravel, to allow for more volume of water.
I took triangulation measurements to document the location of this well as well as this photo.
This photo shows the 48″ deep drywell draining water during a fairly heavy rainfall. The location this well was installed is a very sandy area and drains very quickly. It had been raining for some time prior to this photo, there was no water accumulation in this well.
I installed the pipe approx. 6″ into and approx 6-8″ down from the top of the well.