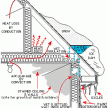
Ice Dam Damage

 Wet Hardwood Floors:
Many times ice dam damage results in wet ceilings, walls and insulation. Extensive leaks can also damage hardwood flooring. Once the leaking has stopped, use airflow from fans to dry out walls, ceilings and floors. Drywall and plaster will dry quickly but hardwood floors may take longer.
Solid hardwood floors react to water in three ways, they cup, crown or buckle.
- Crown: means the boards raise up in the middle.
- Cup: means the boards raise up along the edges
- Buckle: means the boards come apart and need replacement.
According to my flooring contractor, R.C. Mckinnon from Hyde Park, it can take anywhere from 3 weeks to 4-5 months for a hardwood floor to settle down after getting wet and crowning or cupping.
If there is no staining and the floor settles down your “good to go,” if not, you’ll need to sand and refinish or replace the flooring.
Here’s some guidelines assuming you hire a contractor:
- Sand and Refinish: Plan on spending $2.00 to $3.50 a square foot. The higher range would assume staining to match an existing floor color.
- Replacement and Finish: Plan on spending up to $10 a square foot for 2-1/4” Red Oak flooring.
- Removal and Disposal of Old Floor: this all depends on the contractor but a good rule of thumb is to budget $3 a square foot for demo and disposal of the damaged flooring.
Should You Open the Wall?
The problem is, how do you dry wet insulation located inside a wall / ceiling cavity, or the backside of the wall board?
The BEST solution with wet insulation is to replace it. Wall board can be dried in place if there is no obvious swelling and the seams are intact, and if you can get adequate airflow to the wet surfaces. If not, remove and discard it. Very wet wall cavities should be ventilated.
I’d be lying if I said I never violated this best practice principle. Several years back, I had two simultaneous, ice dam leaks in my house, prior to installing a new roof with full-coverage ice and water shield. Luckily, I was able to stop the leaking within 1 hours of noticing it.
I did not open up the wall because I have extensive wainscoting and crown molding trim on the wall, and I didn’t want to tear it out. That does not mean some mold did not grow in that wall cavity, I’m sure it did.
Mold Concerns
How long it takes mold to grow after a recent water incident? Molds are microorganisms and can be found everywhere. They can grow on almost anything if it is moist enough. Mold will start to growwithin 24 to 48 hours after a leak, under ideal conditions. Carpets get moldy very quick, many older carpets with dirt as a food source start smelling moldy after being wet just a short time.
It may be a week or two before it grows to the extent that it is visible to the naked eye as spots on drywall or carpet pads.
In my experience most leaks that are stopped fast enough, and dried out properly do not develop into mold issues. It’s the longer term, constant leaks that you have to be concerned about.
Mold spores needs three things for growth and thrive:
- Food (i.e. cotton, leather, drywall, wood, paper products and others).
- Water
- Optimal temperatures. [temperatures 32 and 120 degrees Fahrenheit. Temperatures from about 70 – 90 degrees are the most conducive for mold growth] Mold doesn’t die when temperatures drop below 32 degrees, they lay dormant until temperatures raise.
The first thing to do is try to limit the “wetting” damage by collecting or catching the water and stopping the leak.
What is most important is how fast, and how well the flooded areas are dried. Many times a person will think that moisture was removed when in fact enough moisture was left behind to allow mold to start growing.
In some cases, mold growth may not be obvious. It is possible that mold may be growing on the back side of drywall, wallpaper, or wood paneling, the top of ceiling tiles, the underside of carpets and pads, inside ductwork, etc. If you believe that you may have a hidden mold problem, you may want to consider hiring an experienced professional.