How To Retrieve An Item Dropped Down A Sink Drain

Retrieve A Ring From A Sink Drain

How To Retrieve In A Sink Drain
Retrieve rings, coins and earrings from sink drains fast and easily. This post is all about easy tips you can use for retrieving items dropped in a sink drain.
How many times have your taken off your rings to wash dishes only to accidentally knock one into the sink?
Did it make it down the ring down the drain?
Detailed below step by step are the necessary functions needed to EASILY retrieve these items.
Safety Information

Plumbing, especially in older homes can be fragile. Improperly installed or corroded plumbing can break causing water thousands of dollars in water damage.
If you feel that this may be the case in your situation – call a plumber for an evaluation.
It’s always a good idea to shut off the water at the faucet prior to working on the trap beneath the sink.
Tools Needed:
- Adjustable wrench – Channel lock pliers [Preferred] or an adjustable wrench

- Low profile pan, towels or rags
- Flexible magnetic retrieval tool [optional]
- Flexible 4-prong retrieval tool [optional]
- Flashlight

Where Did It Go?
Most likely your item is still in your house plumbing. Hopefully it is sitting in the sinks p trap. The p trap is a U shaped part under the sink that water stops the sewer gases from coming back up through the drainage pipes.
The p trap can be found on  common household fixtures such as sinks, bathtubs , showers, laundry sinks and much more, Fixtures such as bidets and toilets have a trap built into them.
Sink Trap Terminology:

The size of the pipe depends on the size of the fixture.
The larger the plumbing fixture, the larger the drainpipe. Kitchen and bath sinks typically drain into 1-1/4- or 1-1/2-inch waste pipe. Two-inch pipes are common for laundry drains, and 3-inch pipes are used for most residential toilets.
Retrieving Lost Items Down the Drain
There are three possible scenarios if the item dropped was caught and is still inside the sink p trap.
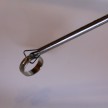
Best case scenario is when you can see the item and are able to use a retrieval tool to grab it out.
Two Types: Magnetic or Prong:
A magnetic retrieval tool us a telescoping tool with a strong magnet on the end. This tool is useful for retrieving items that are magnetic. [note – gold and silver are NOT magnetic]
 A prong retrieval tool can be purchased at most home centers and plumbing supply stores.
It is a flexible rod with a spring loaded lever that open and closes four prongs. The prongs are used to grab items out of reach.
- Another scenario involves removing the drain stopper to retrieve the item
- If your sink p trap does not have two slip nuts you may have to have a plumber cut the pipes to remove the p trap and then reinstall the trap.
Removing the Drain Stopper Mechanism:
This scenario is more likely to occur in a bathroom sink. It involves going under the sink and removing.
Remove the pivot nut that holds the horizontal [pivot] arm onto the pop up drain stopper assembly. Typically this nut can be unscrewed by hand.
TIP: Be careful not to loose any parts. [washers, seats] when loosing this nut. Also do not over tighten this nut when re-installing.
Procedure:
- Turn off the water
- With the drain plug in the up position, place an object like a screwdriver under it so it will not close.
- Locate the clip that the plunger rod slips through to hold the horizontal pivot arm. The pivot arm enters the drain pipe under the sink and will be found just before the p trap.
- Remove the clip by squeezing the clip together with hand pressure. Pay attention how the whole unit is assembles so you can re-install it the same way.
- Loosen the pivot nut by hand
- Remove the horizontal pivot arm and nut.
- Remove the drain plug
- Attempt to locate your lose item with a retrieval tool
- Clean drain plug and re-install

- TIP: the hole in the bottom of the drain plug need to receive the horizontal pivot arm on re-assemble.
- Turn on water and test for leaks

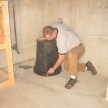
How To Remove The P-Trap
Look underneath the sink to locate the P-trap. In most cases, the P-trap is easily accessible. If it is not, you might need to call a plumber.
Note: Many p traps have a drain plug at the bottom of the P-trap. If your sink has this, you may still need to remove the P-trap to retrieve your item. This drain plug, intended to aid in cleaning the P-trap, and is probably too small for your dropped item to fit through.
1. Turn off the water under the sink. Many times people working on drains have to leave to get a tool or answer the call of nature. Turning off the water avoids someone else from turning on the faucet and flooding the floor.
2. The first thing you will want to do is to remove any objects or belongings from the area of where you will be working.
3. Place a small bucket or tray under the p trap, to catch the water in the pipes. Failing to do this WILL result in water spilling onto your vanity cabinet base or floor, depending on where you are working.
4. Remove the drain plug at the bottom of the p trap. This will drain the pipe and if your lucky your object may fall out. If it does replace the nut, turn on the water and test for leaks.
5. Look at the p-trap and locate the two “slip nuts” on each side of the p trap bend. Refer to diagram above.
6. Using Channel lock pliers or an adjustable wrench turn the slip nuts counter clockwise to be removed but you must remember that sometimes those nuts are screwed from the bottom up so make sure you are turning them the right way. Water may leak out as you loosen these nuts.
TIPs:
- Use care not to strip the slip nut threads.

- Loosen the nuts one at a time and leaving the first nut on by a thread or two so that when you are loosening the second nut the trap does not just fall on you.
- To protect the pipe from wrench tool marks wrap the slip nut with a rap and place your pliers over the rag.

7. Once you have removed the two slip nuts dump the pipe contents into your pan. Hopefully the item you dropped in it.
8. Clean the p trap with hot water and soap before replacing.
9. Replace the trap and tighten both slip nuts by hand before using the wrench. Make sure the nuts screw on easily and do not strip the nuts.
10. Turn on and run water checking for leaks.
11. If leaking is observed tighten the slip nuts, wipe area and check for leaks again.
Cutting the Pipe:

This is the time to call a plumber unless you are skilled in working with drain pipe that you have.
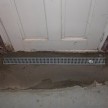
The photo below shows a drain with one slip nut, not two. In this case the p trap would have to be cut out.
Typically the pipe would be cut where the pink letters are and a union or threaded union assembly added to replace the trap.
Avoid Common Errors:
1. Not turning off the water and having someone come in the room while you’re away and turn on the water faucet – flooding the area below.
2. Being too aggressive with the wrench and damaging or stripping the threads on the slip nut
3. Being too aggressive or banging into corroded water supply pipes causing a leak.
4. Tightening nut too tight
5. Not aligning pieces prior to tightening nuts
6. Not placing a pan under the p trap clean out nut to catch the water in the pipe.
7. Damaging the finish on chrome, copper or brass decorative drain pipes
Garbage Disposals:
If you’ve dropped an item down a sink with a garbage disposal, exercise extreme caution.
If the item is visible, use a wooden spoon, tongs or a removal tool to retrieve the item from the garbage disposal.

If the item you’ve dropped is magnetic, use a magnetic retrieval tool or try dangling a magnet tied to a string down the drain to retrieve the item. While most jewelry is not magnetic, sometimes a
steel clasp will provide the necessary magnetism to make this work.
If the item was caught in the grinder, it’s probably damaged the dispos al.
al.

Contact a plumber to evaluate.
Visit my website to find practical solutions to your home improvement -challenges.