

Designing and Managing a Small Workshop
A small workshop to me means that you must be ruthlessly efficient in how you design, your shop, as well as organize and store your tools. A well-organized shop is the hallmark of professionalism, especially if you have clients visit or just want to be more productive.
Planning, executing, designing, and managing a small workshop efficiently can be as fun and as expensive as golf! When you’re trying to get work done in a small shop you have to be able to do more with less, be comfortable working in a cramped space, and be creative. Creativity usually means choosing multiple-use tools and, benches and putting everything on wheels
Setting Up a Small Workshop never really ends, in fact, I’ve remodeled my workshop probably a half dozen times in 28 years. I am going to cover 9 main points that I feel you need to consider in a small workshop.
How to Plan a Small Workshop | Nine Considerations
The 9-points for planning a successful small shop are:
- Set up equipment and tools for workflow
- Organization [tools, materials, parts]
- Mobile bases [tools and tables]
- Multiple-use and space-saving tools
- Dust collection
- Compressed Air
- Temperature, and humidity
- Lighting and power considerations.
- Tool and wood storage
Setting Up Tools | Workflow
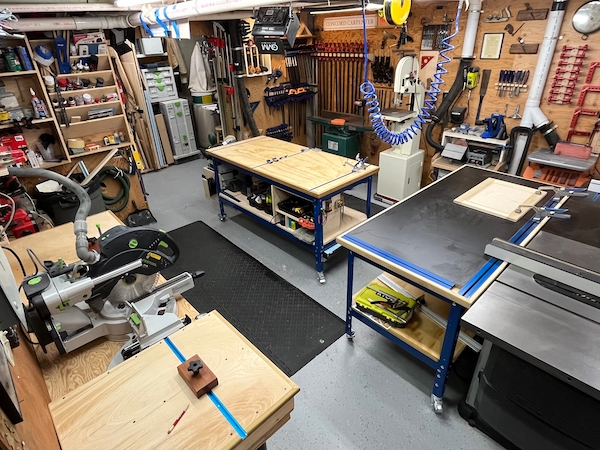
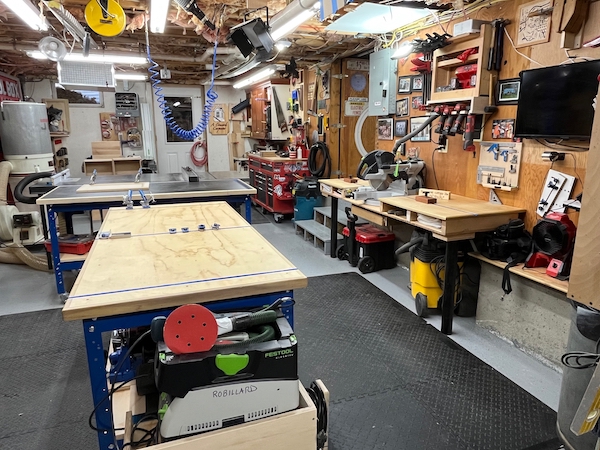
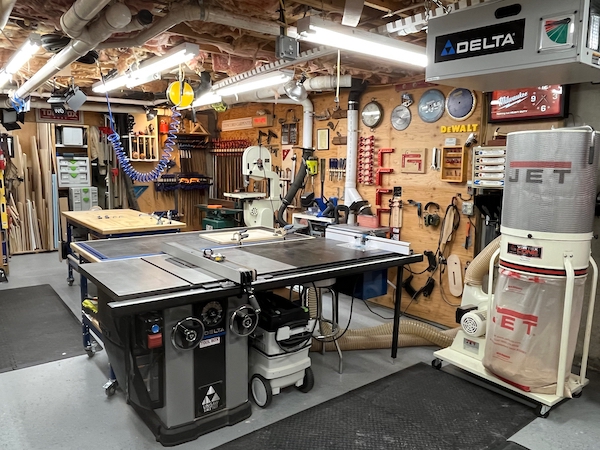
My current shop is not a dream shop, but it is a very functional small workshop. It is about 350 sq. feet and is in my basement. I must rely on two outdoor sheds for two large storage.
A smaller room [8×15] is located at the end of my shop. It was installed in 2004 under a mudroom addition. At first, I was skeptical that adding this small space would be worth it. It turned out to be the perfect place for my drill press, storage, and dust collector.
The Table Saw | Best Location
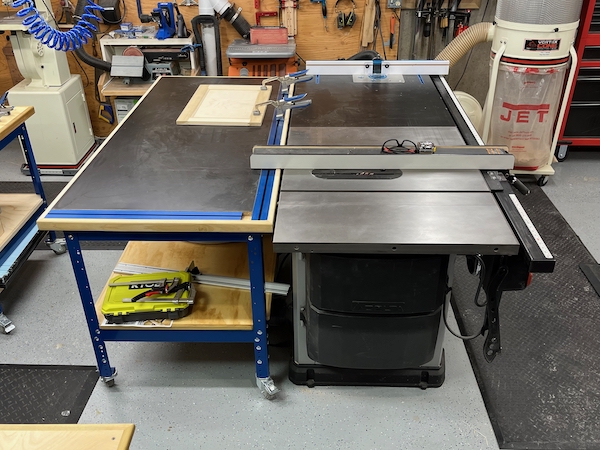
Let’s talk about Table saw positioning. The table saw is best positioned centered in a narrow shop, so you have enough space for feeding and out feeding. Everything centers around the table saw and assembly table so centering it makes sense.
Small Workshop | Machine Workflow
Workflow matters. wood should enter the shop, be cut to size, and assembled. That means that once the wood passes through your table saw it should go right to a miter saw, joiner or planer and finally rest at the assembly table.
Organize tools
I laid out my shop miter station, joiner, and assembly table behind the table saw so as wood is cut it is traveling in the same direction as the next step. The wood is either cut to length, jointer, planned, or assembled. All those stations are in the direction [workflow] of the wood coming out of the table saw.
I’ve also mounted a power switch above the table saw to turn on the dust collector. My intention is to try to eliminate unnecessary steps across the shop. Think about what you need, where you need it, and then organize and install your shop that way.
Small Workshop | Hand tool Workflow
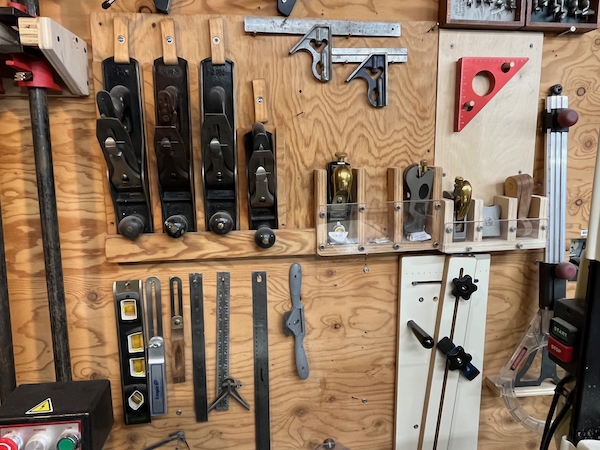
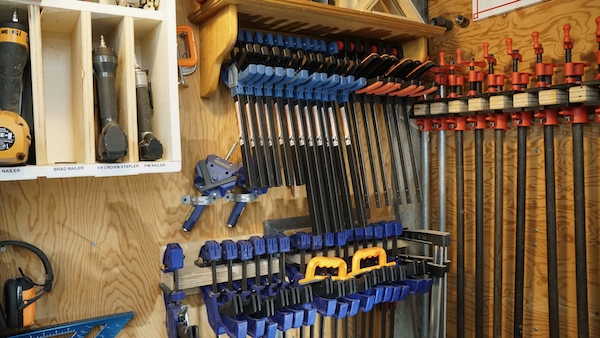
I installed 2×4 walls in front of my concrete walls so I could run outlets and install plywood. The plywood allows me to mount my most-used hand tools [and some decorations] on the wall, where most needed.
For example, all my most-used clamps are mounted on the wall in one location, as are my hand planes, pneumatic nailers, and chisels. Over by the router table, I have a router bit case, wrenches, and every jig I need to work on the router – all within reaching distance. Under my assembly table I store every conceivable tool I use in constructing the projects I do the most.

Table Saw Outfeed and Assembly Tables
For years my table saw outfeed table doubled as my workbench assembly table. The main reason for this is a lack of space, but also my outfeed area sits in the central area of my shop. Over time I’ve added amenities such as overhead power, dust collection, clamp storage, and compressed air. This setup worked great until it didn’t.
It doesn’t work when you are knee-deep into a project on your assembly table and realize that you need to rip something on the table saw, that’s when the trouble starts.
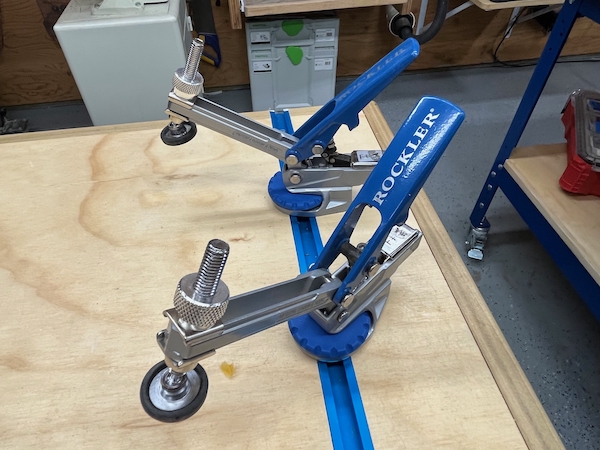
I built two Kreg Universal Workbenches for my shop, just below the height of my table saw. This workbench system of rails and adjustable height legs is available in multiple sizes. The Kreg bench can also accept 3-inch casters, with ½” threads, dual-locking, swivel movement mechanism. something I badly needed in my small shop.
Having two benches allows me to manage projects differently, for example:
- Bolt or clamp the two together for one large assembly table
- Split the two, keeping one as the outfeed and the other as a narrower assembly table.
- Roll one or both around the shop as needed
Having 2 tables helps me solve my problem of having to use my outfeed table as an assembly table.
Now I have two smaller tables, both on casters, that allow me to move the position of the tables and use my assembly table without interfering with the table saw outfeed operations.

Tool Storage | Bottom Shelf Assembly Table
Under the assembly table, bottom shelf, I added some cross braces to allow me to slide two pieces of rigid foam underneath.
I use this foam under stock when cutting with my track saw.
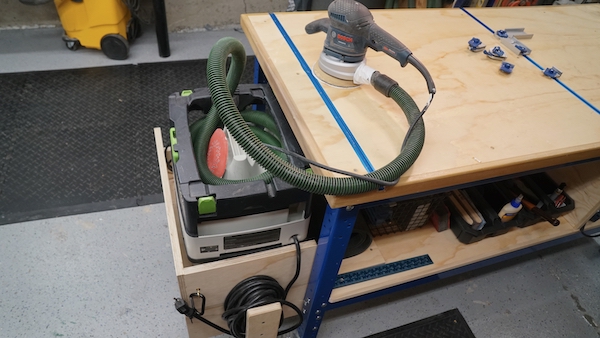
On the other end of the assembly bench, I added, an extension shelf for my Festool CT Mini vacuum. I took the wheels off the vacuum and made it a dedicated sanding vacuum. Prior to this, I used to have to wheel it out from across the room and hook up a sander to it. With my extension shelf, I will keep the sander attached to the vacuum at the end of my bench, ready to go.
Work Bench Tabletop Accessories
On my assembly table, I added three Rockler T-tracks for clamping. I routed three grooves, approx. 5 inches in from the edge, on both sides, and one in the center of the table, for the t-tracks. This will allow me to use inline clamps, like the Kreg Clamp, and Rockler Auto-Lock Hold Down clamp.

Video 2 covers:
- Organization [tools, materials, parts]
- Mobile bases [tools and tables]
- Multiple-use and space-saving tools
- Dust collection
Small Workshop Organization | Tools, Materials, and Parts
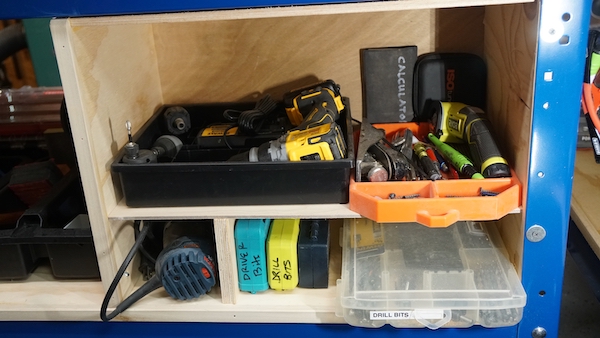
Tool storage systems are as important as the tools that are used to get the job done. Owning the right tool to do the job is one thing, but if you can’t find it, well that’s a problem. It’s important to organize your tools, even labeling storage drawers so you know where things are when you need them.

Additionally, setting up smartly, well-designed work or storage stations with the most reached-for / used tools is a good idea. To give you an example I set up the following stations to assist me when working at my asse3mble table:
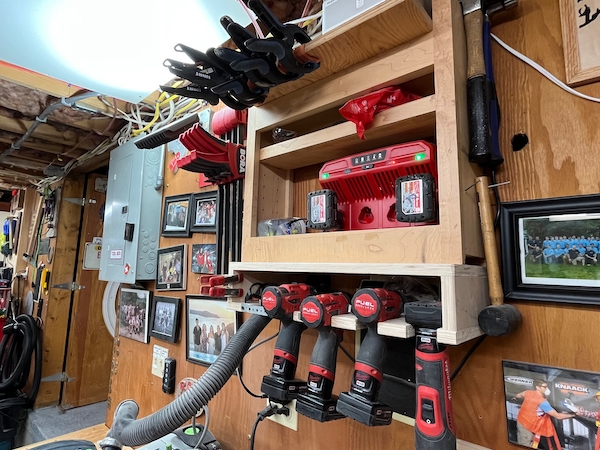
- Cordless Tool Station:
- Sanding Station
- Marking and measuring station
- Clamping station
- Sanding Station
- Track saw station
- Fastener station
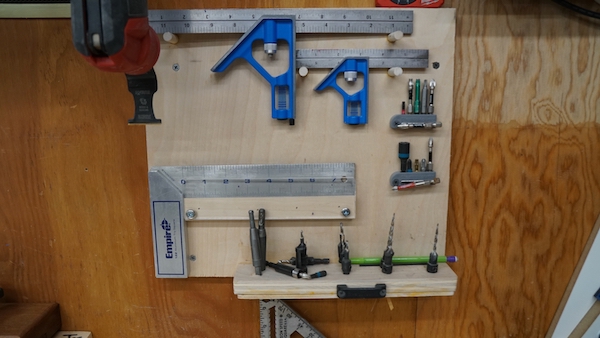
I firmly believe that there is a place for everything and everything in its place. Many of my most used carpentry hand tools, clamps, and jigs hang on the wall near my assembly table.
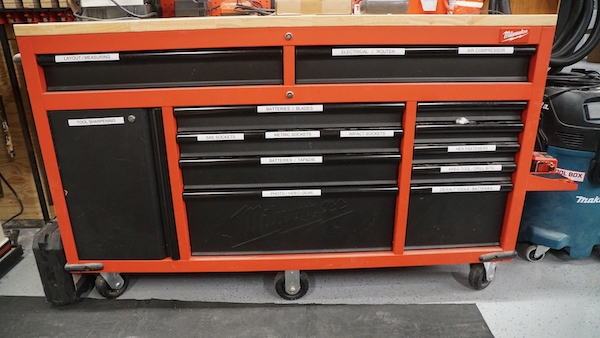
To keep smaller, less used tools organized, and dust-free I deployed two mechanic tool chests. Each drawer is for similar function tools. Here’s is a sample of most of my drawers.
- Screwdriver drawer
- Pliers, Cutter drawer
- Specialty cordless tools
- Electrical drawer
- Wrench drawer
- Sockets and impact drawer
- paintbrush drawer
- parts drawer
- Fasteners [nuts and bolts] drawer unit
- Larger cordless tools
- Misc. drawer
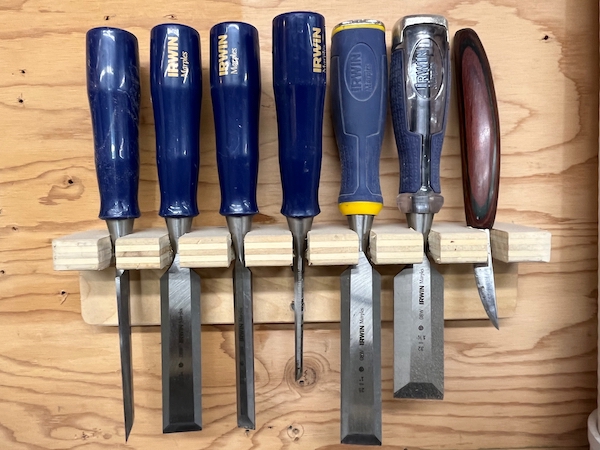
- Chisels, shears, sharpening drawer.
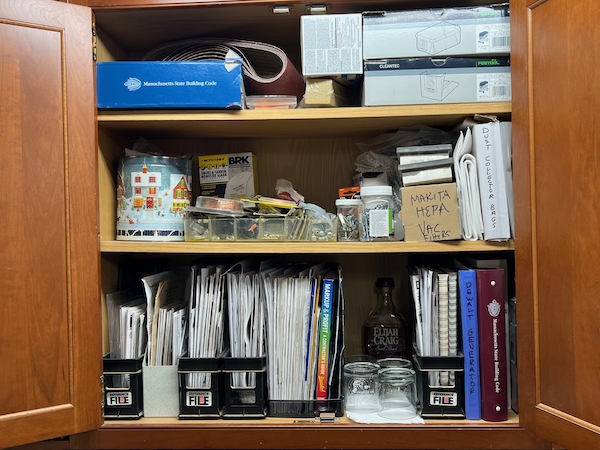
I repurposed two sets of wall cabinets to store all my manuals, Misc. parts, and accessories for my tools, such as:
- sanders and sandpaper
- vacuum bags
- belt sander belts
- router accessories
- shaper accessories and bits
- Heat guns and staplers
- misc. parts
- shelves
- drawers
- cabinets
- Trade books and codebook
In the rear of the shop, I used up some leftover plywood to build open shelving for additional larger, lesser-used tool storage. This place becomes the catch-all for a lot of things, here’s an example of some of the items:
- SDS Drill / Bits / Dust Extractor accessories.
- Pro-press tool, hoses, cords, jigs.
- Routers and flattening mill.
- Water pumps, Tap and Die Set.
- Large and small Domino / Accessories.
- Sawzall / Extra nailers, Cords, clamps.
- Tile laying tools, Concrete nailer, hardwood floor nailer.
- Door mortise and hinge template kits.
- Metal cutting saw, Portable planer, drop cloths.
- Two cabinets house stains, paint, misc. parts, dust collection parts.
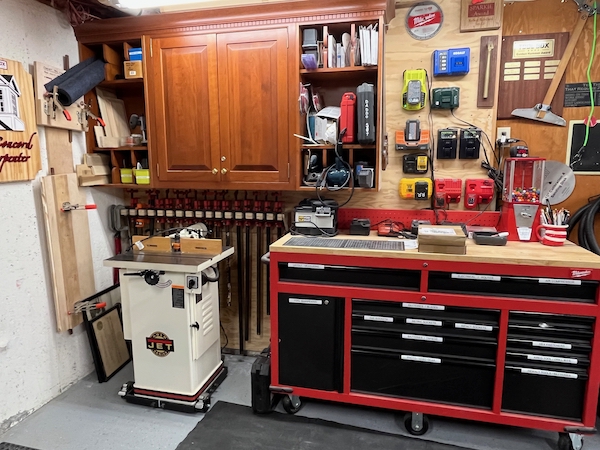
Mobile Bases | Putting Tools on Wheels
Mobile tool bases are ideal for moving, storing, or servicing larger tools in your workshop. In my small workshop, all my woodworking tools are on a mobile base.
This allows me to be able to store these tools against the wall, and out of the way, when not in use. This leaves the center floor area of the shop open for assembling and other operations. I set up my shop tools with mobile bases from Rockler, Port-A-Mate, and JET.
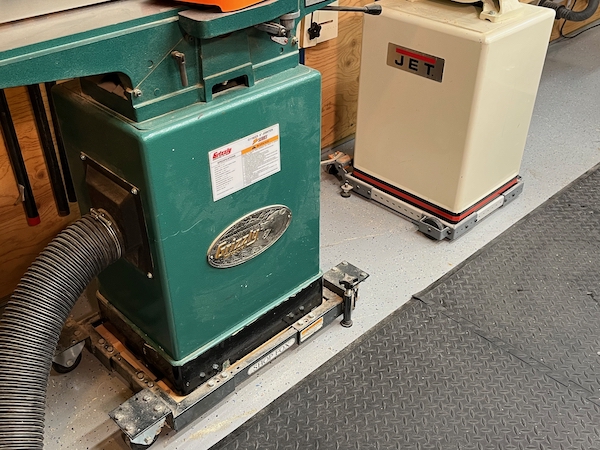
Tables should be on casters as well so you can move them easily and effortlessly.
Storing Tools with Their Accessories
Consider accessory and part storage. These are items that get tossed in a drawer, bucket, or box somewhere and can NEVER be found when you need them. Everyone can see the bright red drill but finding the thin, slim drill bit, that’s another story!
Put similar use tools/accessories together, for example, you should not have your pneumatic nailers spaced all over your shop and then just walk to the opposite end of the shop to refill the nails. Make a storage shelf for your nailers or any other tools [routers, sanders, Domino, or biscuit cutter] and create a space for the accessories, bits, abrasives, or anything that that tool needs to do its job.
Consider dedicating spaces to similar items. such as:
- Organized and labeled drawers
- Repetitive task jigs stored in one place

Label Tools and Drawers – Markers, Pens, Label Machine
Labeling tools can be as simple as a black marker, white paint marker, or real laminated labels. I prefer the latter but have used it all! Being organized is a way of life for me – it helps me navigate life’s chaos! Imagine a workshop where you can find every tool, jig, and board almost without looking. The secret is using labels on tools.
One aspect that I’ve incorporated into my tool organization is labeling toolboxes and tools. Let me explain: If you store your tools in their boxes, labeling toolboxes assist you, or someone working with you, to quickly assess which tool you’re looking for. The same principle applies to parts and fasteners.

Labeling saves time and frustration, for example, I have three routers and all three wrenches for them look the same, but they’re not the same. Labeling them saves me from the aggravation of fiddle around trying to find the correct wrench. A simple permanent black marker makes quick work of this.
I’ve gone so far as to add labels on tools that require consumable accessories like my vacuum bags, specialty bulbs, and air filters. For example, I mark my workshop Delta Air Filter with the replacement filter bag so I can quickly find the part number to order the replacement filter. I do the thing with dust extractor vacuum bags and HEPA filters.
Multiple Use | Space Saving Tools
Multiple-use and space-saving tools are a must in a small shop. Examples of multiple-use tools are my Oscillating bench and spindle saner and Disc and belt sanders. The Disc and belt sander is built on a shelf that has full extension slides. I can pull it out for use and push it against the wall for storage. My two rolling tables are also multiple-use and are used for tool storage, assembly, table saw outfeed operations, sanding, and clamping.
Space-saving tools pretty much mean bench tops tools that can be pulled out to use and store out of the way when not needed. Examples of this in my shop are the thickness planer, track saw, and panel maker.
Building a cordless tool station that allows the tools to be hung, with the charger, extra batteries and accessories is also a huge efficiency win.
Wood Storage
I’ve gone through many iterations of wood storage from piled all around the shop to a rolling cart to what I have now. Currently, I have a small bin with dividers for sheet stock and boards, and wall storage racks up high over my doorway. In another part of my basement, and in my storage shed I have ceiling racks with moldings and other thinner stock.
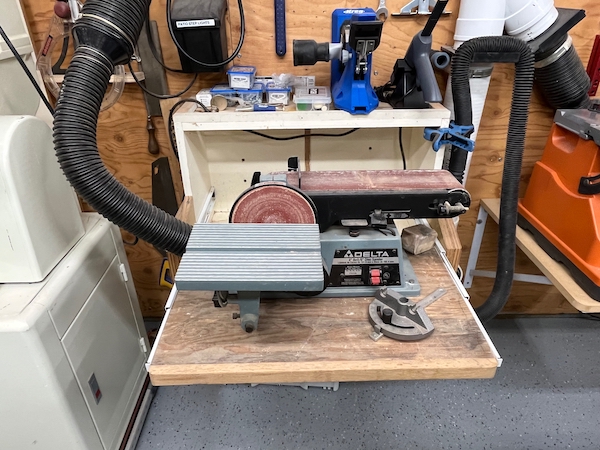
Sanders Mounted to Wall
I mounted my oscillating sand and belt/disk sanders to shelving on the wall. One sander is mounted to a shelf with full extension slides so I can pull it out to use it and push it in to store it. I mounted both sanders next to each other because they fit the same application and they are also both connected to dust collection.
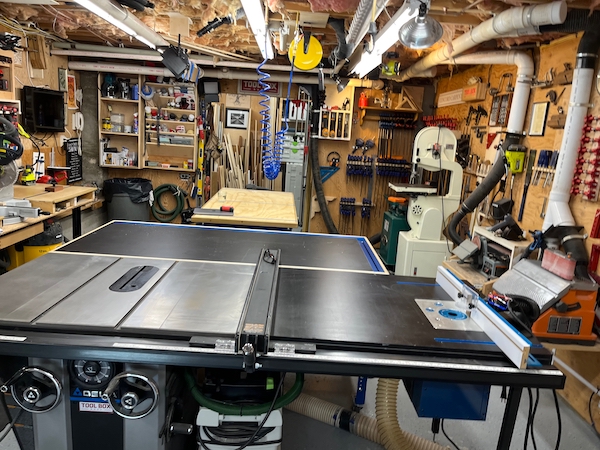
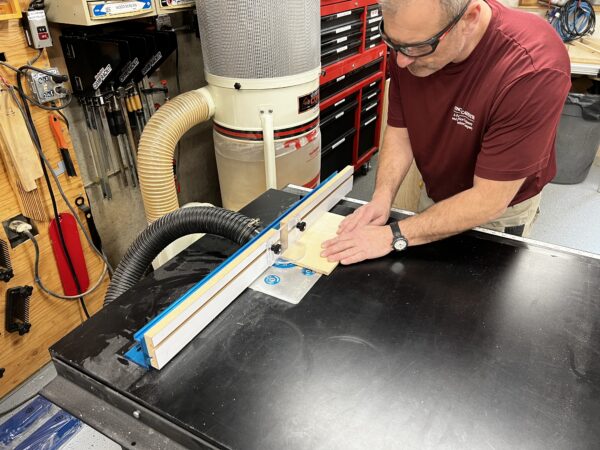
Table Saw | Router Table
The table saw is the center of the workshop and came with a side extension table. I cut in a Rockler router plate, t-tracks, and router fence on the far-right side.
The router has the Rockler Dust right box below the table with the 4” hose connection and the router fence has a 2.5” above table connection. Both the table saw, and router table relates to separate 4-inch dust hoses to a stand-alone Jet dust collector. I did this because I wanted the strongest CFM dust sucking ability for these two heavy dust-producing tools.
Outfeed table and assembly/glue-up table
Dust Collection | Sanders and Miter Saw
In the rear of the shop, I have a Grizzley 2 hp dust collector. I hard piped this unit to a trunk line on the back wall. I used schedule 20 piping to do this, installed blast gates, and created 3 dedicated connections and 3 hook-up locations. This dust collector has a wall-mounted power switch near the router table – centrally located in the shop.
Permanent Connections
- Disc / Belt Sander
- Oscillating belt/spindle sander
Hook Up Locations
- Low floor connection: this connection is located on the back wall, mid shop. It has a dedicated Rockler Dust Right flex hose for sanding or domino connection
- Ceiling connection; [above assembly table] for sander or domino cutter.
- Rear shop wall connection: This connection can be used to connect to my jointer, drill press, or any tool toward the rear of the shop.
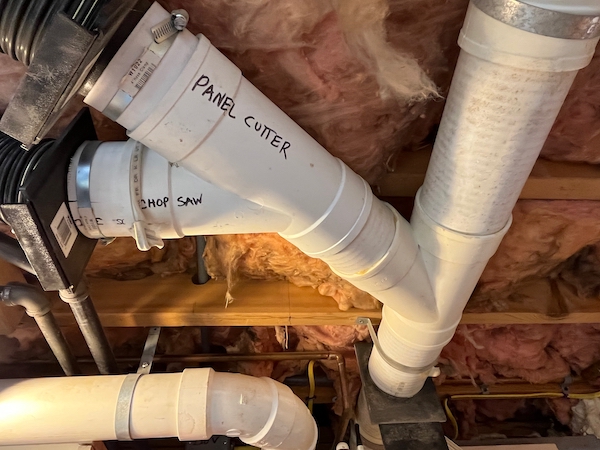
Early on I had a pipe running across the shop ceiling to my miter saw. Connecting to the miter saw was not great and I often [mostly] blew off turning on the dust collector switch across the room. When working in a shop the reality of bouncing between tools is high and many times, I found myself needing to make a few “quick” miters saw cuts. Over the years I have come to realize that the weak link in my dust collection was the miter saw station. I needed to collect dust collection at the source, not have it travel across the shop.
It got me thinking that there must be a better way, so I decided to make a mini dust collection station right at the saw. My plan was simple I was going to dedicate a shop vacuum to this miter saw station and connect the vacuum hose to the miter saw dust port. One thing I wanted to avoid was having to lean over and turn on and then off the vacuum switch, so I researched quality vacuums that had a power tool actuated switch.
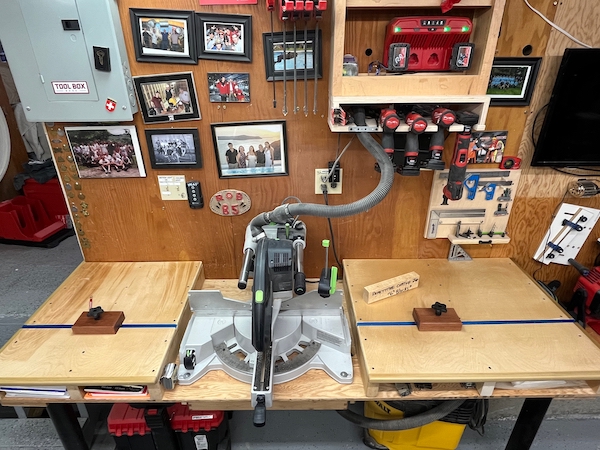
My miter saw plugs into the vacuum and the vacuum plugs into a standard outlet. Once I start the miter saw the vacuum starts and will continue to run for 15 seconds to allow all dust to be cleared from the hose as well as capture any airborne dust after the cut.
Every 15 seconds the vacuum pulses air through the filter to clean the filter of fine dust particles. My vac has a 15-gallon capacity and I use bags – I empty the bag 2-3 times a year, sometimes more.
Not everyone has the budget for a heavy-duty vacuum. An alternative solution to what I did is to buy an I-Socket tool and vacuum switch made by DCG Products, Inc. The I-Socket switch will allow your vacuum to run for seven seconds after you stop your tool to clear out dust from the vacuum hose.

Workshop Dust Collection | Table saw, Router, and Shaper
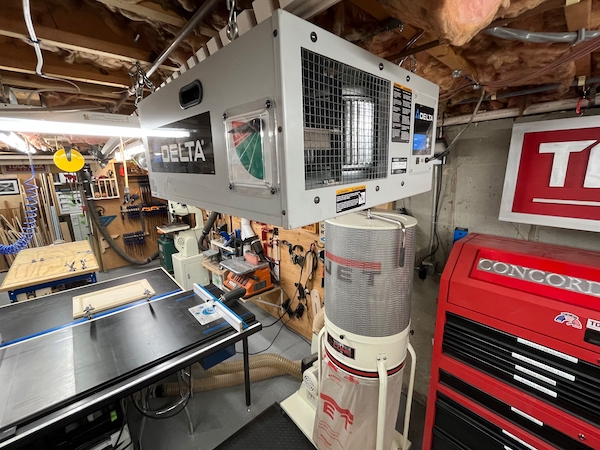
My Jet dust collector is a 2 hp, 230 volts, single-phase, vortex cone collector. To use this machine, I had to wire a 230-volt outlet in my woodshop.
This dust collector is a single-stage machine that is rated for continuous duty. The aerodynamically designed chamber and 14 in. cone combination is what drives the JET Vortex Cone System, the machine “turns” the sawdust, like a tornado, which allows the machine to separate the wood chips from airborne dust.
This cyclonic action takes place in the lower chamber plastic bag. The larger chips fall and the nasty airborne particulate is captured in the upper pleated filter.
When I need to use my shaper or panel cutting machine, I disconnect the 4” hose at the router table and extend it to the other tools. I purposely did not install blast gates because, I did not want to deal with them, and the JET is able to handle two machines at the same time.
I hard wired a switch directly above the table saw to control the dust collector, to prevent me from being lazy and blowing off walking over to a switch on the wall.
The JET has casters that allow the machine to be moved around your shop to hook up to other tools or just moved to sweep behind it.

Workshop Dust Collector Needs
When determining your needs, you should consider the CFM requirements of your tools.
- Table saws, miter saws, shapers, and band saws are rated at 350 CFM.
- Joiners and disc sanders come in at 450 CFM.
- Belt sanders are 550 CFM.
- Thickness planers are 785 CFM.
Other factors to consider when choosing a dust collection system
- Will you operate more than one or two machines at the same time?
- Do you need blast gates?
- Wireless connections
- Lengths of dust collection pipe, including elbows and vertical rise, all of which affect the collector’s efficiency.
DELTA Air Filtration System
Wood dust becomes a potential health problem when wood particles from sanding and cutting become airborne. The purpose of an air filter is to capture and reduce airborne dust as quickly as possible.
In my case…Cedar dust irritates my sinuses, gets into my lungs, and wreaks havoc on my respiratory system for days. Not capturing airborne dust can cause allergic reactions and other health effects such as:
- Eye & Skin Irritation
- Respiratory Effects
- Nasal Cancer
- Increased sensitivity to the wood dust
I installed a Delta Filtration System in my shop to combat the airborne dust particles. I placed it near a side wall approximately 1/3 along a long wall in my shop.
A good rule of thumb is to mount the unit 7-10 feet above the floor, along the longest wall so the intake is approximately 1/3 the distance from the shorter wall. Best practices tell you to mount the unit no further than 4-6 inches from the wall… But that’s not always possible.
The exhaust is the largest determiner of the circulation pattern. by mounting the unit in this suggested location, you are trying to encourage… circulation parallel to the floor/ceiling.
The two most important criteria for an air cleaner are the CFM and the filters. You want a CFM factor that will clean the size of your shop and a filter …. that removes the particle size that you are concerned about.
The delta dust filtration system I use has a three-pocket inner filter, a heavy-duty pleated outer filter, and an electrostatic pre-filter … that works together to trap dust particles larger than one micron. To determine the size or required airflow, use this formula:
The volume of your shop (Length x width x Height) times the number of air changes per hour (typically 6 – 8) divided by 60. This will give you an answer in Cubic Feet per Minute …. which is how air cleaners are measured.
I turn my unit on and leave it on during all cutting and sanding operations. Sometimes I utilize the 4-hour timer and let it run after I’m done in the shop. Using the timer allows the filter to continue cleaning the air after I’ve left the shop, which helps keep the shop cleaner as well as dust from migrating into the rest of the house. The results are immediately noticeable. The air is cleaner, and there is little to no residual dust on the tool tabletops.
My Delta Unit is perfect for my 14 x 28-foot shop. It can filter the air in a 20-by-20-foot room 13 to 18 times an hour. For health reasons you really need to consider installing a dust filtration system in your shop.
x

In video 3 we’ll cover
- Compressed Air
- Temperature, ventilation, and humidity
- Lighting, power, and plumbing considerations.
- Tool and wood storage
Compressed Air in Workshop
Years ago, I installed a pipe from my shop out the foundation wall, underground to my shed. I did this to avoid the loud compressor noise. A few years ago, a landscaper cut and spliced but pipe and it was never the same. So, I moved my compressor into my shop, but I built a plywood box lined with Safe and Sound ROXUL on the wall. The ROXUL deadens the noise of the compressor by 50%.
The airlines in the shop are copper hard piped to the center of the shop where I have a coiled hose connection. The compressor connects to the hard piping with a short flex hose and is filtered by a moisture separator. Hard piping air in your shop eliminates the hose trip hazard and ensures that you always have air when you want it.
I sued compressed air for all my nails, brad, pin, and staple fastening as well as for cleaning dirt and dust off parts.
Workshop Temperature, and Humidity
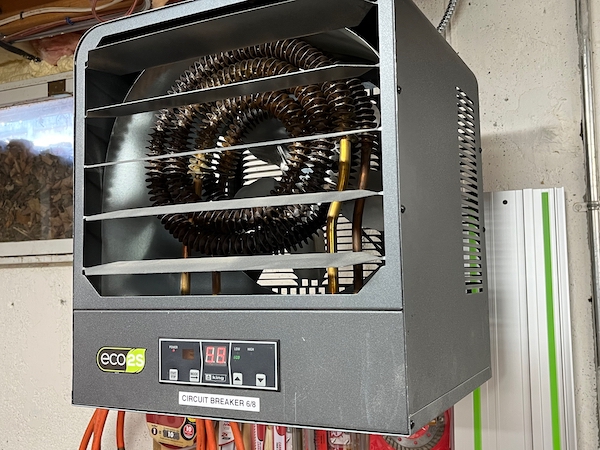
To heat the shop, I installed a permanently mounted 7KW King high-capacity electric space heater with a 25,600 BTU rating. I mounted the heater near the bulkhead doo, the coldest area of the shop. The heater faces a downrange in the shop and does a great job bringing up the temperature on cold days.
I added rim joist insulation and an insulated door to the bulkhead last year and the temperature in the shop increased 10-degrees, it was amazing. exterior door
Controlling Workshop Humidity | Keeping Rust Off Tools
It is much easier to protect your tools from rust than to deal with the consequences of rusty tools later. Three main components for protecting your tools from rust are:
- Control humidity
- Avoid getting tools wet
- Apply a protective coating to your tabletop tools on a regular basis
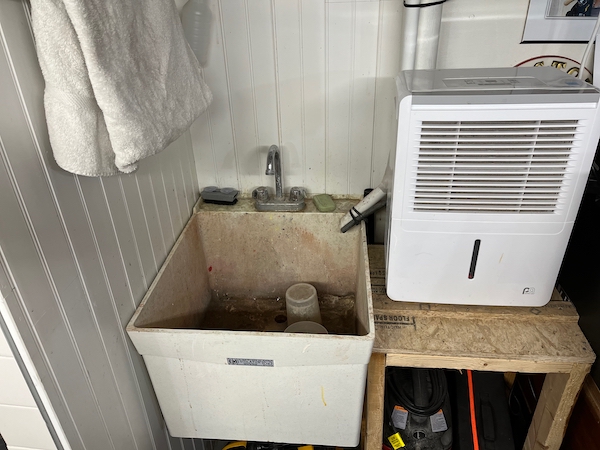
Having a basement workshop in the Northeast means having to deal with humidity. Most basements are not heated or cooled, and humidity can wreak havoc on shop tool surfaces. Finding light rust on hand tools, table saws, band saws, and drill press tables is not uncommon. To deal with the shop issues I purchased a dehumidifier, it is in the older portion of my shop and drains directly into my slop sink. This dehumidifier is always on but does not run in the winter, only in humid months.
One area that dramatically improved the shop’s humidity was the installation of a drain along with the bulkhead door. the drain connects to a deep dry-well well below the frost line. If I keep the drain open, this drain works year-round. Prior to this, I was getting some seepage and sometimes puddling of water near the door.
http://www.aconcordcarpenter.com/how-to-keep-rust-off-woodworking-tools.html
I also treat all metal surface tops with either a Boeshield T9 spray or Butchers paste wax, which helps to keep the metal tops rust-free for a long time. Spray coatings apply faster but are more expensive than paste wax. Both works well.
Workshop Lighting, Power, and Plumbing Considerations.
Spend the time and money to wire your shop properly. That means you should not be relying on extension cords but instead have dedicated 20-amp circuits for tools. Other examples are floor outlets for table saws, and plenty of wall outlets so you can reach them with the cord supplied with the tool
- LED lighting [spotlights] – changed out fluorescents for LED strip lights.
- Wire shop for specific tools – 230, 240, hardwire dust collector
- Install separate 20-amp circuits
- Pull down the power cord at your assembly table
- Utility sink – hand washing, paintbrush cleaning,
Hand Tool, Workshop Wood Storage
- Keep most used tools, clamps, and fasteners at hand – avoid walking across the shop
- Hang often reached for tools
- Store infrequent tools in drawers – labeled and organized by function
- Keep accessories together with tool [drill press wall, sandpaper, cutting blade accessories, nail gun station, clamps, router items on wall, all wrenches, screws, wrenches, and screwdrivers]
- Label everything. [ marker, paint gun, label maker]
- Wood storage ideas – locations. [ceiling, and rear shop dividers]

Is Your Workshop Organized?
Time-Sink Considerations
- How many times did you SEARCH for a tool in your workshop?
- Was the accessory with your tool?
- Did you search through your truck for a bit, blade, or accessory?
- How do you store parts and fasteners?
- Do you store task-specific parts, tools, or accessories together?
- Do you have a system to get multiple tools and accessories into a job in one trip?
Where are your “time sinks” when it comes to tool storage, set up, and cleaning up
□ How many times did you walk around your shop, looking for a tool?
□ Was the accessory with your tool?
□ How do you store parts and fasteners?
□ Where are your “time sinks” when it comes to your workshop, tool storage, set up, and clean up?
In the end, you’ll spend less time searching, resulting in you spending more time working. Time saved is money earned or … more time!