How To Install A Vented Microwave Oven

How To Install A Vented Microwave Oven Under A Cabinet
Today’s task was to install a microwave oven under the cabinets and to install a through the side wall vent. Most of the manufacturer instructions detail specifically how to install a vented microwave oven so make sure to read these instructions and to purchase all of the duct work needed to complete the project before you start.
Microwave Power Cord:
You will need an electrical outlet. Most folks locate the outlet inside the cabinet above, out of view.
Microwave Mounting Options:
Manufacturers usually require the microwaves to be hung from a cabinet above or to mount to the wall with a mounting bracket. sometimes this mounting bracket is an accessory so figure out how you will be mounting the unit when purchasing it.
All microwaves come with templates that help you locate your holes either above in the cabinet or on the wall. If you do mount to the wall it is important to attach your fasteners to at least one wall stud. Use toggle bolts when wall studs are not available.
Microwave Venting Options:
Microwave ovens vent three ways. Exterior venting models require you to adapt to the following three types of ventilation:
- Outside Top Exhaust (Vertical Duct)
- Outside Back Exhaust (Horizontal Duct)
- Recirculating (Non-Vented Ductless
Most cabinets spaces above a stove are 30″ wide and you need to make sure that this space is free from obstructions. If the space between the cabinets is greater than 30′′ yo may need to add filler pieces. All kitchen cabinet supplier offer Filler Panel Kits for this purpose.
Venting To The Outside:
If you are going to vent your microwave oven to the outside you will need to install an exhaust duct with a vent hood. Most hood exhausts has been designed to mate with standard 3 1⁄4′′x 10′′rectangular duct.
If a round duct is required, a rectangular-to-round transition adapter must be used. Note – Do not use less than a 6′′diameter duct as velocity will be restricted.
Preparing the Vent Hole In Wall:
- Place the template or mounting plate against the rear wall and locate and size of the wall cutout for the rear wall duct.
- Use a saw drywall saw to cut out the opening.
- If a wall stud is in the way use a reciprocating saw to remove that section. One wall stud can be cut without concern. The Best scenario would be to head off the cut wall stud to the to adjacent wall studs. Unless the wall board has been removed, most of the time you will not have room to do this.
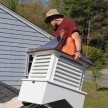
- Cut the exterior hole in the wall and remove any siding necessary to install your exterior vent hood. A proper installation will include some siding or trim work around this hood.
- Most microwaves are shipped assembled for top exhaust. You will need the exhaust adapter for installation in the rear wall opening. To remove the exhaust adapter from the microwave remove tape securing damper.
- Fit the exhaust adapter into the house duct per instruction manual
- Make sure the exhaust adapter is lined up with the house duct and lines up with the holes in the mounting plate.
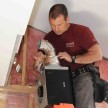
- Line up microwave to duct and connect by placing it on the wall bracket or connecting bolts above. This usually takes two people.
- Install exterior vent hood, utilizing proper exterior installation techniques applicable to your siding material. [Use 3M flashing tape or Vycor, or Tyvek tape to assist] ensure that water will not enter the building envelope.
- Re-install trim or siding.

Photo of unit installed – it was heavy and bulky.

Finished view from the inside. Looks easy!