Deck Sanding

 How Deck Sanding Can Improve Your Home’s Resale Value
Did you know that deck sanding can dramatically increase the resale value of your home? This DIY tutorial teaches you how to do deck sanding easily.
Real estate agents use many techniques to increase the resale value of homes and deck sanding is one of them. Unfortunately many homeowners are not aware of such techniques and when they are looking forward to sell their home, maintenance work is not a top priority for most of them.
What they fail to comprehend is the fact that a little DIY maintenance can dramatically increase a home’s resale value. Sanding has utmost importance among outdoor maintenance jobs because a clean deck easily convinces the buyer that the home is well-maintained.
DIY Deck Sanding – A Step By Step Guide
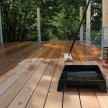
Sanding not only makes your deck look great but it ensures longevity of the wood, thus costing you very less on maintenance in the long run. When you are putting your home for sale, this is surely going to be in the seller’s favor.
There are 4 basic steps in sanding a wooden deck. They are:
1. Deck Inspection
2. Deck Cleaning
3. Power Washing
4. Sanding
These 4 steps are very simple and it won’t take you more than a week or two to transform your rotting wooden deck into a flashy one that will urge you to organize barbecue parties every weekend!
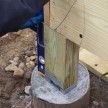
Deck Inspection – Things To Look For
A perfectly finished wooden deck can’t be achieved without attention to detail. In close inspection, you can find imperfections, mold growth and darkened areas of wood that need extra care. Before sanding the wood, loose planks should be fixed and rotten wood should be replaced. If the homeowner fails to do so, a sanding job won’t yield the anticipated results.
If the deck is varnished, you need to use chemical remover before cleaning the deck. Chemical removers have different user instructions: in stubborn areas, you may have to use it more than once.
Deck Cleaning – Chlorine Is A Killer
It is better to avoid chlorine based deck removers since it can damage the wood and develop an unnatural ‘white’ shade on the planks.
The best deck cleaning solution is oxygen based cleaners that are powerful in removing mildew and the grey shade developed on wood over time. The grey shade is a result of chemical reaction caused by ultraviolet rays; the hydrogen peroxide solution formed by oxygen based cleaners can remove this shade.
Before applying the cleaner, make sure to wear rubber gloves and plastic drop clothes to protect yourself from the harmful chemicals. Make sure that you mix the chemical as per the manuals instructions. Never use your judgment in mixing chemicals as it can damage your deck if the intensity is high or you may not yield good results due to low intensity.
Instead of trying to clean the entire deck at once, it is better working in sections so that the cleaner will have enough time to work on the wood. You need to leave the cleaner on wood from 10 to 20 minutes, according to the manufacturer’s specifications.
Once the specified time limit has been reached, you can use a hard bristled push broom to remove the dirt.
Power Washing Techniques
Power washers are highly effective tools for outdoor maintenance and they can clean decks very effectively. However, it is recommended to use them in a low pressure setting as high pressure can damage the wood.
Soft woods can be cleaned with a pressure of 500-600 psi while harder woods may need around 1200-1500 psi. It is recommended to use the lowest pressure setting that is still effective. In some cases, multiple adjustments are required to find the optimum power setting but the extra effort will really pay off.
Deck Sanding
The most important part in deck sanding is choosing the right grit. For most home DIY outdoor maintenance jobs, preparation is the most crucial part. With adequate preparation, you can achieve great results despite limited experience but if you are not prepared things can turn; even in unexpected places.
For floor sanding, a grit of 60 or 80 is highly effective while 80 or 200 will work very well on handrails. It is not recommended to use grits over 100 as it will excessively smooth out the wood, making it repellent to stain and sealer. If wood doesn’t absorb the stain effectively, it won’t have longevity.
Guest Writer Bio: Olger Fallas is a local contractor in Maplewood, New Jersey. He specializes in interior and exterior painting, deck refinishing, power washing, and carpentry.