Butcher Block

Butcher Block Counter

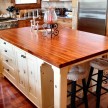
Gluing up a Maple butcher block counter: Butcher block counter tops are natural, beautiful, practical, renewable, economical, and, contrary to popular belief, one of the safest, most sanitary kitchen work surfaces available.
A customer of mine recently asked me if I was willing to glue up two sections of butcher block counter they had bought. They bought two 24” x 60” sections and wanted to glue them together to cover a kitchen island they created with cabinets.
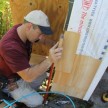
The two sections had edges that were chamfered so first order of business was to run them through the table saw and rip off the champher.
Once I had the champher removed from the butcher block counter I used a jointer to clean the edge and then pushed the two planks together to see how the joint looked. If the joint looks good when you hand mate two pieces you can be assured that it will be invisible when glued and clamped.
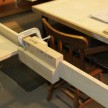
To assist in alignment and the glue process I used a biscut joiner to cut slots in both planks. Simple woodworking glues and biscuits were used to join both butcher block counter planks together.
I needed long clamps to span the 50 plus inches on the planks so I used long pipe clamps. I always use clamps on the bottom as well as the top to keep the board from cupping but to be safe I also used a clamping caul I created out of scrap plywood.
A clamping caul is basically a “T” shaped board that is clamped to the board to keep multiple boards in the same plan or int his case flat.
After 24 hours of dry time I took a random orbital sander the butcher block counter.
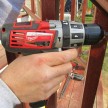
Installing the butcher block counter was a matter or situating it on the cabinets and once that was predrilled slightly larger holes than a screw shank through the cabinet mounting blocks. I then predrilled smaller holes into the maple butcher block. The elongated pre-drilled hole allows for wood movement of the counter.
I installed large headed cabinet screws with washers.
It is not advisable to set the counter top with adhesive caulk; the top must be securely fastened to the base unit by using appropriate length wood screws. Most cabinet manufacturers provide corner blocks within the cabinet for attaching the counter top to the cabinet base, and pilot holes predrilled through the corner blocks into the underside of the top. Be careful that you do not drill too far into the top.
Some manufacturers of cabinets and appliances take into consideration expansion and contractions by slotting the screw holes. Where a manufacturer has not made such allowances, you should use an undersized screw with a washer or counter sink pilot holes are drilled at the extreme ends of the slots and the block has expanded, you negate the advantage of the slots.
A suggested way to make this allowance in attaching wood parts is to counter sink the pilot holes where the wood part attaches to block, or make the pilot holes oversized using a flat head screw and a washer.
If you were installing a back splash along with the counter top, it would be advisable to attach it at this time. The back splash is usually attached to the surface, not to the back edge that would be against the wall.
In many areas post-form counter tops are popular. Butcher Block does not come in this shape, but many fabricators will use a hand router to round the front edge of the block to conform to the front edge of the post-form top. When this cut is made, sand smooth and finish with “Good Stuff” Urethane Gel clear protective finish.
Another light sanding was done to remove dirt and fingerprints and then we sealed the counter top with a food grade oil finish.