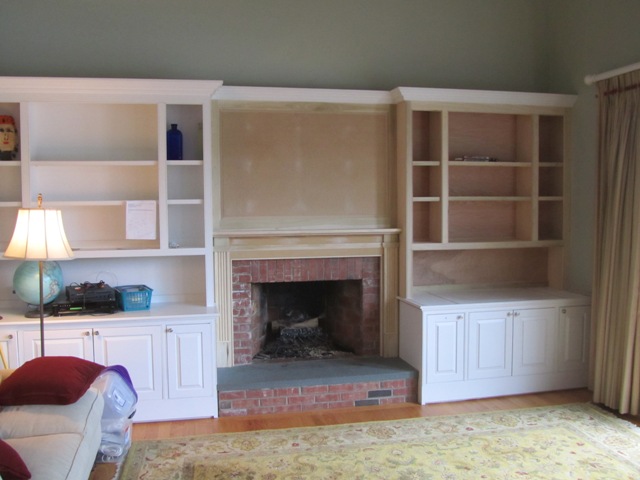
Custom built-in bookcase and mantle project:
On this project we were asked to remove the built-in cabinet and replace it with a built-in bookcase and mantle installation.
New Design – Built-In Bookcase And Mantle Installation
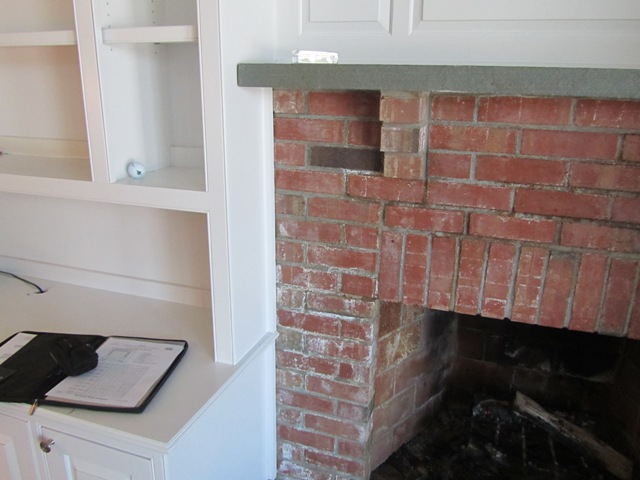
The plan was to install a custom mantle that is lower than the existing blue-stone mantle and built a new panel above the mantle.
The cabinet on the right would then be replaced with a bookcase to match the one on the left of the fireplace. Once this was all done a television would be installed above the fireplace.
Before we started we needed to configure the base cabinet to accommodate audio visual equipment. Cabinet door on the right was really a drawer that had been built for CDs. We removed the drawer slides and installed hinge and a shelf inside to make this a functioning cabinet storage space.
The two doors on the right needed a shelf installed and some structural work done to the underside of the cabinet.

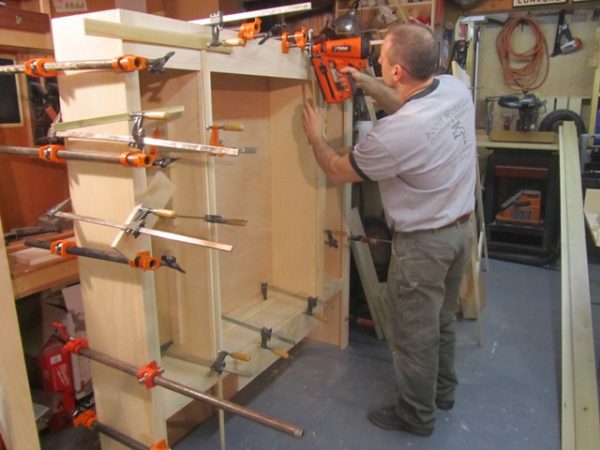
Next we removed the top portion of the cabinet and discarded it. I used long strips of straight plywood as a story pole to mark / duplicate the bookcase height, depth, width and other important measurements. The same was done for the mantle and new panel above.
Fireplace Mantle
We custom ordered a Somerset mantle from Premier Mantles and specified that the left and right returns be cut at exactly the measurement of the space between the two bookcases. The mantle and corbels were then removed. The new Somerset mantle will cover the area where the broken off corbels are.
Equipment Considerations Start At The Design Phase:
Because all of the AV equipment is going into this new bookcase base cabinet we designed the new bookcase to 3/4″ less depth than it’s flanking sister. We did this so we could fur out the wall behind it with 3/4″ plywood strips and use that space as a chase for speaker, TV and HDMI cable.

Making the Bookcase in the Workshop:
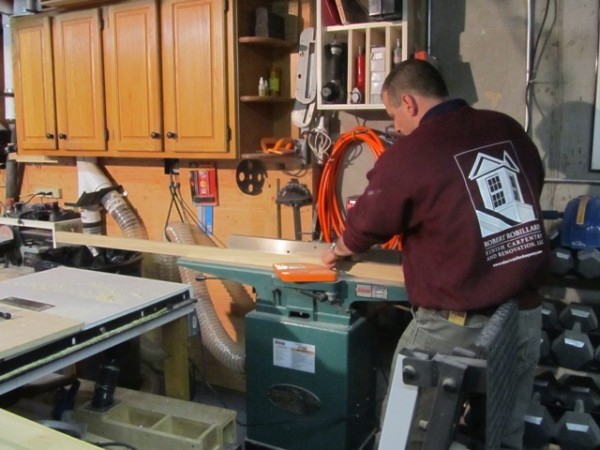
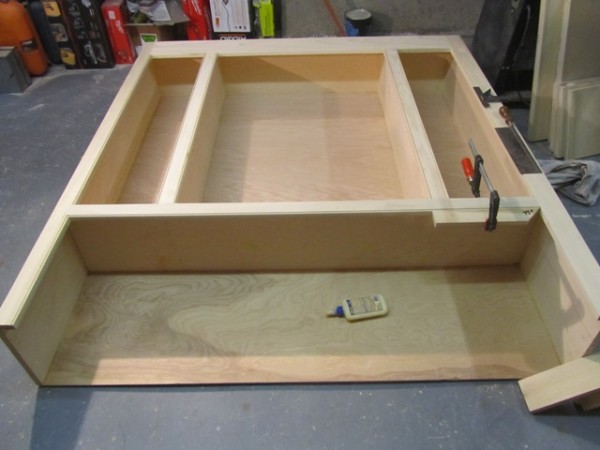
Once back in the shop I ripped all the plywood parts to their rough widths. Using the story pole I ripped and cut everything to the correct width length.
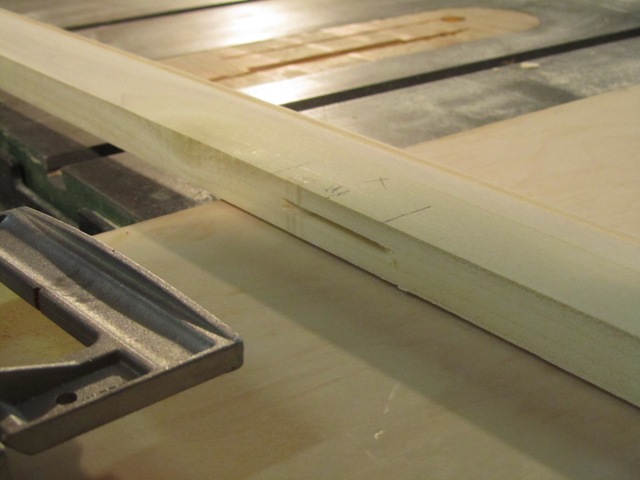
I made the bookcase carcase out of maple plywood and used a dado blade on my table saw to create tongue and dado joints. the tongue and dado joint hold everything together and give better surface for gluing. Glue and finish nails to hold it together.
See my post how to make a bookcase.

Installing the Bookcase Back Panel:
Once I have the carcase assembled I square the case and add a 1/4″ maple plywood back to the bookcase. The plywood back helps square the case as well as give it strength. I like to use 3/4″ staples and wood glue to attach the back panel.
Because the bookcase is against the mantle and the TV panel I did not have to worry about the back plywood panel edge showing. If this was a concern I would have used a dado blade on the table saw to cut a rabbit cut to hide the plywood.
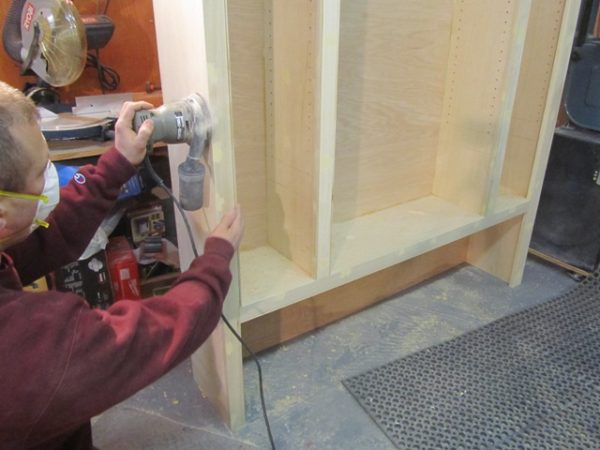
After dealing with the back panel I fill any nail holes and defects that will show and give the bookcase carcase a good sanding. It’s easier to sand the case at this point prior to installing the face frame.
Making the Face Frame:
I also used the story pole to layout and make the face frame. All face frame and shelf nosing trim was done with paint grade poplar wood. I like poplar, its a hard, durable wood, easy to work with and usually has no knots.
Prior to gluing any bookcase components together everything gets a clean and straight edge on the joiner. Doing this now makes for tighter glue joints and easier sanding of mill glaze later.
One of the most common methods of building a built in bookcase involves using a face frame, which is an assembly of vertical and horizontal wood slats, typically 1×3’s. The face frame is attached to the front of a plywood case. Using a face frame construction on built-ins is a popular design in older homes and traditional settings.
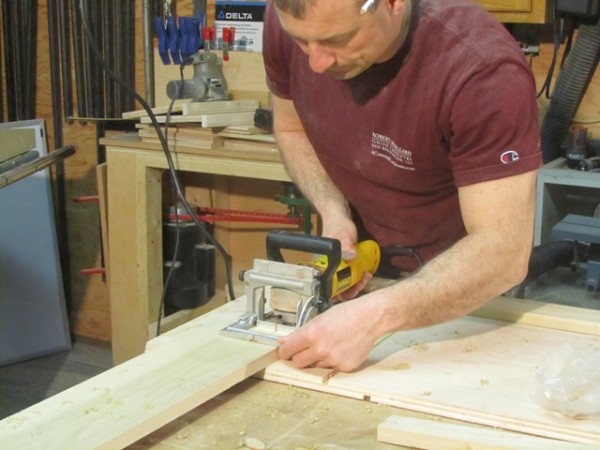
I use a biscuit joiner to cut slots in to the face frame for wood biscuits. A biscuit joiner, also known as a plate joiner is a tool used to join two pieces of wood together. It uses a 4″ diameter carbide tipped circular blade to cut a crescent shaped slot or hole in two opposing pieces of wood. A wood biscuit is then inserted in the slot with wood glue and the assembly is clamped.
Wood biscuits are made from compressed beechwood and are often called Wood Plates or Wafers. Wood biscuits are used for edge or corner-jointing. The wood biscuits are fitted into slots usually created with a biscuit joiner. The biscuits add strength to the face frame, especially prior to installing it. The secret behind using a biscuit is when it comes into contact with a water based glue it swells and creates a tight locked joint. Once all of the biscuit slots are cut I insert the biscuits and dry fir the face frame prior to gluing and clamping. A quick check with the story pole ensures that I stay on track.
Finishing the Face Frame
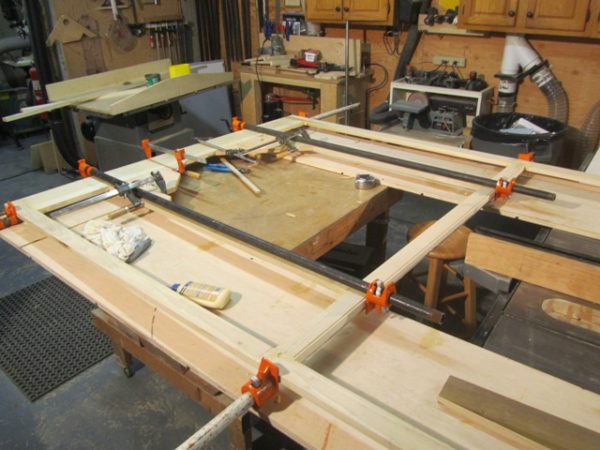
After checking the dry fit, I add glue to all of the slots, insert the biscuits and then clamp the face frame together with bar clamps. When building bookcases, it’s important to have long bar clamps. If you don’t then you need to join your bar clamps. To do this see my post on Size Matters.
I let the face frame dry in the clamps over night, often times planning this for the end of the day. If possible I sometimes move it off to a side of the shop to continue working.
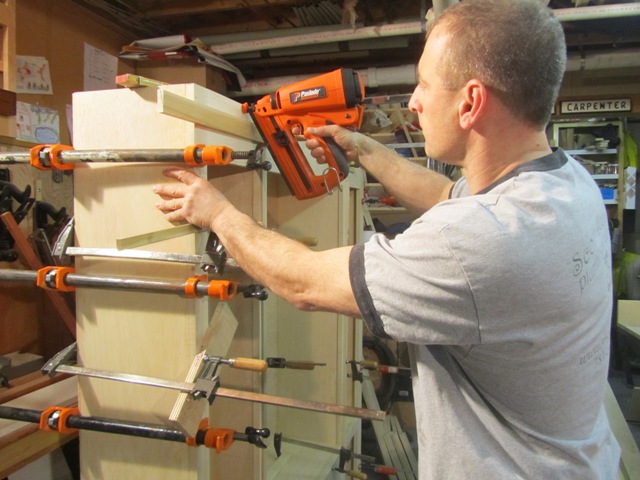
Once the face frame was dry it I remove the clamps it and give the entire face frame a thorough sanding. I pay special attention on getting the joints smooth as well as removing all of the mill marks that were on the face of the wood and from my edge jointing. After sanding if is time to apply the face frame to the bookcase frame. I do this with wood glue and a finish nailer.
My nailer of choice is the Paslode cordless finish nailer. I’m a recent convert to cordless nailers and this tool allows me the precision, reliability and speed of a pneumatic nailer all without the cord.See my Paslode Cordless 16 Gauge Angled Finish Nailer Review
After applying the glue to the bookcase carcase edge I clamp the face frame in place and work it along the edge to maintain the proper reveals and to keep edges flush.
After letting the face frame dry in the clamps I fill all nail holes as well as force wood putty into and seams that were glued. I do this because sometime minor imperfections at the plywood edge cause a depression and show up like a sore thumb with paint. After the wood putty is dry everything gets a thorough sanding with special attention to face frame edges and seams.
Shelves And Shelf Nosing:
Next I cut the shelves to the correct width a dry fit them in the case. Once I was satisfied I ripped stock for the shelf edge and glued them on using brad nails and bar clamps to hold everything in place until the glue dried. Once dried the bookcase shelves received a rough sanded. Then I ran them through the router with a beading bit to make the 1/4″ bead detail on the lover edge. I prefer to use my Porter-Cable random orbital sander for this task.
The random orbital sander allow speed and aggressiveness all with the ability to produce a fine finish and no swirl or scratch marks and is great for sanding two pieced of wood with that meet at a joint. The random orbit is produced by simultaneously spinning the sanding disk and moving it in an ellipse, which ensures that no single part of the abrasive sanding material travels the same path twice.
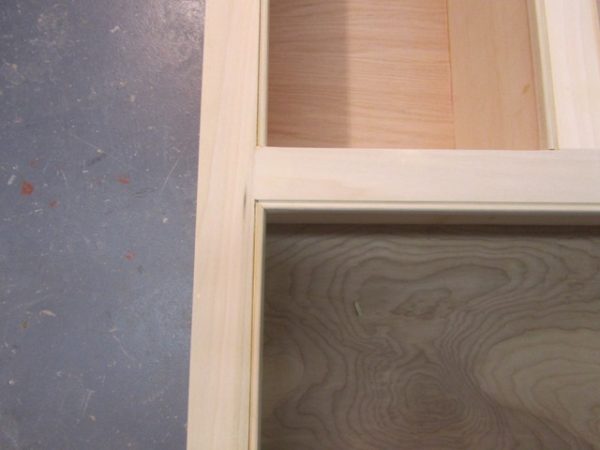
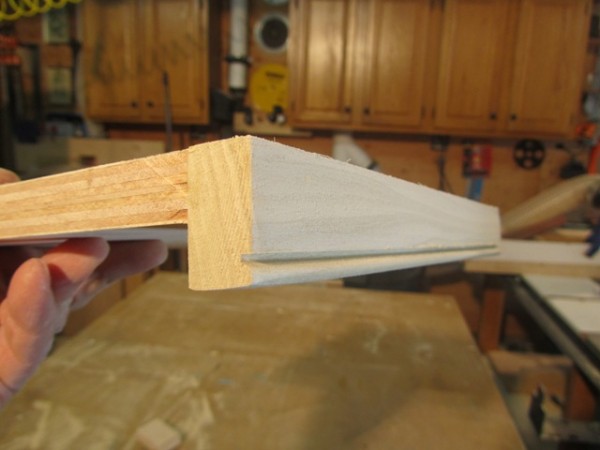
Adding a shelf nosing adds a visual “weight” to the shelf that a nice aesthetic look. In this case I am mimicking the flanking shelf nosing. Shelf nosing also have another important function. The prevent the shelf from sagging. Shelf sagging is measured in deflection, or the maximum distance in which the middle of the shelf bends as a result of weight placed on the shelf. The longer a shelf the more it is likely to deflect. Designing a shelf with 1/4″ or less is a good goal to aim for designing shelving.
On this bookcase we were mimicking the flanking bookcase so I also needed to make and add a 1/4″ bead from to the inside edges of the bookcase openings. Note the strip of scrap plywood taped to the router table. This was to help keep the shelf level in relation to the router beading bit. The next step was to make bead strips to apply to the bookcase face frame edges. I did this by first applying the 1/4″ bead to a bunch of scrap poplar trim stock and then ripping the bead to size ion the table saw. Make sure to use a sacrificial push block on the table saw when ripping thin strips like this beading.
Adjustable Shelves:
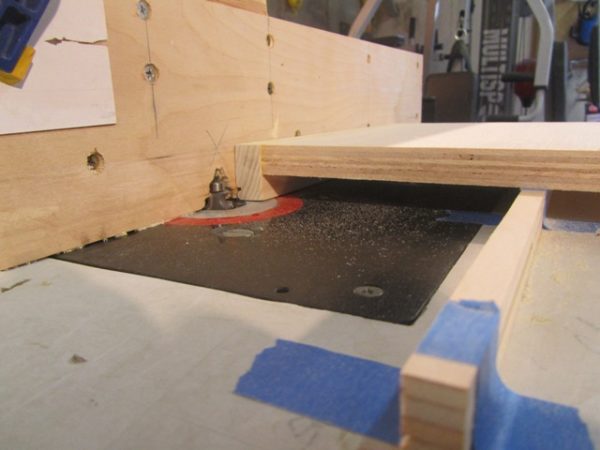
After all of the beading was installed it was time to drill the shelf pin holes. I use a jig I purchased from Rockler that comes with a spring loaded bit. The jig allows me to dill consistently spaced holes at the same depth each and every time.
The jig is a clear acrylic template allows you to drill both 1/4″ and 5mm shelf pin holes on perfect 32mm centers every time. It measures 1/8″ thick x 20″ long and is adjustable so you can place your shelf pins anywhere from 1/2″ to 2-1/2″ in from the cabinet’s edge.
Once this is done the bookcase received a final sanding ans awaits delivery to the job site. Now I turned my attention to the panel above the mmantel.
Mantle Panel Construction:
Above the mantel a style and rail constructed raised panel will cover the wall and have a TV mounted to it. This panel will be furred out from the plaster wall 3-1/2″. this was needed in order to cover the brick that was below the original blue stone mantel. We are lowering the mantel mainly so the TV is not too high.
The first step was to use the story pole and layout the styles and rails to my overall measurement.
Style and rail construction is a technique used in the making of doors and wainscoting with floating panels. The panel is never glued to the frame but is left to ‘float’ within it so that with seasonal movement the panel does not distort the frame. 
With a large area I usually divide the panel into smaller panels but it was decided that one large panel would look and mount better with a TV in front of it. I chose to use Medium density Fiberboard [MDF] for the panel.
Medium-density fibreboard (MDF) is an engineered wood product formed by using wood residue into wood fibers, combined with wax and resin binder, and by applying high temperature and pressure. a major plus is that MDF paints exceptionally well.
Milling The Styles And Rails:
I ripped all of the stock to size and cleaned the edged on the joiner. Once the stock was straight and flat I used my home made wood shaper and a cope and style bit to make the necessary cuts. simple hold down jigs hold the stock secure as it passes the wood shaper bit.
I dry fit the styles and rails together and then measure for my panel making it 3/16″ smaller in both width and height.
Once the panel is made I will glue only the styles and rails. The frame is held together by a joint between the edge of the “stiles” and the ends of the “rails. It is surprisingly strong when dry.

Milling The Raised Panel:
A raised panel has edges have been beveled to provide an aesthetically appealing, three-dimensional effect. I love the shadow lines a raided panel gives off.
The panel sits in the groove created in the styles and rails. Panels should be slightly smaller than the available space within the frame to provide room for movement. Wood will expand and contract across the grain, and a wide panel made of solid wood could change width by a half of an inch, warping the door frame.
This is why I chose to use MDF for this panel. I was also concerned about heat created and rising from the fireplace. A floating panel allows it to expand and contract without damaging the style and rail frame. This principle also applies to panel doors.

With the panel measurements in hand I rip the MDF panel to size and then feed it through my panel machine.My panel machine is an old Craftsman radial Arm saw that I have build a fixed table around and use it as a dedicated raised panel saw. I use a three headed cutter and custom grind-ed and filed a straight dado blade into a beveled cutter. Raised panel profiles can be an ogee, chamfer, cove or scoop. I’m a fan of the bevel or chamfer.
Before cutting into my MDF panel I make an exact fit on a scrap piece of material and note the depth setting on my panel saw. Dry fitting is the best way to test for fit. I take several passes around and lower the depth of my cutter each time.Once done I dry fit the panel into the styles and rails. If I’m satisfied with the fit it’s time to glue and clamp the panel.

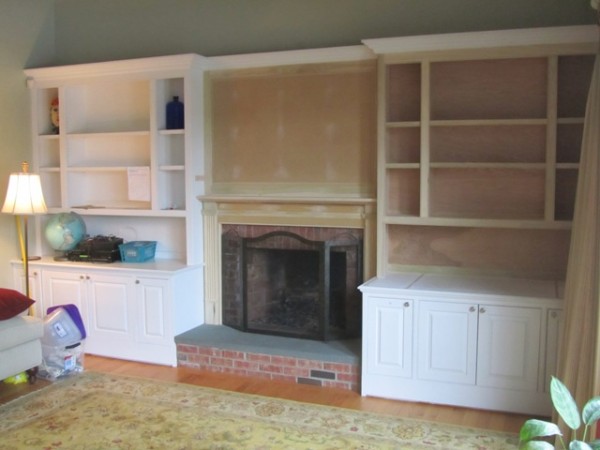
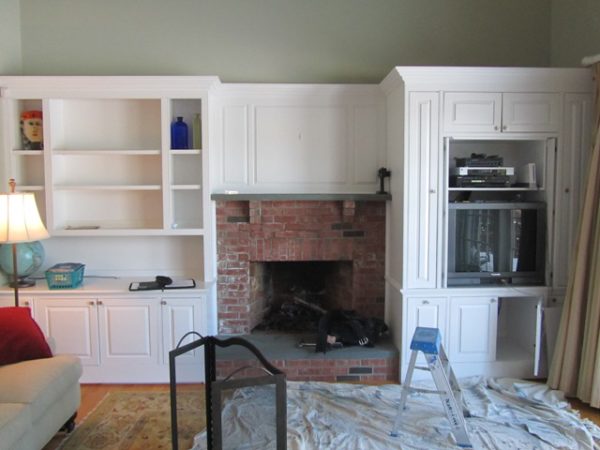
Installation
Today we installed the bookcase, fireplace mantel and the panel above the mantel. Earlier we tool off the blue stone fireplace mantel and brick corbel supports in order to install a shorter mantel to accommodate a flat screen TV. A new Somerset Mantel will cover and hide the torn off corbels and a larger panel will cover the exposed brick.
In order to get the panel too cover the brick we had to fur out the wall above 3-1/2″ to match the face of the brick. We used 2×4 lumber on edge and Timberlock type lag structural screws to lag the studs to the wall. We took care to install all of the lags in the same spots on each stud.
The measurements were then recorded for when the TV wall mount is to be installed. There is nothing worse than drilling into a brand new piece of custom work and hitting a screw or lag.

Planning For A Flat Screen TV:
The electrician ran all of the HDMI, cable and power wires and we fished them to the top of our furring strips for easier access later. He will come back and mount boxes for all of the connections. These boxes will be hidden by the TV.
We purposely designed the new bookcase 3/4″ smaller than the one we were trying to match. We did this so we could fur out the wall behind the bookcase to accommodate future speaker or audio visual wires.
Prior to installing the bookcase we also cut out a rectangular slot in the base cabinet to make getting wires from the base cabinet to the rear of the bookcase.
Installing The Fireplace Mantel:
After furring the walls we set the mantel in place. We attached 3/4″ birch plywood scraps to the face of the brick with 2-1/2″ Tapcon screws. The plywood scraps will allow us to nail the mantle to the fireplace.
Both base cabinets had return molding touching the brick so we had to cut the mantle profile out in this molding. We used a Japanese saw, utility knife and a sharp chisel to carve out the molding and then slid the mantel down.
With the mantle in place we cut installed the panel. Typically a panel this size would have been done as three smaller panels but it was decided that it would be better to have one panel since a large TV was being installed. The panel sits on top of the mantel shelf and was attached with finish screws.

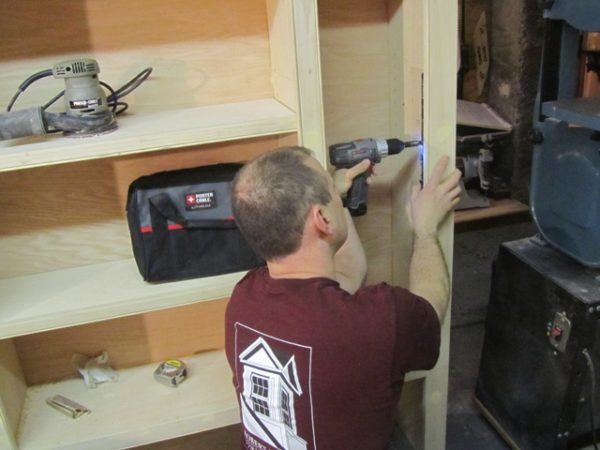
Installing The Bookcase:
The bookcase was then installed. I purposely made the far right side of the bookcase trim larger to accommodate for an uneven or plumb wall. We scribed the wall and used a jigsaw to cut a bevel cut. Bevel cuts help the unit slid in place and are also a lot easier to make miner micro adjustments with a hand plane.
Once the bookcase was in place we secured it through the left side into the panel stud and along the top of the case, and through the back panel on the far right side. Pre-drilling and counter-sinking are important and We filled the screw holes when done.
All nail holes are then filled and sanded, the entire project is vacuumed and then we caulked the seams. We then installed the shelves and re-installed the existing crown molding that we had saved.