Built-In Bookcase And Mantle Installation

Adjustable Shelves:
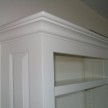
After all of the beading was installed it was time to drill the shelf pin holes. I use a jig I purchased from Rockler that comes with a spring loaded bit. The jig allows me to dill consistently spaced holes at the same depth each and every time.
The jig is a clear acrylic template allows you to drill both 1/4″ and 5mm shelf pin holes on perfect 32mm centers every time. It measures 1/8″ thick x 20″ long and is adjustable so you can place your shelf pins anywhere from 1/2″ to 2-1/2″ in from the cabinet’s edge.
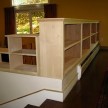
Once this is done the bookcase received a final sanding ans awaits delivery to the job site. Now I turned my attention to the panel above the mmantel.
Mantle Panel Construction:
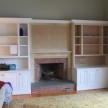
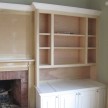
Above the mantel a style and rail constructed raised panel will cover the wall and have a TV mounted to it. This panel will be furred out from the plaster wall 3-1/2″. this was needed in order to cover the brick that was below the original blue stone mantel. We are lowering the mantel mainly so the TV is not too high.
The first step was to use the story pole and layout the styles and rails to my overall measurement.
Style and rail construction is a technique used in the making of doors and wainscoting with floating panels. The panel is never glued to the frame but is left to ‘float’ within it so that with seasonal movement the panel does not distort the frame.  Frame and panel construction at its most basic consists of five members: the panel and the four members which make up the frame.
With a large area I usually divide the panel into smaller panels but it was decided that one large panel would look and mount better with a TV in front of it. I chose to use Medium density Fiberboard [MDF] for the panel.
Medium-density fibreboard (MDF) is an engineered wood product formed by using wood residue into wood fibers, combined with wax and resin binder, and by applying high temperature and pressure. a major plus is that MDF paints exceptionally well.
Milling The Styles And Rails:
I ripped all of the stock to size and cleaned the edged on the joiner. Once the stock was straight and flat I used my home made wood shaper and a cope and style bit to make the necessary cuts. simple hold down jigs hold the stock secure as it passes the wood shaper bit.
I dry fit the styles and rails together and then measure for my panel making it 3/16″ smaller in both width and height.
Once the panel is made I will glue only the styles and rails. The frame is held together by a joint between the edge of the “stiles” and the ends of the “rails. It is surprisingly strong when dry.

Milling The Raised Panel:
A raised panel has edges have been beveled to provide an aesthetically appealing, three-dimensional effect. I love the shadow lines a raided panel gives off.
The panel sits in the groove created in the styles and rails. Panels should be slightly smaller than the available space within the frame to provide room for movement. Wood will expand and contract across the grain, and a wide panel made of solid wood could change width by a half of an inch, warping the door frame.
This is why I chose to use MDF for this panel. I was also concerned about heat created and rising from the fireplace. A floating panel allows it to expand and contract without damaging the style and rail frame. This principle also applies to panel doors.

With the panel measurements in hand I rip the MDF panel to size and then feed it through my panel machine.My panel machine is an old Craftsman radial Arm saw that I have build a fixed table around and use it as a dedicated raised panel saw. I use a three headed cutter and custom grind-ed and filed a straight dado blade into a beveled cutter. Raised panel profiles can be an ogee, chamfer, cove or scoop. I’m a fan of the bevel or chamfer.
Before cutting into my MDF panel I make an exact fit on a scrap piece of material and note the depth setting on my panel saw. Dry fitting is the best way to test for fit. I take several passes around and lower the depth of my cutter each time.Once done I dry fit the panel into the styles and rails. If I’m satisfied with the fit it’s time to glue and clamp the panel.