Removing a Leaking Balcony

Balcony Removal
A cantilever is a beam supported on only one end. The beam carries the load to the support where it is resisted by moment and shear stress .[1] Cantilever construction allows for overhanging structures without external bracing. Cantilevers can also be constructed with trusses or slabs.
This is in contrast to a simply supported beam such as those found in a post and lintel system. A simply supported beam is supported at both ends with loads applied between the supports.
Leaking Balcony:
On this recent project in Lincoln, MA we removed two balconies that had been leaking into the house for years. The house and balconies were approximately 12 years old.
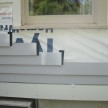
The first step in this project was to install 1/2″ plywood over the doors and windows to protect them from falling debris.
Then we installed pipe staging to safely access the balcony area. We dismantled the balcony railings, decking and joists first. 
For those of you who are wondering how the balcony was supported it is based on the principle of cantilevering.
A cantilever is a beam supported on only one end. The beam carries the load to the support where it is resisted by movement. Cantilevering allows for overhanging structures without external bracing. A diving board is an example of cantilevering. This balcony was another example.
In construction the rule of thumb is to have the balcony overhang supported into the house by two-thirds the balcony distance. [1/3 cantilever and 2/3 supported structure.]
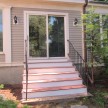
The leaking issue here was due to lack of flashing and pitch. Instead of repairing the leak the homeowner opted to remove both balconies. On e side we removed the balcony and installed windows, on the other side we removed the balcony and installed a railing at the door.
Removing the Balcony:
In order to remove the balcony we had to cut the deck joists 1/2″ in from the outside plane of the house. the 1/2″ is needed to apply plywood sheathing. Once the joists were cut we installed solid blocking to keep the joist from twisting and help support the wall above.
We then removed the door and frame and framed a new wall to support the new window we were installing. We cut the existing plywood on the door sides back to solid framing and installed new

plywood over the repair and new framing.
Rubber sill flashing, windows and house wrap were installed. We also installed rubber flashing behind the corner boards on both sides of the new window and under the window trim. The flashing ran down and terminated on top of a clapboard below. This was done to provide extra protection to the house wrap at all of the continuous vertical clapboard seams and to provide an exit for moisture.
Once the window was installed and flashed we installed new cedar clapboard siding. the clapboard cut ends were sealed with primer and ring shank, stainless steel nails were installed into studs.