Rain Screen Wall Construction

 Rain Screen Wall

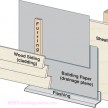
The basic rain screen wall configuration incorporates a wall drainage plane [air space] to allow moisture to drain and siding to dry from both sides.
A Rain screens layers, or wythes provide different levels of rain protection effectiveness.
What is a Rain Screen Wall?
What is usually meant by a “rain screen wall” is generally an exterior cladding with an air space cavity behind the cladding that allows moisture to drain and vented to the outside. The inner house wall plane will have an air barrier.
The outer siding layer of cladding deflects rain and other elements while the inner wythe remains protected. The vented cavity uses gravity and flashing to drain water that penetrates the outer wall, or outside and away from vulnerable surfaces and joints. This air cavity needs to be sufficiently wide enough to avoid surface tension and capillary action.
Rain Screen Wall Best Practice
The Best Practice for building rain screens is to ensure the wall cavity is pressure-equalized. This means that the wall is vented at the top as well as the bottom. This ensures that the space between the sheathing and the drainage plane maintains equalized air pressure (neither positive nor negative). If the air gap was to become pressurized, air and water would be pushed through any air leaks in the wall assembly to the home’s interior, wetting the framing, insulation, and interior walls.
Rain screens are recommended for use with brick, stucco, wood siding, and cement board siding. They are not recommended for use with vinyl siding because lengths of vinyl siding are too short to span between exterior wall studs (16” o.c.), where the furring strips are attached.
Step by step construction tips for basic rain screen construction:
1. Install house-wrap (such as DuPont Tyvek’s Drainwrap) or gas permeable building paper.
2. Install vertical furring strips. Ensure they are lined up with the studs. I prefer pressure treated plywood.
3. Windows and doors will need to be padded out and extension jambs added before trim is re-installed.
4. Install screen materials at the bottom and top of the furring strips. Fold the screen material over the furring strips or use specially designed venting material
to create this vent.
5. Install siding over the furring strips.
Photo source: buildingscience.com
RELATED POSTS:
Window Installation and Water Infiltration
Caulking Exterior Trim and siding