Installing WarmlyYours Roof And Gutter Deicing System

Preventing Ice Dam Damage
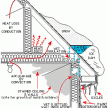
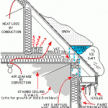
When the snow hits our roofs several conditions together create the “perfect storm” for ice dams.
The easiest way to spot an ice dam is to look for a lump of ice at the roofs edge, icicles are often present but do not cause ice dams. Roofs with inadequate ventilation ice up after a snow fall and an ice dam will form at the roofs edge where the roof is colder.
Even in below freezing weather, snow on the roof will often thaw because of heat from the sun and heat loss from the house through the roof. As this melted snow reaches the roofs edge, or overhang as some refer, it refreezes.
The over hang has no heat loss so it’s roof surface is much colder than the main house roof. As this melted snow refreezes over and over on the roof overhang, it builds up and forms an “ice dam.”
The ice dam prevents melting snow run off from the upper section of the roof from flowing off the roof. This melting water running down the roof  builds up or “ponds” at the ice dam and backs up under the shingles causing roof leaks.
Learn more on How Ice Dams Form and How to Prevent Ice Dams
Damage resulting from ice dam water to your home’s interior can be many times more expensive to repair than the roof or gutter itself. A roof and gutter deicing system is designed to protect your home and preventing the formation of ice dams.
Installing WarmlyYours Roof And Gutter Deicing System
Roof and gutter deicing cables or “heating cables” provide an effective and economical method for draining the roof of snow melt. 
A deicing system efficiently reduces ice dam formation along roof edges and in gutters, providing a path for roof melt water to flow off the roof edge or down the down spout.
Gutters as useful and necessary as they are sometimes complicate this issue by filling up with ice as well. Roof leaks and structural damage can be the direct result of snow and ice build-up in gutters, along the roof’s edge, and on roof eaves.
While heater cable is not designed or intended to keep eaves completely clear  of snow and ice, it provides melted pathways to prevent formation of ice dams.
If your house is prone to ice damming and you’re unable to correct the root causes and refuse to install a deicing system then I wish you the best of luck and you should read my post on Removing Ice Dams.
Designing Your Roof and Gutter Deicing System:
On this roof deicing system I installed a roof and gutter deicing system from WarmlyYours. I dealt with Chad from the WarmlyYours Installation Support Team. I quickly realized that Chad knew his fair share on electric heating and deicing systems. He was knowledgeable and accessible to my needs both when estimating the project, designing it and then when later installing it.
One thing that Chad did that I feel was a game changer was he drew me an installation map. Sometimes when talking to people on the phone you may not be getting 100 percent what the other person is saying.
I’m a hands on and visual learner and when Chad emailed me a hand drawn diagram while we were talking I instantly realized what he was trying to get into my thick skull! Thanks Chad – I appreciated the drawing!
Chad basically designed the entire system for me. I provided him with measurements, a few photos and filled out an estimate form. Although I had to adjust my plan once in the field I ended up with only 24″ of extra of wire on both my deicing cables – not bad!
I’d rather have more cable a n not need it then need it and not have it!
What I liked the most about this experience was that Chad and the Installation Support Team is that they are available over the phone and by email 24/7, simply by calling their 800 help line.
This is huge if you’re a DIYer or even a professional and have a quick question or get hung up on something. My electrician even called Chad for a question on the snow sensor.
TIP: To calculate the amount of cable needed, multiply roof edge length to be heat traced by the spacing factor. The spacing factor (feet of cable required per foot of roof edge) is determined by the roof overhang, heating width and heating height. Add the total gu tter length and the total downspout length to the figure calculated in step 1 to get the total length of cable required.
Materials Used For This Project:
WarmlyYours provide most of the material needed to do this installation with exception of the eye hooks and a few electrical materials that the electrical contractor provided.
The SCP-120 Deicing Control Panel they provided has an adjustable dial on the front cover which provides the option of setting the heat temperature. The control works in conjunction with an external ambient air temperature sensor a nd an aerial mounted snow sensor (AIR-SS).
The SCP-120 panel has a hold-on timer for user adjustment allowing the user to keep the system on for up to 10 additional hours, after snowfall has stopped.
Also provided is a RLY-Series Relay Panel Box that allows for load switching panels. These relays are rated for up to 24 amps and include NEMA1 rated.
The AIR-SS Aerial Mounted Snow Sensor detects falling or blowing snow at temperatures below 38°F (3.3°C) and turns on the rood deicing cables.
WarmlyYours also provided special heat shrink tubing to seal the heat cable ends and splices. My electrician provided the UL Listed weather-proof junction box and wire needed to connect this system to the house.
Slate roof cable clips – copper
Asphalt roof cable clips – aluminum with 3M double sided adhesive tape. [Watch my video to see how well this 3M tape works]
Check out My VIDEO REVIEW on this installation.
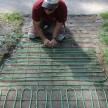
Installing the Deicing Cable:
We needed to pick a day that was a minimum temperature of 50°F. This was because the 3M stick on pads we were using to adhere the wires to the flat roof will not stick in colder temperatures.
In order to keep the exterior weather proof junction box out of view we decided to install it below the deck. Under this deck is a walk out basement so it was a perfect for us to hide the electrical connections.
First we ran the gutter wire in the gutter and then down the downspout were I was able to get it under ground approximately 24″ and then loop back up to the weather proof junction box.
I used some of the 3M pads and aluminum clips to secure the heat cable in the center and bottom of the gutter.
We purposely designed the gutter cable to be long enough to extend the length of the gutter and to be ab le to extend down and back up both downspouts. The purpose behind this is to allow the entire roof and gutter melt run off a place to go, preferably down and away from the house!
We then ran the cables designated for the slate roof up the same down spout and onto the roof.
Or plan was to install the heat cables in triangular or saw tooth patterns. Chad helped us with this and we decided on a 24″ pattern at the base or the triangle bottom and 24″ up at the top or tip of the triangle.
We tried to keep to the 24″ spacing of the loops as much as possible, field conditions always necessitate adjustments.
 For the roof heat tapes we looped the heating cable over the overhang area of the roof, using eye hooks to help keep the wires in place and provide a drip edge.
Note – The overhang is the portion of the roof that extends beyond the vertical walls and is where ice dams form.
We took care to ensure that the heating cable loop should extend into the gutter to maintain a drainage path into the gutter. It should also extend to a point 6 inches above the line where the wall joins the roof. We went way above that.
We attached the cable to the slate roof using copper roof clips. These clips have nail slots that are used to hook onto and secure on the nails that are installed in the slate shingle. We simply slide the copper clips up and under the slate shingles and “feel around” for the nail and then pull down to hook onto the nail. This takes some practice but worked real well.

We then ran the cable up the roof along the side of dormer and installed the cable in the valley and on the flat shed roof. Once on the shed roof we used a combination of 3M pads / aluminum cable roof clips and eye hooks to create 60″ tall triangles with 24″ bases.
We wanted to make sure snow was adequately draining off the flat roof by installing these large drainage paths.
When we were done installing the heat cables we cut off the excess and followed the directions to seal the ends and heat shrink wrap them
TIP: During the heat cable installation make sure the heating cable is free of mechanical damage (nicks, cuts, etc.)
An Unexpected Surprise:

Last year this house experienced terrible ice damming and subsequent roof leaks. The homeowner hired a roofer to remove the ice dams.
They obviously used a claw hammer to chip the ice dam which although is effective can seriously damage the roof as evidenced by the photo on the right of the hammer. These damaged slate shingles now need to be replaced in the spring which will cost the homeowner thousands of dollars.

Electrical Connections:
Although there is no real maintenance with this system you do need to keep your roof, gutters and downspouts clean and free from debris.
Prior to the winter season, make sure to clean your gutters and downspouts.
Under the deck we installed a weather proof junction box to terminate the heat tapes into and to make the connection to the electrical power to heat the tapes.
We chose an area under the deck and next to the gutter downspout. Even though this area is protected from weather it’s still important to use the weather proof junction box.
This area is located exactly opposite of the inside control box and was perfect for our installation.
We installed and mounted our snow sensor off the back side of the deck. We decided on this “out of the way” spot and looked better than mounting it on the house. It was also easier to install, used less cable and also meant less cable in the gutter downspout.
Ensure that your aerial mounted snow sensor is clear and unobstructed from a structural overhangs or vegetation.
We ran low voltage wire to the sensor and installed it approximately 50 feet away from the basement controller. This sensor can be mounted up to 2000 feet away from the controller.

Warmlyyours weather proof junction box
Preventing Ice Dams: Conclusion
The most likely causes of ice dams are due to heat loss, air leakage and the general warming of the house structure due to conduction from the heated building.
The melted water will drain along the roof, under the snow, until it reaches the cold overhang. The

Aerial Snow Sensor
overhang tends to be at the same temperature [below 32 degrees] as the outdoors and the melted water will refreeze and form an ice dam and icicles.
The ice dam can cause damage to the roof, which will result in water leaks to the inside.
The water back ups and finds cracks and openings in the roofing and then flows into the house. The result is water spots or dripping water on the ceiling under the roof damage.
It’s not those big icicles that do the real damage, it’s the ice you don’t see that backs up in gutters and under shingles.
The WarmlyYours roof and gutter deicing cables provide an uninterrupted path for roof melt to drain off the roof and down the gutter. Ice may still form between the cables but water will not build up behind the ice.
These cables were relatively easy to install and work! Let the snow fly!!!!
This review contains my opinion of a product. I take pride in providing my readers with honest and objective information as well as a practical approach to using a product. I never accept payment in exchange for a positive review. Many of the tools and products are provided to for free by a manufacturer for review.
Installing a WarmlyYours Roof and Gutter Deicing System is a project for the serious and skilled DIYer or professional. You should have an electrician make all electrical connections and follow all directions for a proper installation and consult the company installation support team if you are in doubt or have a question.