Installing Beadboard

How To Install Beadboard Wainscotting
Beadboard is a type of paneling that has a series of distinctive vertical beaded grooves.
Traditionally bead board is installed so that the grooves run vertically, creating a striped or paneled effect. Historically bead board was installed along a horizontal axis to protect walls from chairs. This is a look that was often found in farmhouses.


The beadboard is milled with a tongue on one side and a groove on the other side so that the boards fit together flush and create a continuous beaded panel look.
Beadboard comes in thicknesses of 3/8,” 1/2″,” to ¾.”
On this project, we purchased our bead board and allowed it to acclimate to the job site a few days prior to installation.
Installing Bead Board:
1. LAYOUT: We used the window bottoms as a stopping point for the chair rail. Subtracting ¾” for the thickness of the chair rail gave us the top height of the bead board.


The photo above: Red laser line used as a layout on the far wall. The photo below: Window trim but to allow chair rail nosing to fit under.
2. Always begin with a level line. We used a laser level and a 6’ level to mark a continuous line around the room. You can also snap chalk lines. Your level line should be at the height of the top of where the bead board will hang. This is crucial to lining up your beadboard paneling.
3. Use the measurements below for your specific kit. These are the lengths of the boards that will run from the floor to the chair rail molding.
For 32″ height, the measurement from the floor is 31-1/4″
For 36″ height, the measurement from the floor is 35-1/4″
For 42″ height, the measurement from the floor is 41-1/4″
4. After the lines are drawn, measure from the line to the floor in multiple spots to see if the floor is level. In our case, it was not and we had to adjust our beadboard lengths a few times.
5. Mark all of your studs at the top section of the wall. Make sure you can see your marks with the bead board in place.
6. To save time and work efficiently, we cut all of our beadboard at one time and then installed it. To avoid any moisture from wicking into the end cuts we kept the bead board 3/4 “to 1” off the concrete basement floor. The baseboard will cover this gap.


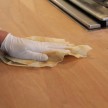
7. Starting in a corner I used a level to hold my first piece of bead board plumb, with the top of the bead board touching my level line and scribing it to the corner. All cutting was done to the “groove” end of the bead board.
8. Use a jigsaw or a table saw to cut your scribe. Sometimes a simple 15-degree back bevel on the table saw is all that is needed.
9. Once I had a good fit I secured the first board to the wall with construction adhesive and six finish nails. I nailed through the face of the wood at the very top [are covered by Scotia molding] and the very bottom. [Into the 2×4 shoe plate.] I also blind-nailed approximately three to four nails into the tongue and an angle. [Blind nailing means that the nails are installed into the tongue at an angle and are covered and hidden by the next board’s groove.]
10. After the first board is installed using a zigzag motion to apply the bead board construction adhesive to the wall. Put the bead board in place and nail it. Face nail into the studs as you pass them.
11. When you get to the end of a wall leave the second to last board loose until you scribe, cut, and are ready to fit the last board. This will allow you to fold/hinge out the late two boards and then snap them into place. Once in place apply face nails into the last board corner stud and the top and bottom of both bead boards.
12. It may become necessary to use a narrower piece of bead board paneling to finish your corners. This is best accomplished by using a table saw,.
13. Repeat the above step as you work from corner to corner around the room.


14. You may need to make some cuts for the switch, outlet, or window openings, for unlevel floors, and for wall endings. A jig saw is useful for many of these cuts.
15. Outside corners can be mitered or butted.
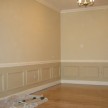
16. After installing the beadboard, you can choose a decorative chair rail cap and molding trim to use around the top and also attach baseboard trim to the bottom to give your room a finished look.

17. Run the chair rail nosing on top of the bead board wainscoting you’ve set into place. Using finishing nails, nail from the top of the bull nose into the ends of the tongue and groove boards.


18. Apply a Scotia or cove molding underneath the bull nose, nail into the face of the tongue, and groove boards. Counter-sink the nails with a nail set in order to hide the nail heads, afterward use caulk or wood filler to fill in the area where the nails were set.