How To Build A Torsion Box Bookcase Seat

Using Airplane Technology to Build Bookcases

When designing an aircraft, it’s all about finding lightweight and strong material that is stiff enough to withstand the exceptional forces under which it has to operate.
Durability is an important factor especially when the wings come into play. Aerodynamic forces not only bend the wing, they also twist it. To prevent this, aircraft’s often use two-spar wings joined and by strengthened opposing sections of skin, forming a torsion box.
Using A Torsion Box In Bookcases:
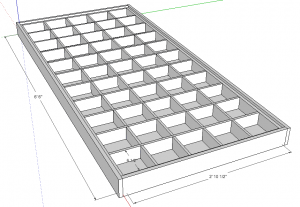
Image: http://www.scottmorton.com
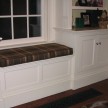
I recently had a customer ask if I would build two bookcases and connect them with a window seat. She specifically requested that the seat span the area between the bookcases with no floor supports. Oh yea, and she “preferred” a sleek and slender look.
Unlike standard window seats that have frames under them , this bookcase was being installed in a condo that had a concrete floor and hot water radiators running along the wall. Recessing the hot water radiators into the floor was not an option this time so we needed to keep this area open, hence the window seat.
All of this meant one thing to me – DEFLECTION!!! and a call-back.
In order to avoid deflection that this bench seat was doomed to have we decided on using torsion box technology. this was the only way we were going to be able to span the distance as well as hold a persons weight.
What is a Torsion Box?
A torsion box is really nothing more than a grid-work with a skin on both sides. The shims and grid work together to create a strong, light, structure that resists warping and deflection. Just like the concept behind our airplane wing analogy.
Torsion boxes are fairly common in our life you just may not recognize them. A hollow core door is probably the most common example of a torsion box, structural insulated panels for houses, some types of wooden tables, skis and snowboards all utilize torsion box technology.
The size of your torsion box will depend on the types of projects for which you plan to use it. In general, smaller grid-squares result in greater strength and stability.
The stiffness in a torsion box comes from the two skins being separated by a fairly great distance while still being rigidly locked together by the filler structure. The stiffness of the filler can contribute some additional strength, but it isn’t what primarily makes a torsion box stiff.
By the way – when our project was complete two grown men could stand on this seat with no noticeable deflection.
Why is A Torsion Box So Strong?
The torsion box functions like a beam, but is considerably lighter than a solid beam of the same size without losing much strength.
The thicker the torsion box, the stronger it will be for example if you increase a torsion box’s thickness by 25%, for example, it will be 100% stronger.
If you doubled the thickness, it would be eight times stronger. Strength increases by the thickness cubed.
How To Build A Torsion Box:
The stiffness gained in building a torsion box comes from the two skins separated and locked together by the grid filler structure.
The strength of a torsion box is highly dependent on establishing a good grid-to-skin glue joint over the entire surface of the grid, so you need to nail or screw the plywood skins to the grid right after applying the glue to ensure that good contact is maintained while the glue sets.
Determine Grid thickness and Assemble
- The strength of a torsion box comes from the connection between the edges of the outer frame and inner grid and the top and bottom skins. Ensuring that the grid fits together and is flat is crucial to the glue up and strength or the box.
Cutting the Grid Material
- We ripped our grid material out of AC plywood and then laid out our grid lines.
- A table saw with a dado blade made easy and fast work of making the grid. Set up your table saw to cut half-lap joints in all the web pieces
- First, adjust the width of a dado set to just a little bit over 1/2″, or whatever it takes so the parts will easily slip by each other.
- Make and use an indexing jig to space the notches
Attach the skins
- The top and bottom skins are attached with glue, brads, and screws.
- We used construction adhesive because it is a great adhesive with end grain.
- Apply glue liberally to the top edge of the outer frame and inner grid and apply the skin layer.
- Flip the torsion box over and follow the same process to attach the second skin.
Securing The Skins to The Grid
- We screwed the skin to the grid immediately.
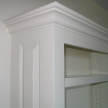
- Later we attached a layer of 1/4 inch Birch plywood to dress up the torsion box and hide the screws.
- Trim was applied to the front edge and the seat was installed on the bookcases and back wall with cleats.

Photographer: a concord carpenter