How To Build A Bookcase

Convert A Closet Into A Built-in Bookcase

Recently I was asked to convert two closets into built-in storage shelves or bookcases. This article is on How To Build A Bookcase.
Both built-ins were to be painted to match the rest of the room they were going in. I came up with a plan to built the bookcases out of birch plywood and poplar trim and shelf nosing.
This post will detail building the built-in in my shop, a subsequent post will detail the installation.
Here are the steps on How To Build A Bookcase
1. Make a story pole and take accurate measurements:
A story pole is a length 1 x material [I use 3/4″ plywood rips] that are used to duplicate measurements on a larger project.
Cut or select a piece that is longer than the longest cut required. Carefully mark the height, width, depth and length of various parts onto the 1×2. The story pole will speed up marking for cuts, and matching parts will be cut the same.
I used a story pole to refer to and to confirm measurements during this project.
Note – always confirm that your finished product can be removed from your shop once assembles!

2. Rip all of the stock to size:
I started ripping the plywood case parts to size. then I cut my shelves to size. the shelves all were going to get 3/4 by 1 1/2″ nosing applied to the edges. The nosing hides the plywood end grain as well as add considerable strength to the shelf. Nosing help prevent shelf deflection.
After ripping all of the plywood I ripped all of the poplar trim to size. I needed 2 1/2″ face frame as well as 1 1/2″ shelf nosing stock.
3. Cut your stock to length:
I used a BORA straight edge clamp to cut the sides of the built-ins. The plywood is 96″ and I needed 88″. the straight edge allows me to

use a circular saw and achieve straight clean cuts. Note – Use a nice blade for this cut.
4. Set up a dado blade:
I set up my dado blade for 3/8″ wide.
5. Cut the tongues and dados:
The shelves and the top and bottom of the built-in all have 3/8″ tongued sut into them. This type of construction is super strong and recommended for building cabinets.
I make these cuts on a dado blade all at the same time.

Note – remember to cut your selves 3/4″ longer than you need to accommodate for the pair of 3/8″ tongues. The tongues will fit into dados that are cut in the built-in sides.
Note – always test fit the tongue and dado heights on scrap wood before cutting into your project.
6. Sand everything:
The best time to sand is before everything is assembled. I usually sand the insides of the case, and both sides of the shelves after the nosing is applied.
7. Clean up the edges:

Once everything is milled too size I run the edges through my joiner to clean up the edges. This is especially important for my shelves which will receive glued on nosings.
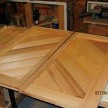
8. Glue up the shelves and nosings:
I apply the nosing to the shelf plywood with yellow glue and four pneumatic finish nails. I start nailing at one end and work the nosing s I nail to the other end. I attach the nosing just proud of flush to give me a bit of materials to sand flush to the shelf later.
My clamps are 60″ long so I clamp two shelves at a time.
After the shelves are dry I fill any voids in the glue joint with wood filler and sand the shelves thoroughly.

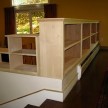
8. Attach the case sides and insert the shelves:
I glued and nailed the case together, with the help of a few clamps. Once the case is
together I slide in the shelves into the dados with glue. Keeping the edges flush I nail through the sides of the built-in case and into the shelves. Clamps are added to keep everything tight and together until the glue dries.
9. Make the face frame:
Once the case is assembles I cut the face frame stock to

the proper length and assemble it together with biscuts and glue.
#0 – 5/8″ x 1-3/4″
#10 – 3/4″ x 2-1/8″#20 – 1″ x 2-3/8″

Biscuts are used for edge-to-edge joints, miter joints, T-joints and corner joints. Biscuit joints are strong and accurate and inexpensive. I use a plate joiner to make the slots for the biscuts.
I use bar clamps to hold the face frame joints together.Note – before clamping make sure you have your faces and edges aligned.
I add 90 degree “clamping blocks” to the corners to help keep the face frame square when clamped.

I hand sand all of the edges to break the sharp edges.

12. Finished built-in bookcase awaiting installation.