Flashing Exterior Light Fixtures

Improper Flashing Can Cause Structural Damage

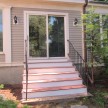
In the picture above all appears normal…. right?
We thought so too and were going to replace a few clapboards that had unpleasant looking clapboard butt joints that were too close to the front door and aesthetically unpleasing to the owner. Flashing exterior light fixtures is often overlooked.
The moment I put a pry bar on these clapboards the bar went right into the stud bay cavity.
It was after this that the close together clapboard butts made sense = prior repair, problem returned! [See photo below on close clapboard butt joints.]

In the lower right you can see the hole where my pry bar went right threw the plywood sidewall sheathing.

Stripping back the rotted OSB plywood revealed a prior repair in the same area. you can see sistered 2×6 studs. We removed all the rot, which ran up to the top of the doorway trim head piece and lights.
New cdx plywood and a vapor barrier was installed.

The rot shown below is a direct result of an improper mounting block and lack of flashing of the exterior light sconce. The importance of flashing exterior light fixtures can not be overstated.

Prior to taking this picture we removed the light which was attached to a plastic, vinyl siding type mounting block. Similar to the one pictured above.
The problem with using this block to mount a light is that it is not designed for cedar clapboards and does not provide for flashing.
The picture below shows the result of a mounting block that was mounted to cedar clapboards and not flashed. Water entered behind this light mounting block and ran behind the clapboards rotting out the 1/2″ plywood sheathing.

The photo above shows similar rotting. The rot on this side was a combination of water leaking behind entryway trim crown molding, large open, un caulked clapboard seams and an improperly flashed and mounted light block.
When replacing the clapboards I always flash the butt joints with tar paper strips. Clapboard joints can widen over time leaving the house wrap as the only protective barrier.
The tar paper overlaps the lower course of clapboard to “positive drain” any moisture that sneaks into the joint and drains it to the exterior of the house and not behind the siding.

Tar paper was also installed at all vertical seams and overlaps a clapboard or flashing below.

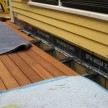
Below repairs well underway, caulking vertical seams.

The right side mounting block is pvc block set into the clapboards and flashed with a drip cap.
Once the light wires are connected I push the connections into the box and cover the box opening with vycor rubber flashing to seal the hole and wires from the weather.
No more water sneaking behind this light block.

A combination of tar paper, vycor rubber flashing and lead flashing is used to flash the head trim piece and all trouble spots.

Rubber flashing and lead cap the trim head piece. Tar paper overlaps the two.

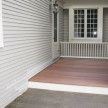
Site made plinth blocks finish off the bottom of the columns. This install was unique in that the columns did not sit on or terminate on the front door stoop. These plinth blocks help ground the columns.

Back of plinth block. A mounting block attaches to the house and the plinth slides over the mounting block and under the column.


Cutting and gluing up the head trim piece.


~ concord carpenter